本文最后更新于:December 9, 2022 pm
本文主要在centos7系统上基于containerd和stable版本(1.12.4)的cilium组件部署v1.25.4版本的堆叠ETCD高可用k8s原生集群,在LoadBalancer上选择了PureLB和kube-router结合cilium实现BGP路由可达 的K8S集群部署。
此前写的一些关于k8s基础知识和集群搭建的一些方案 ,有需要的同学可以看一下。
1、准备工作 1.1 集群信息 机器均为16C16G的虚拟机,硬盘为100G。
IP
Hostname
10.31.80.0
k8s-cilium-apiserver.tinychen.io
10.31.80.1
k8s-cilium-master-10-31-80-1.tinychen.io
10.31.80.2
k8s-cilium-master-10-31-80-2.tinychen.io
10.31.80.3
k8s-cilium-master-10-31-80-3.tinychen.io
10.31.80.4
k8s-cilium-worker-10-31-80-4.tinychen.io
10.31.80.5
k8s-cilium-worker-10-31-80-5.tinychen.io
10.31.80.6
k8s-cilium-worker-10-31-80-6.tinychen.io
10.32.0.0/17
podSubnet
10.32.128.0/18
serviceSubnet
10.32.192.0/18
LoadBalancerSubnet
1.2 检查mac和product_uuid 同一个k8s集群内的所有节点需要确保mac地址和product_uuid均唯一,开始集群初始化之前需要检查相关信息
link cat /sys/class/dmi/id/product_uuid
1.3 配置ssh免密登录(可选) 如果k8s集群的节点有多个网卡,确保每个节点能通过正确的网卡互联访问
1 2 3 4 5 6 7 8 9 10 11 12 13 14 15 16 17 18 19 20 21 22 23 24 25 26 27 28 29 30 31 32 33 34 35 36 37 38 39 40 41 42 43 44 45 cd /root/.ssh/cat id_rsa.pub >> authorized_keyschmod 600 authorized_keyscat >> ~/.ssh/config <<EOF Host k8s-cilium-master-10-31-80-1 HostName 10.31.80.1 User root Port 22 IdentityFile ~/.ssh/id_rsa Host k8s-cilium-master-10-31-80-2 HostName 10.31.80.2 User root Port 22 IdentityFile ~/.ssh/id_rsa Host k8s-cilium-master-10-31-80-3 HostName 10.31.80.3 User root Port 22 IdentityFile ~/.ssh/id_rsa Host k8s-cilium-worker-10-31-80-4 HostName 10.31.80.4 User root Port 22 IdentityFile ~/.ssh/id_rsa Host k8s-cilium-worker-10-31-80-5 HostName 10.31.80.5 User root Port 22 IdentityFile ~/.ssh/id_rsa Host k8s-cilium-worker-10-31-80-6 HostName 10.31.80.6 User root Port 22 IdentityFile ~/.ssh/id_rsa EOF
1.4 修改hosts文件 cat >> /etc/hosts <<EOF 10.31.80.1 k8s-cilium-master-10-31-80-1 k8s-cilium-master-10-31-80-1.tinychen.io 10.31.80.2 k8s-cilium-master-10-31-80-2 k8s-cilium-master-10-31-80-2.tinychen.io 10.31.80.3 k8s-cilium-master-10-31-80-3 k8s-cilium-master-10-31-80-3.tinychen.io 10.31.80.4 k8s-cilium-worker-10-31-80-4 k8s-cilium-worker-10-31-80-4.tinychen.io 10.31.80.5 k8s-cilium-worker-10-31-80-5 k8s-cilium-worker-10-31-80-5.tinychen.io 10.31.80.6 k8s-cilium-worker-10-31-80-6 k8s-cilium-worker-10-31-80-6.tinychen.io 10.31.80.0 k8s-cilium-apiserver k8s-cilium-apiserver.tinychen.io EOF
1.5 关闭swap内存 '/swap / s/^\(.*\)$/#\1/g' /etc/fstab
1.6 配置时间同步 这里可以根据自己的习惯选择ntp或者是chrony同步均可,同步的时间源服务器可以选择阿里云的ntp1.aliyun.com或者是国家时间中心的ntp.ntsc.ac.cn。
使用ntp同步 install ntpdate -y
使用chrony同步 1 2 3 4 5 6 7 8 9 10 11 12 13 14 15 16 17 18 19 20 21 22 23 24 25 26 27 28 29 30 31 enable chronyd.service
1.7 关闭selinux 's/^SELINUX=enforcing$/SELINUX=disabled/' /etc/selinux/config
1.8 配置防火墙 k8s集群之间通信和服务暴露需要使用较多端口,为了方便,直接禁用防火墙
disable firewalld.service
1.9 配置netfilter参数 这里主要是需要配置内核加载br_netfilter和iptables放行ipv6和ipv4的流量,确保集群内的容器能够正常通信。
cat <<EOF | sudo tee /etc/modules-load.d/k8s.conf br_netfilter EOF cat <<EOF | sudo tee /etc/sysctl.d/k8s.conf net.bridge.bridge-nf-call-ip6tables = 1 net.bridge.bridge-nf-call-iptables = 1 EOF
1.10 关闭IPV6(不建议) 和之前部署其他的CNI不一样,cilium很多服务监听默认情况下都是双栈的(使用cilium-cli操作的时候),因此建议开启系统的IPV6网络支持(即使没有可用的IPV6路由也可以)
当然没有ipv6网络也是可以的,只是在使用cilium-cli的一些开启port-forward命令时会报错而已。
1.11 配置IPVS IPVS是专门设计用来应对负载均衡场景的组件,kube-proxy 中的 IPVS 实现 通过减少对 iptables 的使用来增加可扩展性。在 iptables 输入链中不使用 PREROUTING,而是创建一个假的接口,叫做 kube-ipvs0,当k8s集群中的负载均衡配置变多的时候,IPVS能实现比iptables更高效的转发性能。
因为cilium需要升级系统内核,因此这里的内核版本高于4.19
注意在4.19之后的内核版本中使用nf_conntrack模块来替换了原有的nf_conntrack_ipv4模块
(Notes : use nf_conntrack instead of nf_conntrack_ipv4 for Linux kernel 4.19 and later)
1 2 3 4 5 6 7 8 9 10 11 12 13 14 15 16 17 18 19 20 21 22 23 24 25 26 27 28 29 30 31 32 33 34 35 36 37 38 cat <<EOF | sudo tee /etc/modules-load.d/ipvs.conf ip_vs ip_vs_rr ip_vs_wrr ip_vs_sh nf_conntrack EOF cut -f1 -d " " /proc/modules | grep -e ip_vs -e nf_conntrack
1.12 配置Linux内核(cilium必选) cilium和其他的cni组件最大的不同在于其底层使用了ebpf技术,而该技术对于Linux的系统内核版本有较高的要求,完成的要求可以查看官网的详细链接 ,这里我们着重看内核版本、内核参数这两个部分。
Linux内核版本 默认情况下我们可以参考cilium官方给出的一个系统要求总结。因为我们是在k8s集群中部署(使用容器),因此只需要关注Linux内核版本和etcd版本即可。根据前面部署的经验我们可以知道1.23.6版本的k8s默认使用的etcd版本是3.5.+,因此重点就来到了Linux内核版本这里。
Requirement
Minimum Version
In cilium container
Linux kernel >= 4.9.17
no
Key-Value store (etcd)
>= 3.1.0
no
clang+LLVM
>= 10.0
yes
iproute2
>= 5.9.0
yes
This requirement is only needed if you run cilium-agent natively. If you are using the Cilium container image cilium/cilium, clang+LLVM is included in the container image.
iproute2 is only needed if you run cilium-agent directly on the host machine. iproute2 is included in the cilium/cilium container image.
毫无疑问CentOS7内置的默认内核版本3.10.x版本的内核是无法满足需求的,但是在升级内核之前,我们再看看其他的一些要求。
cilium官方还给出了一份列表 描述了各项高级功能对内核版本的要求:
可以看到如果需要满足上面所有需求的话,需要内核版本高于5.10,本着学习测试研究作死的精神,反正都升级了,干脆就升级到新一些的版本吧。这里我们可以直接使用elrepo源来升级内核 到较新的内核版本。
1 2 3 4 5 6 7 8 9 10 11 12 13 14 15 16 17 18 19 20 21 22 23 24 25 26 27 28 29 30 31 32 33 34 35 "*" --enablerepo="elrepo-kernel" list availableuname -a
Linux内核参数 首先我们查看自己当前内核版本的参数,基本上可以分为y、n、m三个选项
y:yes,Build directly into the kernel. 表示该功能被编译进内核中,默认启用
n:no,Leave entirely out of the kernel. 表示该功能未被编译进内核中,不启用
m:module,Build as a module, to be loaded if needed. 表示该功能被编译为模块,按需启用
cat /boot/config-$(uname -r)
cilium官方对各项功能所需要开启的内核参数列举 如下:
In order for the eBPF feature to be enabled properly, the following kernel configuration options must be enabled. This is typically the case with distribution kernels. When an option can be built as a module or statically linked, either choice is valid.
为了正确启用 eBPF 功能,必须启用以下内核配置选项。这通常因内核版本情况而异。任何一个选项都可以构建为模块或静态链接,两个选择都是有效的。
我们暂时只看最基本的Base Requirements
CONFIG_BPF =yCONFIG_BPF_SYSCALL =yCONFIG_NET_CLS_BPF =yCONFIG_BPF_JIT =yCONFIG_NET_CLS_ACT =yCONFIG_NET_SCH_INGRESS =yCONFIG_CRYPTO_SHA1 =yCONFIG_CRYPTO_USER_API_HASH =yCONFIG_CGROUPS =yCONFIG_CGROUP_BPF =y
对比我们使用的6.0.11-1.el7.elrepo.x86_64内核可以发现有两个模块是为m
缺少的这两个模块我们可以在/usr/lib/modules/$(uname -r)目录下面找到它们:
$ realpath ./kernel/net/sched/sch_ingress.korealpath ./kernel/net/sched/cls_bpf.ko
确认相关内核模块存在我们直接加载内核即可:
"cls_bpf|sch_ingress" cat <<EOF | sudo tee /etc/modules-load.d/cilium-base-requirements.conf cls_bpf sch_ingress EOF
其他cilium高级功能所需要的内核功能也类似,这里不做赘述。
2、安装container runtime 2.1 安装containerd 详细的官方文档可以参考这里 ,由于在刚发布的1.24版本中移除了docker-shim,因此安装的版本≥1.24的时候需要注意容器运行时的选择。这里我们安装的版本为高于1.24,因此我们不能继续使用docker,这里我们将其换为containerd
修改Linux内核参数 1 2 3 4 5 6 7 8 9 10 11 12 13 14 15 16 17 18 cat <<EOF | sudo tee /etc/modules-load.d/containerd.conf overlay br_netfilter EOF cat <<EOF | sudo tee /etc/sysctl.d/99-kubernetes-cri.conf net.bridge.bridge-nf-call-iptables = 1 net.ipv4.ip_forward = 1 net.bridge.bridge-nf-call-ip6tables = 1 EOF
安装containerd centos7比较方便的部署方式是利用已有的yum源进行安装,这里我们可以使用docker官方的yum源来安装containerd
1 2 3 4 5 6 7 8 9 10 11 12 13 14 15 16 17 sort -renable --now containerd
关于CRI 官方表示,对于k8s来说,不需要安装cri-containerd,并且该功能会在后面的2.0版本中废弃。
FAQ : For Kubernetes, do I need to download cri-containerd-(cni-)<VERSION>-<OS-<ARCH>.tar.gz too?
Answer : No.
As the Kubernetes CRI feature has been already included in containerd-<VERSION>-<OS>-<ARCH>.tar.gz, you do not need to download the cri-containerd-.... archives to use CRI.
The cri-containerd-... archives are deprecated , do not work on old Linux distributions, and will be removed in containerd 2.0.
安装cni-plugins 使用yum源安装的方式会把runc安装好,但是并不会安装cni-plugins,因此这部分还是需要我们自行安装。
The containerd.io package contains runc too, but does not contain CNI plugins.
我们直接在github上面 找到系统对应的架构版本,这里为amd64,然后解压即可。
sha512sum -c cni-plugins-linux-amd64-v1.1.1.tgz.sha512mkdir -p /opt/cni/bin
2.2 配置cgroup drivers CentOS7使用的是systemd来初始化系统并管理进程,初始化进程会生成并使用一个 root 控制组 (cgroup), 并充当 cgroup 管理器。 Systemd 与 cgroup 集成紧密,并将为每个 systemd 单元分配一个 cgroup。 我们也可以配置容器运行时和 kubelet 使用 cgroupfs。 连同 systemd 一起使用 cgroupfs 意味着将有两个不同的 cgroup 管理器。而当一个系统中同时存在cgroupfs和systemd两者时,容易变得不稳定,因此最好更改设置,令容器运行时和 kubelet 使用 systemd 作为 cgroup 驱动,以此使系统更为稳定。 对于containerd, 需要设置配置文件/etc/containerd/config.toml中的 SystemdCgroup 参数。
参考k8s官方的说明文档:
https://kubernetes.io/docs/setup/production-environment/container-runtimes/#containerd-systemd
[plugins."io.containerd.grpc.v1.cri" .containerd.runtimes.runc]"io.containerd.grpc.v1.cri" .containerd.runtimes.runc.options]true
接下来我们开始配置containerd的cgroup driver
1 2 3 4 5 6 7 8 9 10 11 12 13 14 15 16 17 18 19 20 21 22 23 24 false cat /etc/containerd/config.toml | egrep -v "^#|^$" "cri" ]mv /etc/containerd/config.toml /etc/containerd/config.toml.origin's/SystemdCgroup = false/SystemdCgroup = true/g' /etc/containerd/config.tomltrue "2022-05-12T09:57:31.100285056+08:00" level=error msg="failed to load cni during init, please check CRI plugin status before setting up network for pods" error="cni config load failed: no network config found in /etc/cni/net.d: cni plugin not initialized: failed to load cni config"
2.3 关于kubelet的cgroup driver k8s官方有详细的文档 介绍了如何设置kubelet的cgroup driver,需要特别注意的是,在1.22版本开始,如果没有手动设置kubelet的cgroup driver,那么默认会设置为systemd
Note: In v1.22, if the user is not setting the cgroupDriver field under KubeletConfiguration, kubeadm will default it to systemd.
一个比较简单的指定kubelet的cgroup driver的方法就是在kubeadm-config.yaml加入cgroupDriver字段
kind: ClusterConfiguration apiVersion: kubeadm.k8s.io/v1beta3 kubernetesVersion: v1.21.0 --- kind: KubeletConfiguration apiVersion: kubelet.config.k8s.io/v1beta1 cgroupDriver: systemd
我们可以直接查看configmaps来查看初始化之后集群的kubeadm-config配置。
1 2 3 4 5 6 7 8 9 10 11 12 13 14 15 16 17 18 19 20 21 22 23 24 25 26 27 28 29 30 31 32 33 34 35 $ kubectl describe configmaps kubeadm-config -n kube-systemData ==== ClusterConfiguration: ---- extraArgs: authorization-mode: Node,RBAC timeoutForControlPlane: 4m0s local: dataDir: /var/lib/etcd dnsDomain: cali-cluster.tclocal serviceSubnet: 10.88.0.0/18 BinaryData ====
当然因为我们需要安装的版本高于1.22.0并且使用的就是systemd,因此可以不用再重复配置。
3、安装kube三件套
对应的官方文档可以参考这里
https://kubernetes.io/docs/setup/production-environment/tools/kubeadm/install-kubeadm/#installing-kubeadm-kubelet-and-kubectl
kube三件套就是kubeadm、kubelet 和 kubectl,三者的具体功能和作用如下:
kubeadm:用来初始化集群的指令。kubelet:在集群中的每个节点上用来启动 Pod 和容器等。kubectl:用来与集群通信的命令行工具。
需要注意的是:
kubeadm不会帮助我们管理kubelet和kubectl,其他两者也是一样的,也就是说这三者是相互独立的,并不存在谁管理谁的情况;kubelet的版本必须小于等于API-server的版本,否则容易出现兼容性的问题;kubectl并不是集群中的每个节点都需要安装,也并不是一定要安装在集群中的节点,可以单独安装在自己本地的机器环境上面,然后配合kubeconfig文件即可使用kubectl命令来远程管理对应的k8s集群;
CentOS7的安装比较简单,我们直接使用官方提供的yum源即可。需要注意的是这里需要设置selinux的状态,但是前面我们已经关闭了selinux,因此这里略过这步。
1 2 3 4 5 6 7 8 9 10 11 12 13 14 15 16 17 18 19 20 21 22 23 24 25 26 27 28 29 30 31 32 33 34 35 36 37 38 cat <<EOF | sudo tee /etc/yum.repos.d/kubernetes.repo [kubernetes] name=Kubernetes baseurl=https://packages.cloud.google.com/yum/repos/kubernetes-el7-\$basearch enabled=1 gpgcheck=1 repo_gpgcheck=1 gpgkey=https://packages.cloud.google.com/yum/doc/yum-key.gpg https://packages.cloud.google.com/yum/doc/rpm-package-key.gpg exclude=kubelet kubeadm kubectl EOF cat <<EOF > /etc/yum.repos.d/kubernetes.repo [kubernetes] name=Kubernetes baseurl=https://mirrors.aliyun.com/kubernetes/yum/repos/kubernetes-el7-x86_64/ enabled=1 gpgcheck=1 repo_gpgcheck=1 gpgkey=https://mirrors.aliyun.com/kubernetes/yum/doc/yum-key.gpg https://mirrors.aliyun.com/kubernetes/yum/doc/rpm-package-key.gpg EOF 's/repo_gpgcheck=1/repo_gpgcheck=0/g' /etc/yum.repos.d/kubernetes.repoenable --now kubelet
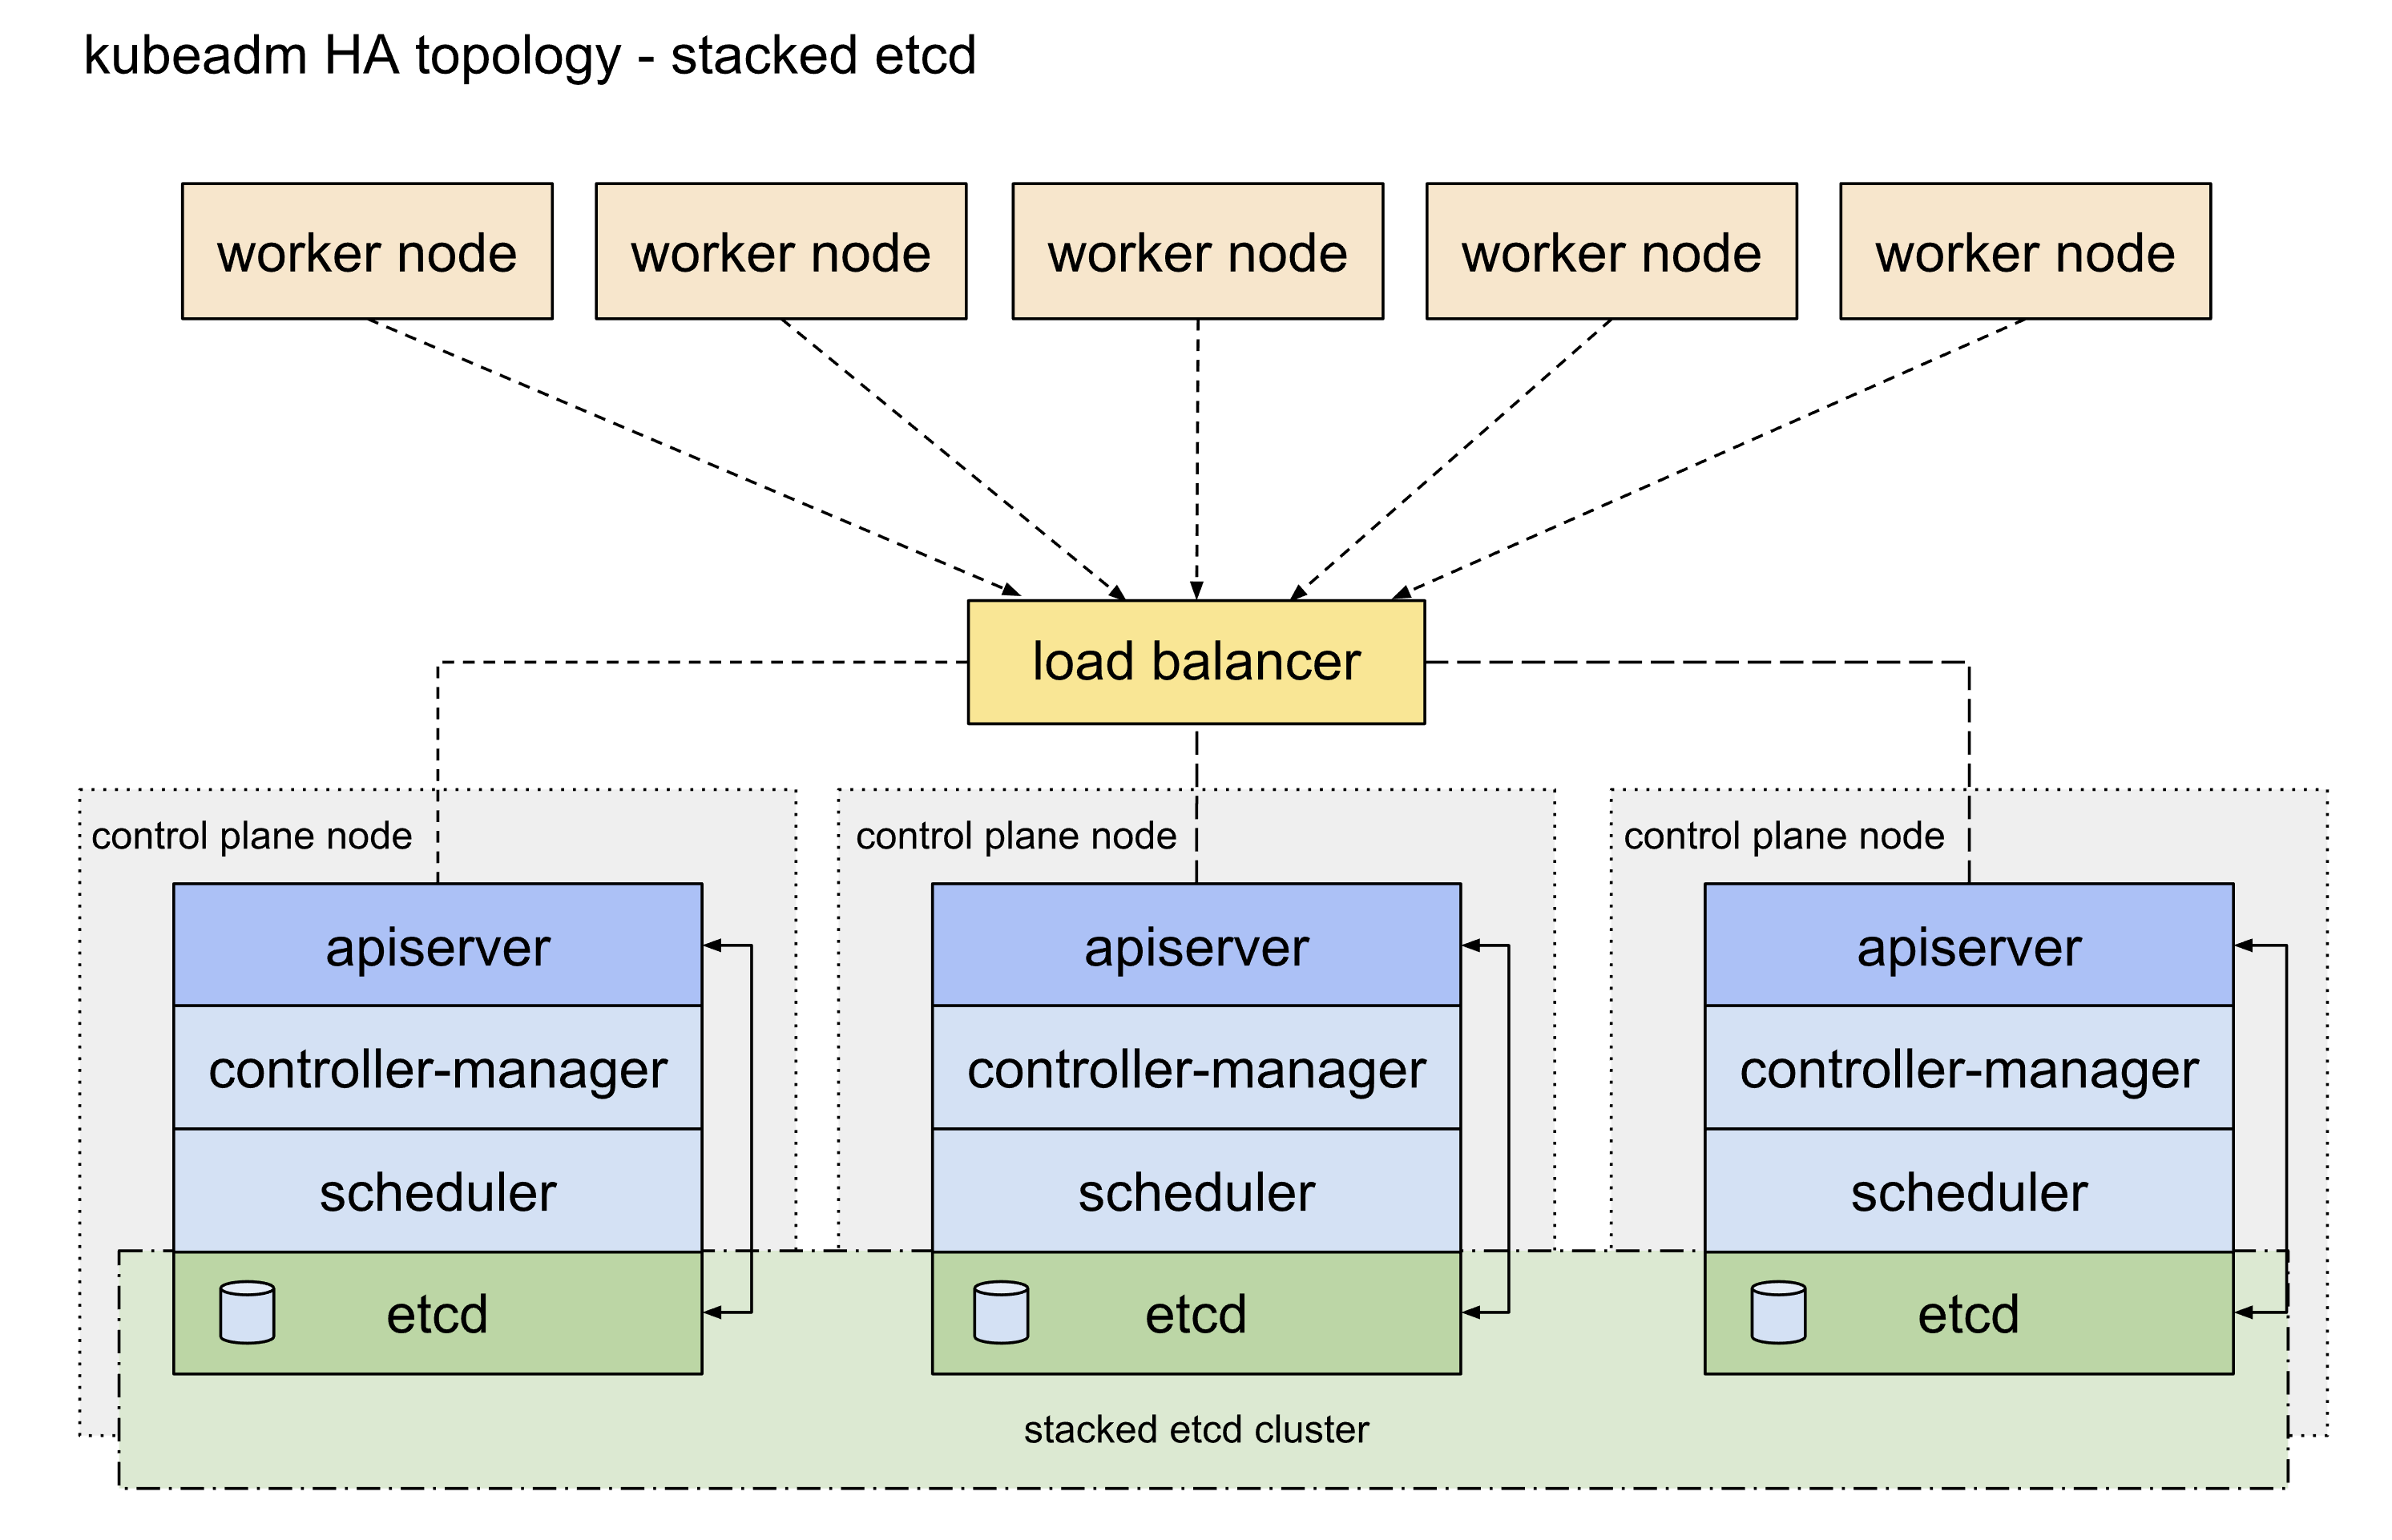
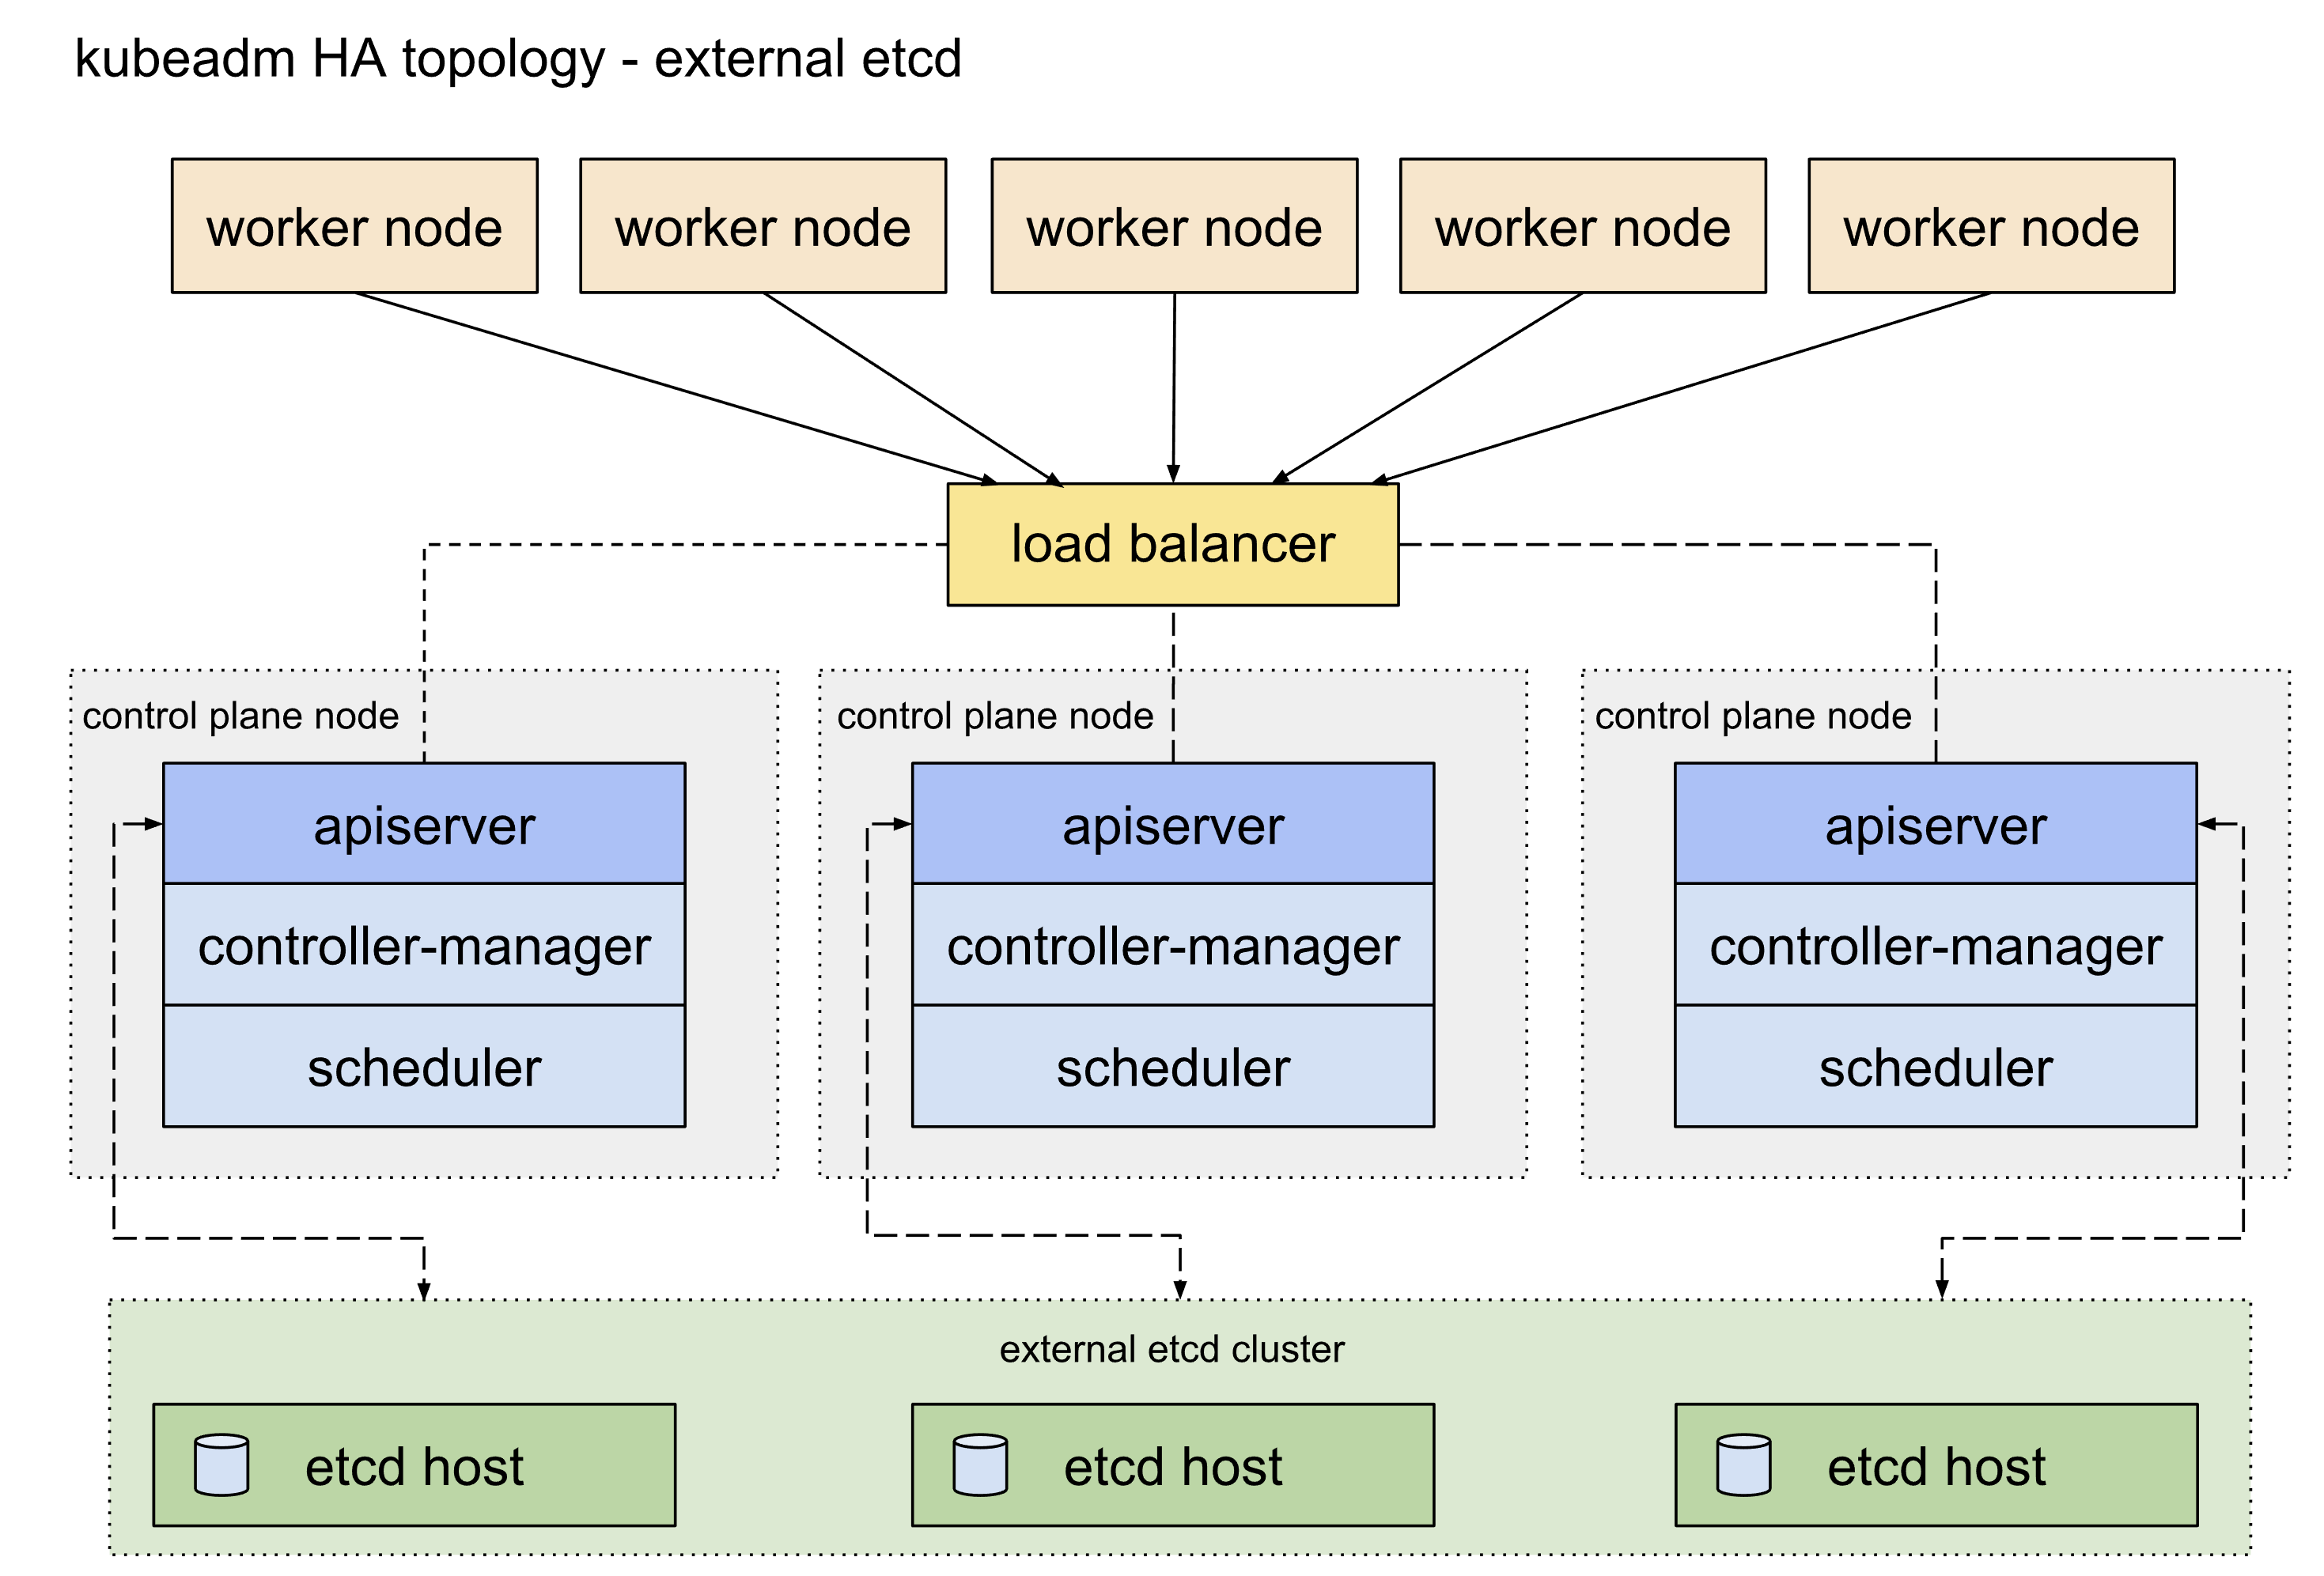
4、初始化集群 4.0 etcd高可用 etcd高可用架构参考这篇官方文档 ,主要可以分为堆叠etcd方案和外置etcd方案,两者的区别就是etcd是否部署在apiserver所在的node机器上面,这里我们主要使用的是堆叠etcd部署方案。
4.1 apiserver高可用 apisever高可用配置参考这篇官方文档 。目前apiserver的高可用比较主流的官方推荐方案 是使用keepalived和haproxy,由于centos7自带的版本较旧,重新编译又过于麻烦,因此我们可以参考官方给出的静态pod的部署方式 ,提前将相关的配置文件放置到/etc/kubernetes/manifests目录下即可(需要提前手动创建好目录)。官方表示对于我们这种堆叠部署控制面master节点和etcd的方式而言这是一种优雅的解决方案。
This is an elegant solution, in particular with the setup described under Stacked control plane and etcd nodes .
首先我们需要准备好三台master节点上面的keepalived配置文件和haproxy配置文件:
1 2 3 4 5 6 7 8 9 10 11 12 13 14 15 16 17 18 19 20 21 22 23 24 25 26 27 28 29 ! /etc/keepalived/keepalived.conf ! Configuration File for keepalived global_defs { router_id LVS_DEVEL } vrrp_script check_apiserver { script "/etc/keepalived/check_apiserver.sh" interval 3 weight -2 fall 10 rise 2 } vrrp_instance VI_1 { state ${STATE} interface $ {INTERFACE} virtual_router_id $ {ROUTER_ID} priority $ {PRIORITY} authentication { auth_type PASS auth_pass ${AUTH_PASS} } virtual_ipaddress { ${APISERVER_VIP} } track_script { check_apiserver } }
实际上我们需要区分三台控制面节点的状态
1 2 3 4 5 6 7 8 9 10 11 12 13 14 15 16 17 18 19 20 21 22 23 24 25 26 27 28 29 ! /etc/keepalived/keepalived.conffor keepalived"/etc/keepalived/check_apiserver.sh" int erval 3 -2 10 2 interface eth0 virtual_router_id 80 priority 100 authentication {pass@ 77 10.31 .80 .0
1 2 3 4 5 6 7 8 9 10 11 12 13 14 15 16 17 18 19 20 21 22 23 24 25 26 27 28 29 ! /etc/keepalived/keepalived.conffor keepalived"/etc/keepalived/check_apiserver.sh" int erval 3 -2 10 2 interface eth0 virtual_router_id 80 priority 90 authentication {pass@ 77 10.31 .80 .0
1 2 3 4 5 6 7 8 9 10 11 12 13 14 15 16 17 18 19 20 21 22 23 24 25 26 27 28 29 ! /etc/keepalived/keepalived.conffor keepalived"/etc/keepalived/check_apiserver.sh" int erval 3 -2 10 2 interface eth0 virtual_router_id 80 priority 80 authentication {pass@ 77 10.31 .80 .0
这是haproxy的配置文件模板:
1 2 3 4 5 6 7 8 9 10 11 12 13 14 15 16 17 18 19 20 21 22 23 24 25 26 27 28 29 30 31 32 33 34 35 36 37 38 39 40 41 42 43 44 45 46 47 48 49 50 log /dev/log local0log /dev/log local1 noticelog globaltimeout http-request 10stimeout queue 20stimeout connect 5stimeout client 20stimeout server 20stimeout http-keep-alive 10stimeout check 10sbind *:${APISERVER_DEST_PORT} ${HOST1_ID} ${HOST1_ADDRESS} :${APISERVER_SRC_PORT} check
这是keepalived的检测脚本,注意这里的${APISERVER_VIP}和${APISERVER_DEST_PORT}要替换为集群的实际VIP和端口
# !/bin/sh
这是keepalived的部署文件/etc/kubernetes/manifests/keepalived.yaml,注意这里的配置文件路径要和上面的对应一致。
1 2 3 4 5 6 7 8 9 10 11 12 13 14 15 16 17 18 19 20 21 22 23 24 25 26 27 28 29 30 31 apiVersion: v1 kind: Pod metadata: creationTimestamp: null name: keepalived namespace: kube-system spec: containers: - image: osixia/keepalived:2.0.17 name: keepalived resources: {}securityContext: capabilities: add: - NET_ADMIN - NET_BROADCAST - NET_RAW volumeMounts: - mountPath: /usr/local/etc/keepalived/keepalived.conf name: config - mountPath: /etc/keepalived/check_apiserver.sh name: check hostNetwork: true volumes: - hostPath: path: /etc/keepalived/keepalived.conf name: config - hostPath: path: /etc/keepalived/check_apiserver.sh name: check status: {}
这是haproxy的部署文件/etc/kubernetes/manifests/haproxy.yaml,注意这里的配置文件路径要和上面的对应一致,且${APISERVER_DEST_PORT}要换成我们对应的apiserver的端口,这里我们改为8443,避免和原有的6443端口冲突
1 2 3 4 5 6 7 8 9 10 11 12 13 14 15 16 17 18 19 20 21 22 23 24 25 26 27 28 apiVersion: v1 kind: Pod metadata: name: haproxy namespace: kube-system spec: containers: - image: haproxy:2.1.4 name: haproxy livenessProbe: failureThreshold: 8 httpGet: host: localhost path: /healthz port: 8443 scheme: HTTPS volumeMounts: - mountPath: /usr/local/etc/haproxy/haproxy.cfg name: haproxyconf readOnly: true hostNetwork: true volumes: - hostPath: path: /etc/haproxy/haproxy.cfg type: FileOrCreate name: haproxyconf status: {}
4.2 编写配置文件 在集群中所有节点都执行完上面的操作之后,我们就可以开始创建k8s集群了。因为我们这次需要进行高可用部署,所以初始化的时候先挑任意一台master控制面节点进行操作即可。
print init-defaults > kubeadm-cilium-ha.conf
考虑到大多数情况下国内的网络无法使用谷歌的镜像源(1.25版本开始从k8s.gcr.io换为registry.k8s.io),我们可以直接在配置文件中修改imageRepository参数为阿里的镜像源registry.aliyuncs.com/google_containers
kubernetesVersion字段用来指定我们要安装的k8s版本localAPIEndpoint参数需要修改为我们的master节点的IP和端口,初始化之后的k8s集群的apiserver地址就是这个criSocket从1.24.0版本开始已经默认变成了containerdpodSubnet、serviceSubnet和dnsDomain两个参数默认情况下可以不用修改,这里我按照自己的需求进行了变更nodeRegistration里面的name参数修改为对应master节点的hostnamecontrolPlaneEndpoint参数配置的才是我们前面配置的集群高可用apiserver的地址新增配置块使用ipvs,具体可以参考官方文档
1 2 3 4 5 6 7 8 9 10 11 12 13 14 15 16 17 18 19 20 21 22 23 24 25 26 27 28 29 30 31 32 33 34 35 36 37 38 39 40 41 42 43 44 apiVersion: kubeadm.k8s.io/v1beta3 bootstrapTokens: - groups: - system:bootstrappers:kubeadm:default-node-token token: abcdef.0123456789abcdef ttl: 24h0m0s usages: - signing - authentication kind: InitConfiguration localAPIEndpoint: advertiseAddress: 10.31 .80 .1 bindPort: 6443 nodeRegistration: criSocket: unix:///var/run/containerd/containerd.sock imagePullPolicy: IfNotPresent name: k8s-cilium-master-10-31-80-1.tinychen.io taints: null --- apiServer: timeoutForControlPlane: 4m0s apiVersion: kubeadm.k8s.io/v1beta3 certificatesDir: /etc/kubernetes/pki clusterName: kubernetes controllerManager: {}dns: {}etcd: local: dataDir: /var/lib/etcd imageRepository: registry.aliyuncs.com/google_containers kind: ClusterConfiguration kubernetesVersion: 1.25 .4 controlPlaneEndpoint: "k8s-cilium-apiserver.tinychen.io:8443" networking: dnsDomain: cili-cluster.tclocal serviceSubnet: 10.32 .128 .0 /18 podSubnet: 10.32 .0 .0 /17 scheduler: {}--- apiVersion: kubeproxy.config.k8s.io/v1alpha1 kind: KubeProxyConfiguration mode: ipvs
4.3 初始化集群 此时我们再查看对应的配置文件中的镜像版本,就会发现已经变成了对应阿里云镜像源的版本
1 2 3 4 5 6 7 8 9 10 11 12 13 14 15 16 17 18 19 20 21 22 23 24 25 26 27 28 29 'systemctl enable kubelet.service' for setting up a Kubernetes clusterin beforehand using 'kubeadm config images pull'
当我们看到下面这个输出结果的时候,我们的集群就算是初始化成功了。
1 2 3 4 5 6 7 8 9 10 11 12 13 14 15 16 17 18 19 20 21 22 23 24 25 26 27 28 29 30 Your Kubernetes control-plane has initialized successfully!mkdir -p $HOME /.kubecp -i /etc/kubernetes/admin.conf $HOME /.kube/configchown $(id -u):$(id -g) $HOME /.kube/configif you are the root user, you can run:export KUBECONFIG=/etc/kubernetes/admin.conf"kubectl apply -f [podnetwork].yaml" with one of the options listed at:join any number of the control-plane node running the following command on each as root:join k8s-cilium-apiserver.tinychen.io:6443 --token abcdef.0123456789abcdef \in two hours; If necessary, you can use"kubeadm init phase upload-certs --upload-certs" to reload certs afterward.join any number of worker nodes by running the following on each as root:join k8s-cilium-apiserver.tinychen.io:6443 --token abcdef.0123456789abcdef \
接下来我们在剩下的两个master节点上面执行上面输出的命令,注意要执行带有--control-plane --certificate-key这两个参数的命令,其中--control-plane参数是确定该节点为master控制面节点,而--certificate-key参数则是把我们前面初始化集群的时候通过--upload-certs上传到k8s集群中的证书下载下来使用。
This node has joined the cluster and a new control plane instance was created:to apiserver and approval was received.of the new secure connection details.and taint were applied to the new node.new etcd member was added to the local /stacked etcd cluster.start administering your cluster from this node, you need to run the following as a regular user:'kubectl get nodes' to see this node join the cluster.
最后再对剩下的三个worker节点执行普通的加入集群命令,当看到下面的输出的时候说明节点成功加入集群了。
This node has joined the cluster:'kubectl get nodes' on the control-plane to see this node join the cluster.
如果不小心没保存初始化成功的输出信息,或者是以后还需要新增节点也没有关系,我们可以使用kubectl工具查看或者生成token
1 2 3 4 5 6 7 8 9 10 11 12 13 14 15 16 17 18 19 # 查看现有的token列表 $ kubeadm token list # 如果token已经失效,那就再创建一个新的token $ kubeadm token create $ kubeadm token list # 如果找不到--discovery-token-ca-cert-hash参数,则可以在master节点上使用openssl工具来获取 $ openssl x509 -pubkey -in /etc/kubernetes/pki/ca.crt | openssl rsa -pubin -outform der 2>/dev/null | openssl dgst -sha256 -hex | sed 's/^.* //'
4.4 配置kubeconfig 刚初始化成功之后,我们还没办法马上查看k8s集群信息,需要配置kubeconfig相关参数才能正常使用kubectl连接apiserver读取集群信息。
mkdir -p $HOME /.kubecp -i /etc/kubernetes/admin.conf $HOME /.kube/configchown $(id -u):$(id -g) $HOME /.kube/configexport KUBECONFIG=/etc/kubernetes/admin.confecho "source <(kubectl completion bash)" >> ~/.bashrc
前面我们提到过kubectl不一定要安装在集群内,实际上只要是任何一台能连接到apiserver的机器上面都可以安装kubectl并且根据步骤配置kubeconfig,就可以使用kubectl命令行来管理对应的k8s集群。
配置完成后,我们再执行相关命令就可以查看集群的信息了,但是此时节点的状态还是NotReady,接下来就需要部署CNI了。
1 2 3 4 5 6 7 8 9 10 11 12 13 14 15 16 17 18 19 20 21 22 23 24 25 26 27 28 29 30 31 32 33 34 35 36 37 38 39 40 41 42 43 44 45 $ kubectl cluster-info'kubectl cluster-info dump' .
5、安装CNI 5.1 部署helm3 cilium的部署依赖helm3,因此我们在部署cilium之前需要先安装helm3 。
helm3的部署非常的简单,我们只要去GitHub 找到对应系统版本的二进制文件,下载解压后放到系统的执行目录就可以使用了。
$ wget https://get.helm.sh/helm-v3.10.2-linux-amd64.tar.gzcp -rp linux-amd64/helm /usr/local/bin/"v3.10.2" , GitCommit:"50f003e5ee8704ec937a756c646870227d7c8b58" , GitTreeState:"clean" , GoVersion:"go1.18.8" }
5.2 部署cilium 完整的部署指南可以参考官方文档 ,首先我们添加helm的repo。
$ helm repo add cilium https://helm.cilium.io/"cilium" has been added to your repositories
参考官网的文档,这里我们需要指定集群的APIserver的IP和端口
helm install cilium ./cilium \set kubeProxyReplacement =strict \set k8sServiceHost =REPLACE_WITH_API_SERVER_IP \set k8sServicePort =REPLACE_WITH_API_SERVER_PORT
但是考虑到cilium默认使用的podCIDR为10.0.0.0/8,很可能会和我们集群内的网络冲突,最好的方案就是初始化的时候指定podCIDR,关于初始化的时候podCIDR的设置,可以参考官方的这个文章 。
helm install cilium cilium/cilium --version 1.12.4 \set k8sServiceHost =REPLACE_WITH_API_SERVER_IP \set k8sServicePort =REPLACE_WITH_API_SERVER_PORT \set ipam.operator.clusterPoolIPv4PodCIDRList =<IPv4CIDR> \set ipam.operator.clusterPoolIPv4MaskSize =<IPv4MaskSize>
最后可以得到我们的初始化安装参数
helm install cilium cilium/cilium --version 1.12.4 \set k8sServiceHost =k8s-cilium-apiserver.tinychen.io \set k8sServicePort =8443 \set ipam.operator.clusterPoolIPv4PodCIDRList =10.32.0.0/17 \set ipam.operator.clusterPoolIPv4MaskSize =24
然后我们使用指令进行安装
1 2 3 4 5 6 7 8 9 10 11 12 13 14 15 16 17 18 $ helm install cilium cilium/cilium --version 1.12.4 \set k8sServiceHost=k8s-cilium-apiserver.tinychen.io \set k8sServicePort=8443 \set ipam.operator.clusterPoolIPv4PodCIDRList=10.32.0.0/17 \set ipam.operator.clusterPoolIPv4MaskSize=24help , visit https://docs.cilium.io/en/v1.12/gettinghelp
此时我们再查看集群的daemonset和deployment状态:
再查看所有的pod,状态都正常,ip也和我们初始化的时候分配的ip段一致,说明初始化的参数设置生效了。
1 2 3 4 5 6 7 8 9 10 11 12 13 14 15 16 17 18 19 20 21 22 23 24 25 26 27 28 29 30 31 32 33 34 35 36 37 $# kubectl get pods -A -o wide
这时候我们再进入pod中检查cilium的状态
1 2 3 4 5 6 7 8 9 10 11 12 13 14 15 16 17 18 19 20 21 22 23 24 25 26 27 28 29 30 31 32 33 34 35 36 37 38 39 40 41 42 43 44 45 46 47 48 49 50 51 52 53 54 55 56 57 58 59 60 61 62 63 64 65 66 67 68 69 70 71 72 73 74 75 76 77 78 79 80 81 82 83 84 85 86 87 88 89 90 exec -it -n kube-system cilium-5ppb6 -- cilium status --verbose"cilium-agent" out of: cilium-agent, mount-cgroup (init), apply-sysctl-overwrites (init), mount-bpf-fs (init), clean-cilium-state (init)"cilium/v2::CiliumClusterwideNetworkPolicy" , "cilium/v2::CiliumEndpoint" , "cilium/v2::CiliumNetworkPolicy" , "cilium/v2::CiliumNode" , "core/v1::Namespace" , "core/v1::Node" , "core/v1::Pods" , "core/v1::Service" , "discovery/v1::EndpointSlice" , "networking.k8s.io/v1::NetworkPolicy" ]for events on 16 CPUs with 64x4096 of shared memoryfor BPF: ktime
其实到这里cilium的部署就可以说是ok了的,整个集群的cni都处于正常状态,其余的工作负载也都能够正常运行了。
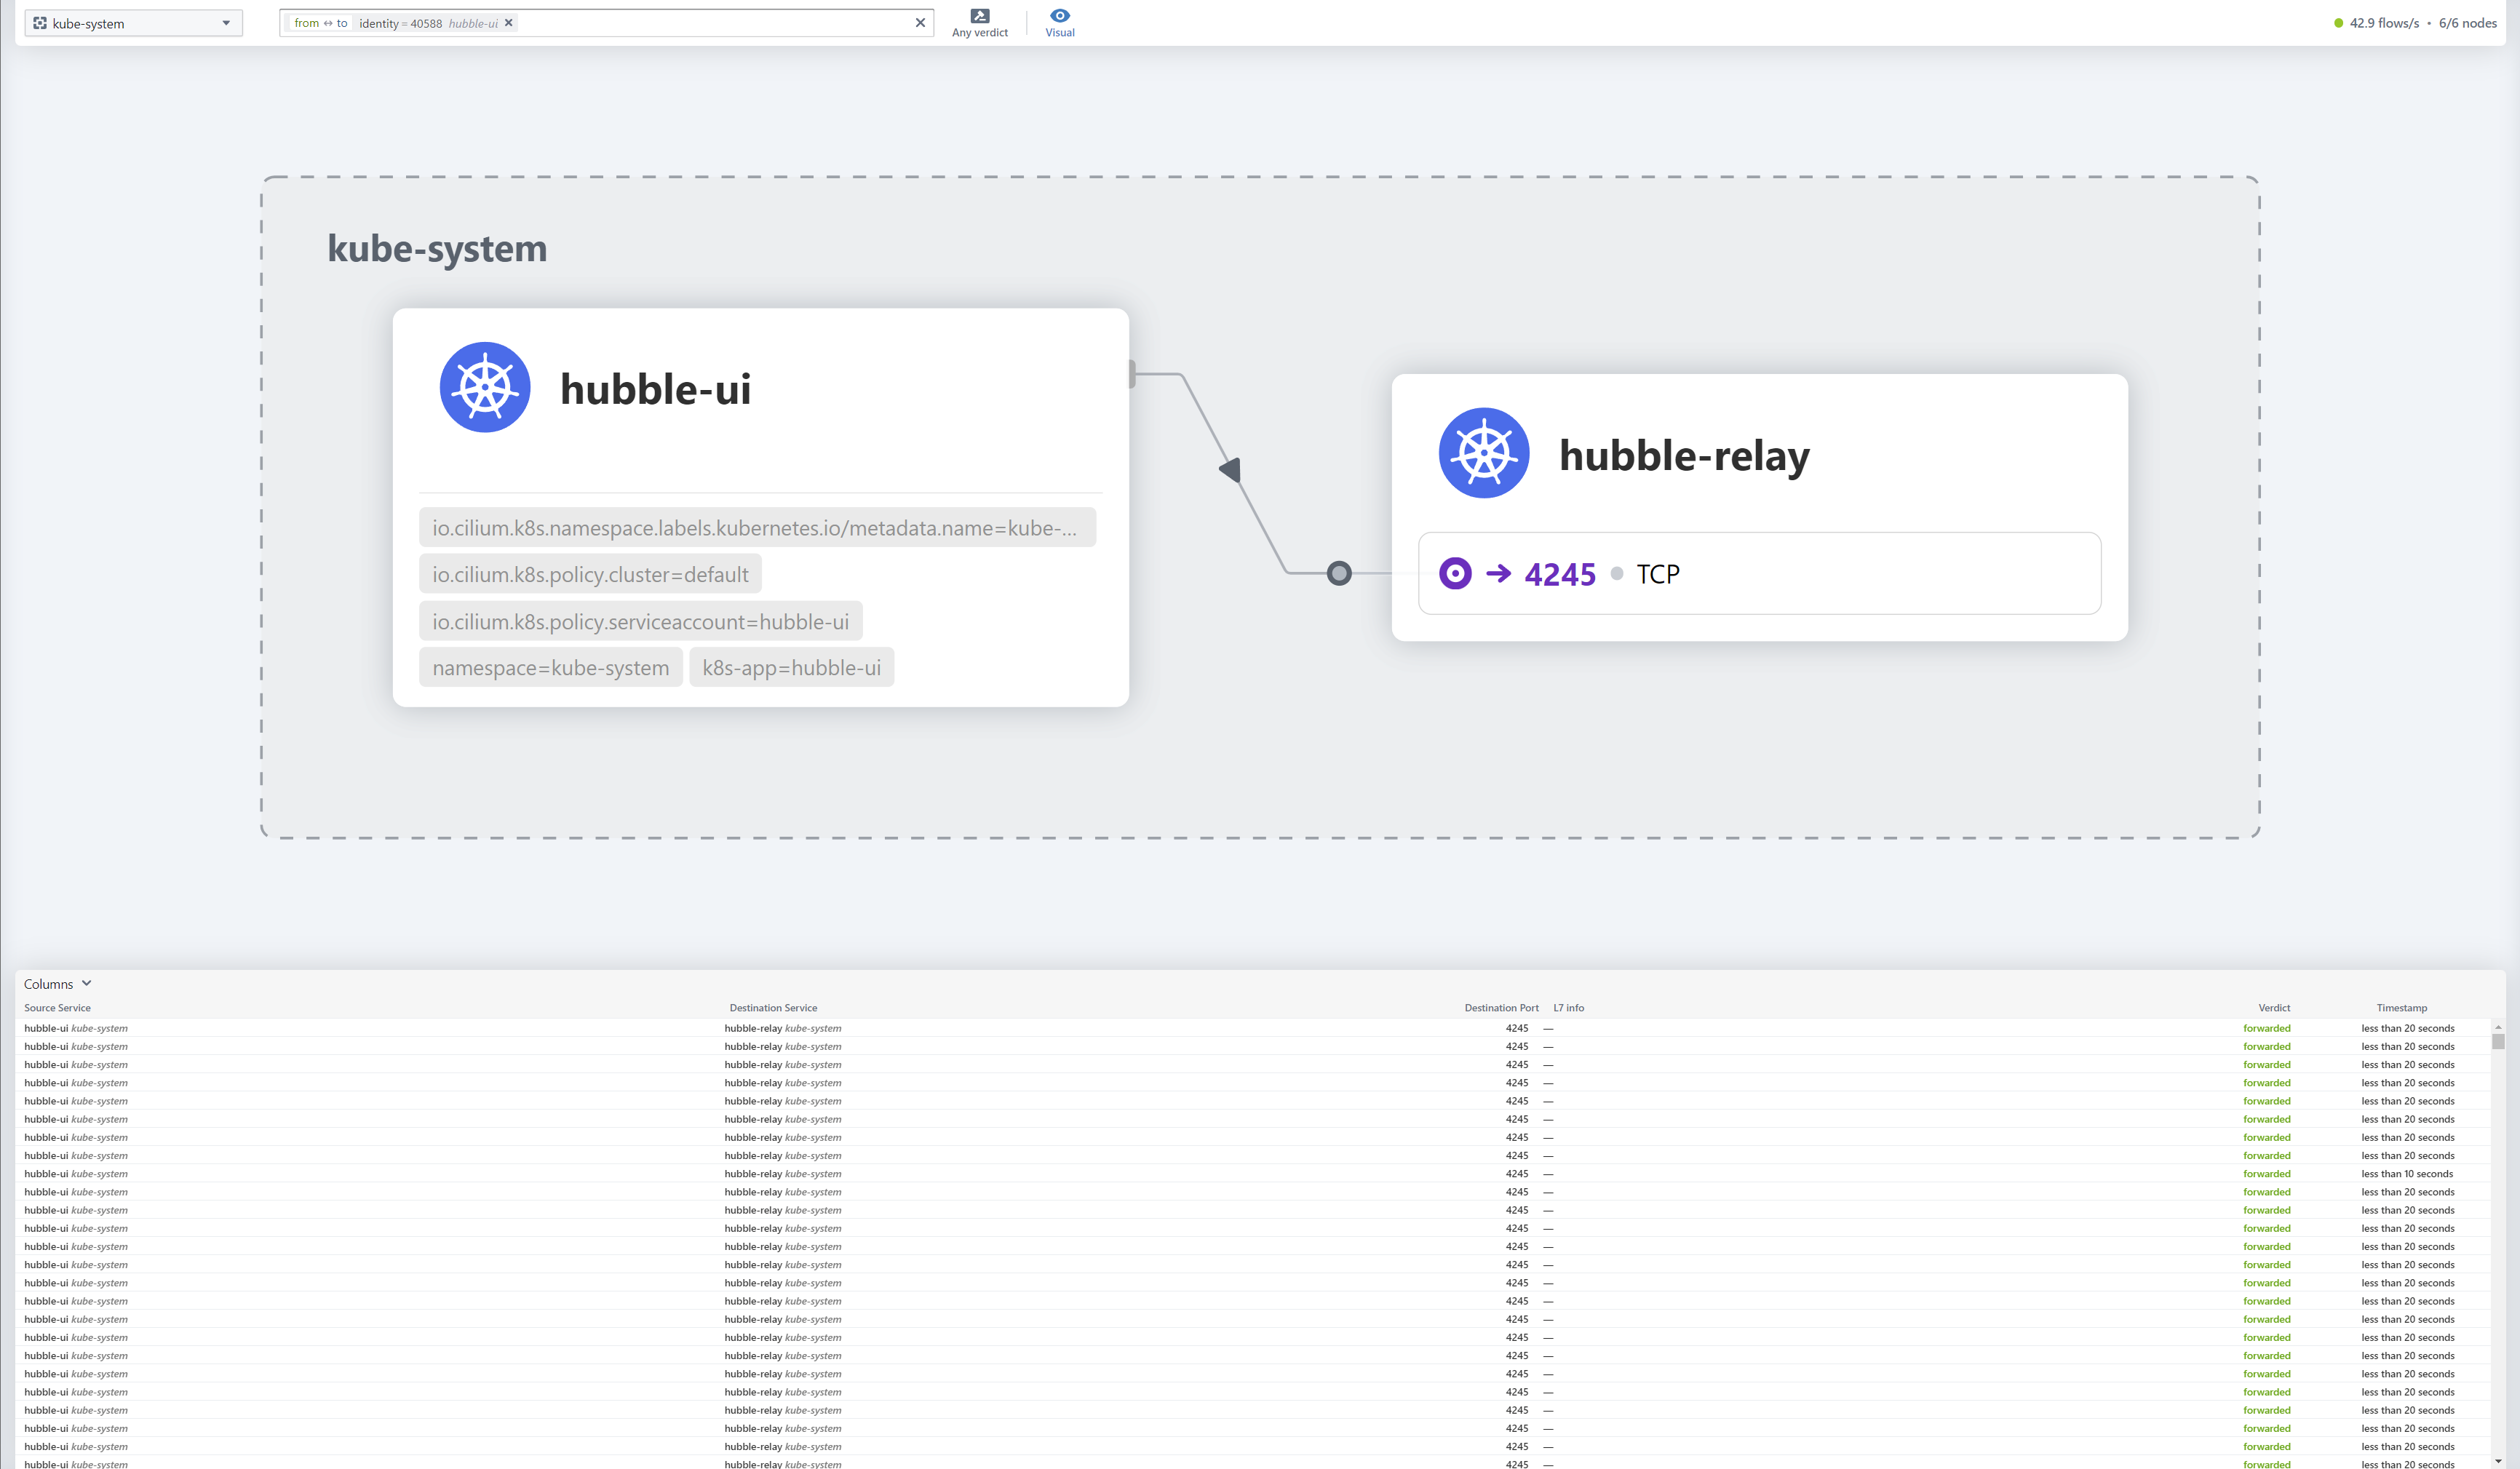
5.3 部署hubble cilium还有一大特点就是其可观测性比其他的cni要优秀很多,想要体验到cilium的可观测性,我们就需要在k8s集群中安装hubble 。同时hubble提供了ui界面来更好的实现集群内网络的可观测性,这里我们也一并把hubble-ui安装上。
helm3安装hubble 我们继续接着上面的helm3来安装hubble,因为我们已经安装了cilium,因此这里需要使用upgrade来进行升级安装,并且使用--reuse-values来复用之前的安装参数
helm upgrade cilium cilium/cilium --version 1.12.4 \set hubble.relay.enabled=true \set hubble.ui.enabled=true
然后我们直接进行安装
1 2 3 4 5 6 7 8 9 10 11 12 13 14 15 16 17 18 $ helm upgrade cilium cilium/cilium --version 1.12.4 \set hubble.relay.enabled=true \set hubble.ui.enabled=true "cilium" has been upgraded. Happy Helming!help , visit https://docs.cilium.io/en/v1.12/gettinghelp
随后我们查看相关的集群状态,可以看到相对应的pod、deploy和svc都工作正常
$ kubectl get pod -A | grep hubble
cilium-cli安装hubble 使用cilium-cli功能来安装hubble也非常简单:
1 2 3 4 5 6 7 8 9 10 11 12 13 14 15 16 17 18 19 20 21 22 23 24 25 26 27 28 29 30 31 32 33 34 35 sha256sum }sha256sum --check cilium-linux-amd64.tar.gz.sha256sumenable enable --ui
安装hubble客户端 和cilium一样,hubble也提供了一个客户端来让我们操作
export HUBBLE_VERSION=$(curl -s https://raw.githubusercontent.com/cilium/hubble/master/stable.txt)$HUBBLE_VERSION /hubble-linux-amd64.tar.gz{,.sha256sum }sha256sum --check hubble-linux-amd64.tar.gz.sha256sumrm hubble-linux-amd64.tar.gz{,.sha256sum }
然后我们需要暴露hubble api服务的端口,直接使用kubectl的port-forward功能把hubble-relay这个服务的80端口暴露到4245端口上
如果使用cilium-cli工具安装的hubble也可以使用cilium暴露api端口,需要注意的是该命令默认会暴露到IPV6和IPV4网络中,如果宿主机节点不支持ipv6网络会报错
$ cilium hubble port-forward&
api端口暴露完成之后我们就可以测试一下hubble客户端的工作状态是否正常
$ hubble status Handling connection for 4245 Healthcheck (via localhost:4245): Ok Current/Max Flows: 10 ,903/12,285 (88.75%) Flows/s: 5.98 Connected Nodes: 3 /3
这里需要注意如果发现hubble的状态不正常,查看日志发现
$ kubectl logs -f hubble-relay-67ffc5f588-qr8nt -n kube-systemlevel =warning msg ="Failed to create peer client for peers synchronization; will try again after the timeout has expired" error ="context deadline exceeded" subsys =hubble-relay target ="hubble-peer.kube-system.svc.cluster.local:443"
主要是因为前面初始化的时候我们定义了集群名为cili-cluster.tclocal,因此集群中coredns的配置没有cluster.local的解析,我们手动增加一个即可。
1 2 3 4 5 6 7 8 9 10 11 12 13 14 15 16 17 18 19 20 21 22 23 24 25 26 27 28 29 30 31 32 33 34 35 36 37 38 39 40 41 42 43 44 45 46 47 48 $ kubectl get cm coredns -n kube-system -o yaml"2022-12-08T08:14:37Z" "11835"
暴露hubble-ui 官方介绍里面是使用cilium工具直接暴露hubble-ui的访问端口到宿主机上面的12000端口
"http://localhost:12000" in your browser...
实际上执行的操作等同于下面这个命令
这里我们使用nodeport的方式来暴露hubble-ui,首先我们查看原来的hubble-ui这个svc的配置
$ kubectl get svc -n kube-system hubble-ui -o yamltype : ClusterIP
我们把默认的ClusterIP修改为NodePort,并且指定端口为nodePort: 30081
$ kubectl get svc -n kube-system hubble-ui -o yamltype : NodePort
修改前后对比查看状态
这时候我们在浏览器中访问http://10.31.80.1:30081就可以看到hubble的ui界面了
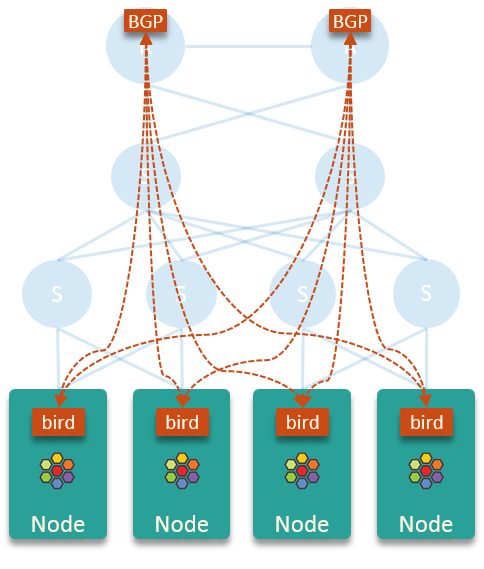
6、配置BGP路由 6.1 使用bird2 cilium官方给出的基于bird宣告BGP路由的架构图如下:
这里假设的是存在两个核心路由器,实际上根据网络环境的不同可以动态变化(可以是多个路由器或者是能跑BGP路由的三层交换机),在下面的测试环境中我们只使用一个openwrt来充当路由器的角色
bird不从核心路由器和其他节点学习路由,这使得每个节点的内核路由表保持干净和小,并且没有性能问题(这里的性能问题指的是bird的性能问题)。在这个方案中,每个节点只是将 pod 出口流量发送到节点的默认网关(核心路由器),并让后者进行路由。
上述的这个方案最大的特点就是每个node节点都会把整个pod的CIDR发布到对端路由器上,并不会精确控制每个node的路由条目。
好处是只要还有一个node的BGP连接正常,那么集群外部就能够访问所有node节点上面的pod;坏处就是集群外部访问pod的流量不一定会直接转发到对应pod所在的node上面,很可能会转发到其他的node上面,再通过这个node上面的具体路由走隧道转发到对应的pod上。
enable bird
bird的配置文件也是相对比较简单,下面是其中一台机器的配置,这里10.31.80.1是本机IP,64515是cilium集群的ASN号,而10.31.254.253是路由器的IP,64512是路由器端的ASN号。
注意这里的配置开启了BFD、ECMP和graceful restart,更详细的高级配置可以参考cilium的官方文档 。
1 2 3 4 5 6 7 8 9 10 11 12 13 14 15 16 17 18 19 20 21 22 23 24 25 26 27 28 29 30 31 32 33 34 35 36 37 38 39 40 41 42 43 44 45 46 47 48 49 50 51 52 53 54 log syslog all;id 10.31.80.1;export none; yes limit 16 ;"cilium_host" ;"{{ grains['node_mgnt_device'] }}" {"OpenWRT BGP uplink 0" ;local 10.31.80.1 as 64515;export filter {accept;};
六个机器都成功配置之后我们在路由器侧应该是可以看到类似的路由条目,此时在集群外的机器上面如果添加了对应pod网段的路由 的话,是可以通过pod IP直接访问到集群内的pod。
1 2 3 4 5 6 7 8 9 10 11 12 13 14 15 16 17 18 19
6.2 使用kube-router 6.2.1 配置kube-router curl -LO https:// raw.githubusercontent.com/cloudnativelabs/ kube-router/v1.2/ daemonset/generic-kuberouter-only-advertise-routes.yaml
默认的arg参数如下,完整的配置参考官方文档
args: "--run-router=true" "--run-firewall=false" "--run-service-proxy=false" "--bgp-graceful-restart=true" "--enable-cni=false" "--enable-ibgp=false" "--enable-overlay=false" "--peer-router-ips=<CHANGE ME>" "--peer-router-asns=<CHANGE ME>" "--cluster-asn=<CHANGE ME>" "--advertise-cluster-ip=true" "--advertise-external-ip=true" "--advertise-loadbalancer-ip=true"
我们需要对其进行修改,官方表示下面的这些参数必须要和要求的一致:
- "--run-router=true" "--run-firewall=false" "--run-service-proxy=false" "--enable-cni=false" "--enable-pod-egress=false"
这些参数建议一致:
- "--enable-ibgp=true" "--enable-overlay=true" "--advertise-cluster-ip=true" "--advertise-external-ip=true" "--advertise-loadbalancer-ip=true"
最后剩下的参数就是根据实际的网络状态来进行配置
- "--peer-router-ips=10.31.254.253" "--peer-router-asns=64512" "--cluster-asn=64515"
如果需要同时和多个BGP peer建立连接可以参考官方的这个配置
- "--cluster-asn=65001" "--peer-router-ips=10.0.0.1,10.0.2" "--peer-router-asns=65000,65000"
最后我这里使用的参数如下
- "--run-router=true" "--run-firewall=false" "--run-service-proxy=false" "--enable-cni=false" "--enable-pod-egress=false" "--enable-ibgp=true" "--enable-overlay=true" "--advertise-cluster-ip=true" "--advertise-external-ip=true" "--advertise-loadbalancer-ip=true" "--bgp-graceful-restart=true" "--peer-router-ips=10.31.254.253" "--peer-router-asns=64512" "--cluster-asn=64515"
注意在官方文档中说明了–advertise-pod-cidr这个参数才是真正的把pod对应的CIDR发布出去的,但是由于这个值默认是true,因此我们不需要在这里进行显性配置。
–advertise-pod-cidr Add Node’s POD cidr to the RIB so that it gets advertised to the BGP peers. (default true)
配置完成之后我们直接进行部署
6.2.2 配置cilium 随后我们还需要修改cilium的配置:
将ipam修改为kubernetes,因为kube-router是从k8s直接获取CIDR信息的
将tunnel修改为disabled,因为可以通过kube-router获取路由信息直接路由到对应的节点上,就不需要再进行IP隧道/封装了
1 2 3 4 5 6 7 8 9 10 11 12 13 14 15 16 17 18 19 20 21 22 23 24 25 26 27 28 29 30 31 32 "tunnel|ipam" link src 10.31.80.1 metric 100link "tunnel|ipam" link src 10.31.80.1 metric 100link
需要注意的是如果cilium-config配置里面没有ipv4-native-routing-cidr这个参数的话也需要加上,配置为pod的CIDR即可(ipv4-native-routing-cidr: 10.32.0.0/17),否则在重启cilium的时候会出现下面这个报错,关于Native-Routing的配置和原理可以参考官方的这个文档
level=fatal msg=”Error while creating daemon” error=”invalid daemon configuration: native routing cidr must be configured with option –ipv4-native-routing-cidr in combination with –enable-ipv4-masquerade –tunnel=disabled –ipam=kubernetes –enable-ipv4=true” subsys=daemon
可以明显的看到修改之后的路由条目默认情况下都不再通过封装的隧道接口cilium_host,而是直接通过kube-router发布的BGP路由直达对应的node节点上面。
7、部署loadbalancer 因为这里我们没有使用cilium的withoutkubeproxy模式,因此有部分cilium的高级功能无法使用,尽管我们前面已经把clusterIP和podIP都通过BGP宣告出去,在部分场景下面还是需要有LoadBalancer类型的服务作为补充。
目前市面上开源的K8S-LoadBalancer主要就是MetalLB 、OpenELB 和PureLB 这三种,三者的工作原理和使用教程我都写文章分析过,针对目前这种使用场景,我个人认为最合适的是使用PureLB,因为他的组件高度模块化,并且可以自由选择实现ECMP模式的路由协议和软件(MetalLB和OpenELB都是自己通过gobgp实现的BGP协议),能更好的和我们前面的cilium+kube-router组合在一起。
7.1 原理架构 关于purelb的详细工作原理和部署使用方式可以参考我之前写的这篇文章 ,这里不再赘述。
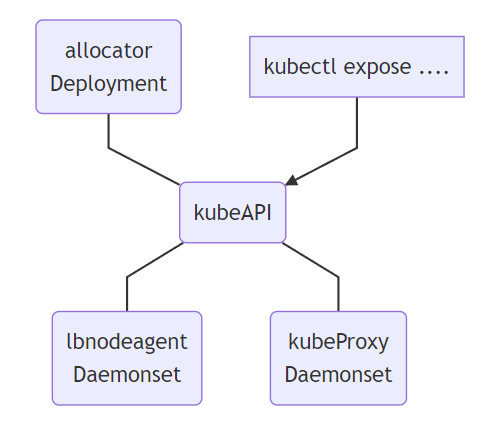
Allocator :用来监听API中的LoadBalancer类型服务,并且负责分配IP。LBnodeagent : 作为daemonset部署到每个可以暴露请求并吸引流量的节点上,并且负责监听服务的状态变化同时负责把VIP添加到本地网卡或者是虚拟网卡KubeProxy :k8s的内置组件,并非是PureLB的一部分,但是PureLB依赖其进行正常工作,当对VIP的请求达到某个具体的节点之后,需要由kube-proxy来负责将其转发到对应的pod
因为我们此前已经部署了kube-router,并且会由它来负责BGP宣告的相关操作,因此在这里我们直接使用purelb的BGP模式,并且不需要自己再额外部署bird或frr来进行BGP路由发布,同时也不需要LBnodeagent组件来帮助暴露并吸引流量,只需要Allocator帮助我们完成LoadBalancerIP的分配操作即可。
7.2 部署purelb 1 2 3 4 5 6 7 8 9 10 11 12 13 14 15 16 17 18 19 20 21 22 23 24 25 26 27 28 29 30 31 32 33 34 35 36 37 in purelb namespace.true LBNodeAgenttrue ServiceGroup
lbnodeagent的这个ds我们这里用不到,因此可以直接删除。
$ kubectl delete ds -n purelb lbnodeagent"lbnodeagent" deletedin purelb namespace.
7.3 配置IP池 接下来我们部署一个ipam的sg,命名为bgp-ippool,ip段就使用我们预留的10.32.192.0/18
1 2 3 4 5 6 7 8 9 10 11 12 13 14 15 16 17 18 19 $ cat purelb-ipam.yamllocal :'10.32.192.0/18' '10.32.192.0-10.32.255.254'
到这里我们的PureLB就部署完了,相比完整的ECMP模式要少部署了路由协议软件 和**额外删除了lbnodeagent**,接下来可以开始测试了。
8、部署测试用例 集群部署完成之后我们在k8s集群中部署一个nginx测试一下是否能够正常工作。首先我们创建一个名为nginx-quic的命名空间(namespace),然后在这个命名空间内创建一个名为nginx-quic-deployment的deployment用来部署pod,最后再创建一个service用来暴露服务,这里我们同时使用nodeport和LoadBalancer两种方式来暴露服务,并且其中一个LoadBalancer的服务还要指定LoadBalancerIP方便我们测试。
1 2 3 4 5 6 7 8 9 10 11 12 13 14 15 16 17 18 19 20 21 22 23 24 25 26 27 28 29 30 31 32 33 34 35 36 37 38 39 40 41 42 43 44 45 46 47 48 49 50 51 52 53 54 55 56 57 58 59 60 61 62 63 64 65 66 67 68 69 70 71 72 73 74 75 76 77 78 79 80 81 82 83 84 85 86 87 88 89 90 91 92 $ cat nginx-quic.yaml apiVersion: v1 kind: Namespace metadata: name: nginx-quic --- apiVersion: apps/v1 kind: Deployment metadata: name: nginx-quic-deployment namespace: nginx-quic spec: selector: matchLabels: app: nginx-quic replicas: 4 template: metadata: labels: app: nginx-quic spec: containers: - name: nginx-quic image: tinychen777/nginx-quic:latest imagePullPolicy: IfNotPresent ports: - containerPort: 80 --- apiVersion: v1 kind: Service metadata: name: nginx-quic-service namespace: nginx-quic spec: externalTrafficPolicy: Cluster selector: app: nginx-quic ports: - protocol: TCP port: 8080 targetPort: 80 nodePort: 30088 type: NodePort --- apiVersion: v1 kind: Service metadata: annotations: purelb.io/service-group: bgp-ippool name: nginx-lb-service namespace: nginx-quic spec: allocateLoadBalancerNodePorts: false externalTrafficPolicy: Cluster internalTrafficPolicy: Cluster selector: app: nginx-quic ports: - protocol: TCP port: 80 targetPort: 80 type: LoadBalancer loadBalancerIP: 10.32 .192 .192 --- apiVersion: v1 kind: Service metadata: annotations: purelb.io/service-group: bgp-ippool name: nginx-lb2-service namespace: nginx-quic spec: allocateLoadBalancerNodePorts: false externalTrafficPolicy: Cluster internalTrafficPolicy: Cluster selector: app: nginx-quic ports: - protocol: TCP port: 80 targetPort: 80 type: LoadBalancer
部署完成后我们直接查看状态
1 2 3 4 5 6 7 8 9 10 11 12 13 14 15 16 17 18 19 20 21 22 23 24 25 26 27 28 29 30 31 32 33 34 35 36 37 38 39 40 41 42 43 44 45 46 47 48 49 50 51 52 53 54 55 56 57 58 59 60 61 62
最后我们进行测试,这个nginx-quic的镜像默认情况下会返回在nginx容器中获得的用户请求的IP和端口,由于我们前面配置的时候把podIP和clusterIP都通过BGP发布出去了,因此我们在集群外直接访问podIP、clusterIP、nodeport和loadbalancerIP都可以成功访问。
1 2 3 4 5 6 7 8 9 10 11 12 13 14 15 16 17 18 19
最后我们检查一下路由器侧的情况,正常情况下可以看到kube-router发布的ECMP路由:
B>* 10.32.192.0 /32 [20 /0 ] via 10.31.80.1 , eth0, weight 1 , 00 :00 :14 10.31.80.2 , eth0, weight 1 , 00 :00 :14 10.31.80.3 , eth0, weight 1 , 00 :00 :14 10.31.80.4 , eth0, weight 1 , 00 :00 :14 10.31.80.5 , eth0, weight 1 , 00 :00 :14 10.31.80.6 , eth0, weight 1 , 00 :00 :14 10.32.192.192 /32 [20 /0 ] via 10.31.80.1 , eth0, weight 1 , 01 :17 :54 10.31.80.2 , eth0, weight 1 , 01 :17 :54 10.31.80.3 , eth0, weight 1 , 01 :17 :54 10.31.80.4 , eth0, weight 1 , 01 :17 :54 10.31.80.5 , eth0, weight 1 , 01 :17 :54 10.31.80.6 , eth0, weight 1 , 01 :17 :54
到这里整个K8S集群就部署完成了。