k8s系列08-负载均衡器之PureLB

本文最后更新于:May 27, 2022 am

本文主要在k8s原生集群上部署v0.6.1版本的PureLB作为k8s的LoadBalancer,主要涉及PureLBLayer2模式ECMP模式两种部署方案。由于PureLB的ECMP支持多种路由协议,这里选用的是在k8s中常见的BGP进行配置。由于BGP的相关原理和配置比较复杂,这里仅涉及简单的BGP配置。

文中使用的k8s集群是在CentOS7系统上基于dockercilium组件部署v1.23.6版本,此前写的一些关于k8s基础知识和集群搭建的一些方案,有需要的同学可以看一下。

1、工作原理

PureLB的工作原理和其他的负载均衡器(MetalLB、OpenELB)类似,也可以大致分为Layer2模式和BGP模式,但是PureLB的两个模式和(MetalLB/OpenELB)还有着较大的区别。

More simply, PureLB either uses the LoadBalancing functionality provided natively by k8s and/or combines k8s LoadBalancing with the routers Equal Cost Multipath (ECMP) load-balancing.

  • MetalLB/OpenELB的BGP模式是指通过跑BGP协议实现ECMP从而实现高可用,并且因为MetalLB/OpenELB只支持BGP这一个路由协议,所以称为BGP模式,或者也可以称之为ECMP模式;
  • PureLB会在k8s的宿主机节点上面添加一个新的虚拟网卡,通过这种方式使得我们可以使用Linux的网络栈看到k8s集群中使用的LoadBalancerVIP,同样得益于使用了Linux网络栈,因此PureLB可以使用任意路由协议实现ECMP(BGP、OSPF等),这种模式更倾向于ECMP模式而不止是BGP模式
  • MetalLB/OpenELB的Layer2模式会把所有的VIP的请求通过ARP/NDP吸引到一台节点上面,所有的流量都会经过这个节点,属于典型的鸡蛋放在一个篮子里
  • PureLB的Layer2模式也和MetalLB/OpenELB不同,它可以根据单个VIP来选择节点,从而将多个VIP分散到集群中的不同节点上,尽可能的把流量均衡的分散到集群中的每个节点,一定程度上将鸡蛋分散,避免了严重的单点故障

解释PureLB的工作原理比较简单,我们看一下官方的这个架构图:

Instead of thinking of PureLB as advertising services, think of PureLB as attracting packets to allocated addresses with KubeProxy forwarding those packets within the cluster via the Container Network Interface Network (POD Network) between nodes.

  • Allocator:用来监听API中的LoadBalancer类型服务,并且负责分配IP。
  • LBnodeagent: 作为daemonset部署到每个可以暴露请求并吸引流量的节点上,并且负责监听服务的状态变化同时负责把VIP添加到本地网卡或者是虚拟网卡
  • KubeProxy:k8s的内置组件,并非是PureLB的一部分,但是PureLB依赖其进行正常工作,当对VIP的请求达到某个具体的节点之后,需要由kube-proxy来负责将其转发到对应的pod

和MetalLB与OpenELB不同,PureLB并不需要自己去发送GARP/GNDP数据包,它执行的操作是把IP添加到k8s集群宿主机的网卡上面。具体来说就是:

  1. 首先正常情况下每个机器上面都有一个本地网卡用于集群之间的常规通信,我们暂且称之为eth0
  2. 然后PureLB会在每台机器上面创建一个虚拟网卡,默认名字为kube-lb0
  3. PureLB的allocator监听k8s-api中的LoadBalancer类型服务,并且负责分配IP
  4. PureLB的lbnodeagent收到allocator分配的IP之后,开始对这个VIP进行判断
  5. 如果这个VIP和k8s宿主机是同网段的,那么会将其添加到本地网卡eth0上,此时我们可以在该节点上使用ip addr show eth0看到这个VIP
  6. 如果这个VIP和k8s宿主机是不同网段的,那么会将其添加到虚拟网卡kube-lb0上,此时我们可以在该节点上使用ip addr show kube-lb0看到这个VIP
  7. 一般来说Layer2模式的IP是和k8s宿主机节点同网段,ECMP模式是和k8s宿主机节点不同网段
  8. 接下来的发送GARP/GNDP数据包、路由协议通信等操作全部交给Linux网络栈自己或者是专门的路由软件(bird、frr等)实现,PureLB不需要参与这个过程

从上面这个逻辑我们不难看出:PureLB在设计实现原理的时候,尽可能地优先使用已有的基础架构设施。这样一来是可以尽可能地减少开发工作量,不必重复造轮子;二来是可以给用户提供尽可能多的接入选择,降低用户的入门门槛。

2、Layer2模式

2.1 准备工作

在开始部署PureLB之前,我们需要进行一些准备工作,主要就是端口检查和arp参数设置。

  • PureLB使用了CRD,原生的k8s集群需要版本不小于1.15才能支持CRD

  • PureLB也使用了Memberlist来进行选主,因此需要确保7934端口没有被占用(包括TCP和UDP),否则会出现脑裂的情况

    PureLB uses a library called Memberlist to provide local network address failover faster than standard k8s timeouts would require. If you plan to use local network address and have applied firewalls to your nodes, it is necessary to add a rule to allow the memberlist election to occur. The port used by Memberlist in PureLB is Port 7934 UDP/TCP, memberlist uses both TCP and UDP, open both.

  • 修改arp参数,和其他的开源LoadBalancer一样,也要把kube-proxy的arp参数设置为严格strictARP: true

    把k8s集群中的ipvs配置打开strictARP之后,k8s集群中的kube-proxy会停止响应kube-ipvs0网卡之外的其他网卡的arp请求。

    strict ARP开启之后相当于把 将 arp_ignore 设置为 1 并将 arp_announce 设置为 2 启用严格的 ARP,这个原理和LVS中的DR模式对RS的配置一样,可以参考之前的文章中的解释

    1
    2
    3
    4
    5
    6
    7
    8
    9
    10
    11
    12
    13
    14
    15
    16
    17
    18
    19
    20
    # 查看kube-proxy中的strictARP配置
    $ kubectl get configmap -n kube-system kube-proxy -o yaml | grep strictARP
    strictARP: false

    # 手动修改strictARP配置为true
    $ kubectl edit configmap -n kube-system kube-proxy
    configmap/kube-proxy edited

    # 使用命令直接修改并对比不同
    $ kubectl get configmap kube-proxy -n kube-system -o yaml | sed -e "s/strictARP: false/strictARP: true/" | kubectl diff -f - -n kube-system

    # 确认无误后使用命令直接修改并生效
    $ kubectl get configmap kube-proxy -n kube-system -o yaml | sed -e "s/strictARP: false/strictARP: true/" | kubectl apply -f - -n kube-system

    # 重启kube-proxy确保配置生效
    $ kubectl rollout restart ds kube-proxy -n kube-system

    # 确认配置生效
    $ kubectl get configmap -n kube-system kube-proxy -o yaml | grep strictARP
    strictARP: true

2.2 部署PureLB

老规矩我们还是使用manifest文件进行部署,当然官方还提供了helm等部署方式

1
2
3
4
5
6
7
8
9
10
11
12
13
14
15
16
17
18
19
20
21
22
23
24
25
26
27
28
29
30
31
32
33
34
35
36
37
38
39
40
$ wget https://gitlab.com/api/v4/projects/purelb%2Fpurelb/packages/generic/manifest/0.0.1/purelb-complete.yaml

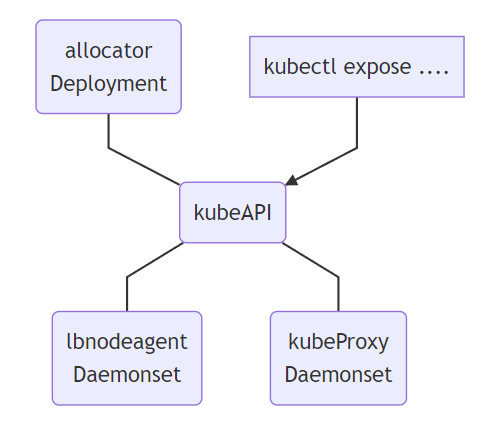
$ kubectl apply -f purelb/purelb-complete.yaml
namespace/purelb created
customresourcedefinition.apiextensions.k8s.io/lbnodeagents.purelb.io created
customresourcedefinition.apiextensions.k8s.io/servicegroups.purelb.io created
serviceaccount/allocator created
serviceaccount/lbnodeagent created
Warning: policy/v1beta1 PodSecurityPolicy is deprecated in v1.21+, unavailable in v1.25+
podsecuritypolicy.policy/allocator created
podsecuritypolicy.policy/lbnodeagent created
role.rbac.authorization.k8s.io/pod-lister created
clusterrole.rbac.authorization.k8s.io/purelb:allocator created
clusterrole.rbac.authorization.k8s.io/purelb:lbnodeagent created
rolebinding.rbac.authorization.k8s.io/pod-lister created
clusterrolebinding.rbac.authorization.k8s.io/purelb:allocator created
clusterrolebinding.rbac.authorization.k8s.io/purelb:lbnodeagent created
deployment.apps/allocator created
daemonset.apps/lbnodeagent created
error: unable to recognize "purelb/purelb-complete.yaml": no matches for kind "LBNodeAgent" in version "purelb.io/v1"

$ kubectl apply -f purelb/purelb-complete.yaml
namespace/purelb unchanged
customresourcedefinition.apiextensions.k8s.io/lbnodeagents.purelb.io configured
customresourcedefinition.apiextensions.k8s.io/servicegroups.purelb.io configured
serviceaccount/allocator unchanged
serviceaccount/lbnodeagent unchanged
Warning: policy/v1beta1 PodSecurityPolicy is deprecated in v1.21+, unavailable in v1.25+
podsecuritypolicy.policy/allocator configured
podsecuritypolicy.policy/lbnodeagent configured
role.rbac.authorization.k8s.io/pod-lister unchanged
clusterrole.rbac.authorization.k8s.io/purelb:allocator unchanged
clusterrole.rbac.authorization.k8s.io/purelb:lbnodeagent unchanged
rolebinding.rbac.authorization.k8s.io/pod-lister unchanged
clusterrolebinding.rbac.authorization.k8s.io/purelb:allocator unchanged
clusterrolebinding.rbac.authorization.k8s.io/purelb:lbnodeagent unchanged
deployment.apps/allocator unchanged
daemonset.apps/lbnodeagent unchanged
lbnodeagent.purelb.io/default created

请注意,由于 Kubernetes 的最终一致性架构,此manifest清单的第一个应用程序可能会失败。发生这种情况是因为清单既定义了CRD,又使用该CRD创建了资源。如果发生这种情况,请再次应用manifest清单,应该就会部署成功。

Please note that due to Kubernetes’ eventually-consistent architecture the first application of this manifest can fail. This happens because the manifest both defines a Custom Resource Definition and creates a resource using that definition. If this happens then apply the manifest again and it should succeed because Kubernetes will have processed the definition in the mean time.

检查一下部署的服务

1
2
3
4
5
6
7
8
9
10
11
12
13
14
15
16
17
18
19
20
21
22
23
$ kubectl get pods -n purelb -o wide
NAME READY STATUS RESTARTS AGE IP NODE NOMINATED NODE READINESS GATES
allocator-5bf9ddbf9b-p976d 1/1 Running 0 2m 10.0.2.140 tiny-cilium-worker-188-12.k8s.tcinternal <none> <none>
lbnodeagent-df2hn 1/1 Running 0 2m 10.31.188.12 tiny-cilium-worker-188-12.k8s.tcinternal <none> <none>
lbnodeagent-jxn9h 1/1 Running 0 2m 10.31.188.1 tiny-cilium-master-188-1.k8s.tcinternal <none> <none>
lbnodeagent-xn8dz 1/1 Running 0 2m 10.31.188.11 tiny-cilium-worker-188-11.k8s.tcinternal <none> <none>

$ kubectl get deploy -n purelb
NAME READY UP-TO-DATE AVAILABLE AGE
allocator 1/1 1 1 10m
[root@tiny-cilium-master-188-1 purelb]# kubectl get ds -n purelb
NAME DESIRED CURRENT READY UP-TO-DATE AVAILABLE NODE SELECTOR AGE
lbnodeagent 3 3 3 3 3 kubernetes.io/os=linux 10m

$ kubectl get crd | grep purelb
lbnodeagents.purelb.io 2022-05-20T06:42:01Z
servicegroups.purelb.io 2022-05-20T06:42:01Z

$ kubectl get --namespace=purelb servicegroups.purelb.io
No resources found in purelb namespace.
$ kubectl get --namespace=purelb lbnodeagent.purelb.io
NAME AGE
default 55m

和MetalLB/OpenELB不一样的是,PureLB使用了另外的一个单独的虚拟网卡kube-lb0而不是默认的kube-ipvs0网卡

1
2
3
4
5
$ ip addr show kube-lb0
15: kube-lb0: <BROADCAST,NOARP,UP,LOWER_UP> mtu 1500 qdisc noqueue state UNKNOWN group default qlen 1000
link/ether 12:27:b1:48:4e:3a brd ff:ff:ff:ff:ff:ff
inet6 fe80::1027:b1ff:fe48:4e3a/64 scope link
valid_lft forever preferred_lft forever

2.3 配置purelb

上面部署的时候我们知道purelb主要创建了两个CRD,分别是lbnodeagents.purelb.ioservicegroups.purelb.io

1
2
3
4
$ kubectl api-resources --api-group=purelb.io
NAME SHORTNAMES APIVERSION NAMESPACED KIND
lbnodeagents lbna,lbnas purelb.io/v1 true LBNodeAgent
servicegroups sg,sgs purelb.io/v1 true ServiceGroup

2.3.1 lbnodeagents.purelb.io

默认情况下已经创建好了一个名为defaultlbnodeagent,我们可以看一下它的几个配置项

1
2
3
4
5
6
7
8
9
10
11
12
13
14
15
16
17
18
19
20
21
22
23
24
25
26
27
28
29
30
31
32
33
34
$ kubectl describe --namespace=purelb lbnodeagent.purelb.io/default
Name: default
Namespace: purelb
Labels: <none>
Annotations: <none>
API Version: purelb.io/v1
Kind: LBNodeAgent
Metadata:
Creation Timestamp: 2022-05-20T06:42:23Z
Generation: 1
Managed Fields:
API Version: purelb.io/v1
Fields Type: FieldsV1
fieldsV1:
f:metadata:
f:annotations:
.:
f:kubectl.kubernetes.io/last-applied-configuration:
f:spec:
.:
f:local:
.:
f:extlbint:
f:localint:
Manager: kubectl-client-side-apply
Operation: Update
Time: 2022-05-20T06:42:23Z
Resource Version: 1765489
UID: 59f0ad8c-1024-4432-8f95-9ad574b28fff
Spec:
Local:
Extlbint: kube-lb0
Localint: default
Events: <none>

注意上面的Spec:Local:字段中的ExtlbintLocalint

  • Extlbint字段指定的是PureLB使用的虚拟网卡名称,默认为kube-lb0,如果修改为自定义名称,记得同时修改bird中的配置
  • Localint字段指定的是用来实际通信的物理网卡,默认情况下会使用正则表达式来匹配,当然也可以自定义,如果集群节点是单网卡机器基本无需修改

2.3.2 servicegroups.purelb.io

servicegroups默认情况下并没有创建,需要我们进行手动配置,注意purellb是支持ipv6的,配置方式和ipv4一致,只是这里没有需求就没有单独配置v6pool。

1
2
3
4
5
6
7
8
9
10
11
apiVersion: purelb.io/v1
kind: ServiceGroup
metadata:
name: layer2-ippool
namespace: purelb
spec:
local:
v4pool:
subnet: '10.31.188.64/26'
pool: '10.31.188.64-10.31.188.126'
aggregation: /32

然后我们直接部署并检查

1
2
3
4
5
6
7
8
9
10
11
12
13
14
15
16
17
18
19
20
21
22
23
24
25
26
27
28
29
30
31
32
33
34
35
36
37
38
39
40
41
42
43
44
45
46
47
48
49
$ kubectl apply -f purelb-ipam.yaml
servicegroup.purelb.io/layer2-ippool created

$ kubectl get sg -n purelb
NAME AGE
layer2-ippool 50s

$ kubectl describe sg -n purelb
Name: layer2-ippool
Namespace: purelb
Labels: <none>
Annotations: <none>
API Version: purelb.io/v1
Kind: ServiceGroup
Metadata:
Creation Timestamp: 2022-05-20T07:58:32Z
Generation: 1
Managed Fields:
API Version: purelb.io/v1
Fields Type: FieldsV1
fieldsV1:
f:metadata:
f:annotations:
.:
f:kubectl.kubernetes.io/last-applied-configuration:
f:spec:
.:
f:local:
.:
f:v4pool:
.:
f:aggregation:
f:pool:
f:subnet:
Manager: kubectl-client-side-apply
Operation: Update
Time: 2022-05-20T07:58:32Z
Resource Version: 1774182
UID: 92422ea9-231d-4280-a8b5-ec6c61605dd9
Spec:
Local:
v4pool:
Aggregation: /32
Pool: 10.31.188.64-10.31.188.126
Subnet: 10.31.188.64/26
Events:
Type Reason Age From Message
---- ------ ---- ---- -------
Normal Parsed 4m13s purelb-allocator ServiceGroup parsed successfully

2.4 部署service

PureLB的部分CRD特性需要我们手动在Service中通过添加注解(annotations)来启用,这里我们只需要指定purelb.io/service-group来确定使用的IP池即可

1
2
annotations:
purelb.io/service-group: layer2-ippool

完整的测试服务相关manifest如下:

1
2
3
4
5
6
7
8
9
10
11
12
13
14
15
16
17
18
19
20
21
22
23
24
25
26
27
28
29
30
31
32
33
34
35
36
37
38
39
40
41
42
43
44
45
46
47
48
49
50
51
52
53
54
55
56
57
58
59
60
61
62
63
64
65
66
67
68
69
70
71
72
73
74
75
76
77
78
79
80
81
82
83
84
85
86
87
88
89
90
91
92
apiVersion: v1
kind: Namespace
metadata:
name: nginx-quic

---

apiVersion: apps/v1
kind: Deployment
metadata:
name: nginx-lb
namespace: nginx-quic
spec:
selector:
matchLabels:
app: nginx-lb
replicas: 4
template:
metadata:
labels:
app: nginx-lb
spec:
containers:
- name: nginx-lb
image: tinychen777/nginx-quic:latest
imagePullPolicy: IfNotPresent
ports:
- containerPort: 80

---

apiVersion: v1
kind: Service
metadata:
annotations:
purelb.io/service-group: layer2-ippool
name: nginx-lb-service
namespace: nginx-quic
spec:
allocateLoadBalancerNodePorts: false
externalTrafficPolicy: Cluster
internalTrafficPolicy: Cluster
selector:
app: nginx-lb
ports:
- protocol: TCP
port: 80 # match for service access port
targetPort: 80 # match for pod access port
type: LoadBalancer

---

apiVersion: v1
kind: Service
metadata:
annotations:
purelb.io/service-group: layer2-ippool
name: nginx-lb2-service
namespace: nginx-quic
spec:
allocateLoadBalancerNodePorts: false
externalTrafficPolicy: Cluster
internalTrafficPolicy: Cluster
selector:
app: nginx-lb
ports:
- protocol: TCP
port: 80 # match for service access port
targetPort: 80 # match for pod access port
type: LoadBalancer


---

apiVersion: v1
kind: Service
metadata:
annotations:
purelb.io/service-group: layer2-ippool
name: nginx-lb3-service
namespace: nginx-quic
spec:
allocateLoadBalancerNodePorts: false
externalTrafficPolicy: Cluster
internalTrafficPolicy: Cluster
selector:
app: nginx-lb
ports:
- protocol: TCP
port: 80 # match for service access port
targetPort: 80 # match for pod access port
type: LoadBalancer

确认没有问题之后我们直接部署,会创建namespace/nginx-quicdeployment.apps/nginx-lbservice/nginx-lb-serviceservice/nginx-lb2-serviceservice/nginx-lb3-service 这几个资源

1
2
3
4
5
6
7
8
9
10
11
12
$ kubectl apply -f nginx-quic-lb.yaml
namespace/nginx-quic unchanged
deployment.apps/nginx-lb created
service/nginx-lb-service created
service/nginx-lb2-service created
service/nginx-lb3-service created

$ kubectl get svc -n nginx-quic
NAME TYPE CLUSTER-IP EXTERNAL-IP PORT(S) AGE
nginx-lb-service LoadBalancer 10.188.54.81 10.31.188.64 80/TCP 101s
nginx-lb2-service LoadBalancer 10.188.34.171 10.31.188.65 80/TCP 101s
nginx-lb3-service LoadBalancer 10.188.6.24 10.31.188.66 80/TCP 101s

查看k8s的服务日志就能知道VIP在哪个节点上

1
2
3
4
5
6
7
8
9
10
11
12
13
14
15
16
17
18
19
20
21
22
23
24
25
26
27
28
29
30
31
32
33
34
35
36
37
38
39
40
41
42
43
44
45
46
47
48
49
50
51
52
53
54
55
56
57
58
59
60
61
62
63
64
65
66
67
68
69
70
71
72
73
74
75
76
77
$ kubectl describe service nginx-lb-service -n nginx-quic
Name: nginx-lb-service
Namespace: nginx-quic
Labels: <none>
Annotations: purelb.io/allocated-by: PureLB
purelb.io/allocated-from: layer2-ippool
purelb.io/announcing-IPv4: tiny-cilium-worker-188-11.k8s.tcinternal,eth0
purelb.io/service-group: layer2-ippool
Selector: app=nginx-lb
Type: LoadBalancer
IP Family Policy: SingleStack
IP Families: IPv4
IP: 10.188.54.81
IPs: 10.188.54.81
LoadBalancer Ingress: 10.31.188.64
Port: <unset> 80/TCP
TargetPort: 80/TCP
Endpoints: 10.0.1.45:80,10.0.1.49:80,10.0.2.181:80 + 1 more...
Session Affinity: None
External Traffic Policy: Cluster
Events:
Type Reason Age From Message
---- ------ ---- ---- -------
Normal AddressAssigned 3m12s purelb-allocator Assigned {Ingress:[{IP:10.31.188.64 Hostname: Ports:[]}]} from pool layer2-ippool
Normal AnnouncingLocal 3m8s (x7 over 3m12s) purelb-lbnodeagent Node tiny-cilium-worker-188-11.k8s.tcinternal announcing 10.31.188.64 on interface eth0

$ kubectl describe service nginx-lb2-service -n nginx-quic
Name: nginx-lb2-service
Namespace: nginx-quic
Labels: <none>
Annotations: purelb.io/allocated-by: PureLB
purelb.io/allocated-from: layer2-ippool
purelb.io/announcing-IPv4: tiny-cilium-master-188-1.k8s.tcinternal,eth0
purelb.io/service-group: layer2-ippool
Selector: app=nginx-lb
Type: LoadBalancer
IP Family Policy: SingleStack
IP Families: IPv4
IP: 10.188.34.171
IPs: 10.188.34.171
LoadBalancer Ingress: 10.31.188.65
Port: <unset> 80/TCP
TargetPort: 80/TCP
Endpoints: 10.0.1.45:80,10.0.1.49:80,10.0.2.181:80 + 1 more...
Session Affinity: None
External Traffic Policy: Cluster
Events:
Type Reason Age From Message
---- ------ ---- ---- -------
Normal AddressAssigned 4m20s purelb-allocator Assigned {Ingress:[{IP:10.31.188.65 Hostname: Ports:[]}]} from pool layer2-ippool
Normal AnnouncingLocal 4m17s (x5 over 4m20s) purelb-lbnodeagent Node tiny-cilium-master-188-1.k8s.tcinternal announcing 10.31.188.65 on interface eth0

$ kubectl describe service nginx-lb3-service -n nginx-quic
Name: nginx-lb3-service
Namespace: nginx-quic
Labels: <none>
Annotations: purelb.io/allocated-by: PureLB
purelb.io/allocated-from: layer2-ippool
purelb.io/announcing-IPv4: tiny-cilium-worker-188-11.k8s.tcinternal,eth0
purelb.io/service-group: layer2-ippool
Selector: app=nginx-lb
Type: LoadBalancer
IP Family Policy: SingleStack
IP Families: IPv4
IP: 10.188.6.24
IPs: 10.188.6.24
LoadBalancer Ingress: 10.31.188.66
Port: <unset> 80/TCP
TargetPort: 80/TCP
Endpoints: 10.0.1.45:80,10.0.1.49:80,10.0.2.181:80 + 1 more...
Session Affinity: None
External Traffic Policy: Cluster
Events:
Type Reason Age From Message
---- ------ ---- ---- -------
Normal AddressAssigned 4m33s purelb-allocator Assigned {Ingress:[{IP:10.31.188.66 Hostname: Ports:[]}]} from pool layer2-ippool
Normal AnnouncingLocal 4m29s (x6 over 4m33s) purelb-lbnodeagent Node tiny-cilium-worker-188-11.k8s.tcinternal announcing 10.31.188.66 on interface eth0

我们找一台局域网内的其他机器查看可以发现三个VIP的mac地址并不完全一样,符合上面的日志输出结果

1
2
3
4
$ ip neigh | grep 10.31.188.6
10.31.188.65 dev eth0 lladdr 52:54:00:69:0a:ab REACHABLE
10.31.188.64 dev eth0 lladdr 52:54:00:3c:88:cb REACHABLE
10.31.188.66 dev eth0 lladdr 52:54:00:3c:88:cb REACHABLE

我们再查看节点上面的网络地址,除了大家都有的kube-ipvs0网卡上面有所有的VIP,PureLB和MetalLB/OpenELB最大的不同在于PureLB还能在对应节点的物理网卡上面准确地看到对应的Service所属的VIP。

1
2
3
4
5
6
7
8
9
10
11
12
13
14
15
16
17
18
19
20
21
22
23
24
25
26
27
28
29
30
$ ansible cilium -m command -a "ip addr show eth0"
10.31.188.11 | CHANGED | rc=0 >>
2: eth0: <BROADCAST,MULTICAST,UP,LOWER_UP> mtu 1500 qdisc pfifo_fast state UP group default qlen 1000
link/ether 52:54:00:3c:88:cb brd ff:ff:ff:ff:ff:ff
inet 10.31.188.11/16 brd 10.31.255.255 scope global noprefixroute eth0
valid_lft forever preferred_lft forever
inet 10.31.188.64/16 brd 10.31.255.255 scope global secondary eth0
valid_lft forever preferred_lft forever
inet 10.31.188.66/16 brd 10.31.255.255 scope global secondary eth0
valid_lft forever preferred_lft forever
inet6 fe80::5054:ff:fe3c:88cb/64 scope link
valid_lft forever preferred_lft forever

10.31.188.12 | CHANGED | rc=0 >>
2: eth0: <BROADCAST,MULTICAST,UP,LOWER_UP> mtu 1500 qdisc pfifo_fast state UP group default qlen 1000
link/ether 52:54:00:32:a7:42 brd ff:ff:ff:ff:ff:ff
inet 10.31.188.12/16 brd 10.31.255.255 scope global noprefixroute eth0
valid_lft forever preferred_lft forever
inet6 fe80::5054:ff:fe32:a742/64 scope link
valid_lft forever preferred_lft forever

10.31.188.1 | CHANGED | rc=0 >>
2: eth0: <BROADCAST,MULTICAST,UP,LOWER_UP> mtu 1500 qdisc pfifo_fast state UP group default qlen 1000
link/ether 52:54:00:69:0a:ab brd ff:ff:ff:ff:ff:ff
inet 10.31.188.1/16 brd 10.31.255.255 scope global noprefixroute eth0
valid_lft forever preferred_lft forever
inet 10.31.188.65/16 brd 10.31.255.255 scope global secondary eth0
valid_lft forever preferred_lft forever
inet6 fe80::5054:ff:fe69:aab/64 scope link
valid_lft forever preferred_lft forever

2.5 指定VIP

同样的,需要指定IP的话我们可以添加spec:loadBalancerIP:字段来指定VIP

1
2
3
4
5
6
7
8
9
10
11
12
13
14
15
16
17
18
19
apiVersion: v1
kind: Service
metadata:
annotations:
purelb.io/service-group: layer2-ippool
name: nginx-lb4-service
namespace: nginx-quic
spec:
allocateLoadBalancerNodePorts: false
externalTrafficPolicy: Cluster
internalTrafficPolicy: Cluster
selector:
app: nginx-lb
ports:
- protocol: TCP
port: 80 # match for service access port
targetPort: 80 # match for pod access port
type: LoadBalancer
loadBalancerIP: 10.31.188.100

2.6 关于nodeport

PureLB支持allocateLoadBalancerNodePorts特性,可以通过设置allocateLoadBalancerNodePorts: false关闭自动为LoadBalancer服务分配nodeport这个功能。

3、ECMP模式

因为purelb使用了Linux的网络栈,因此在ECMP的实现这一块就有更多的选择,这里我们参考官方的实现方案,使用BGP+Bird的方案来实现。

IP Hostname
10.31.188.1 tiny-cilium-master-188-1.k8s.tcinternal
10.31.188.11 tiny-cilium-worker-188-11.k8s.tcinternal
10.31.188.12 tiny-cilium-worker-188-12.k8s.tcinternal
10.188.0.0/18 serviceSubnet
10.31.254.251 BGP-Router(frr)
10.189.0.0/16 PuerLB-BGP-IPpool

其中PureLB的ASN是64515,路由器的ASN为64512。

3.1 准备工作

我们先把官方的GitHub仓库拉到本地,然后实际上我们部署需要的配置文件只有bird-cm.ymlbird.yml这两个即可。

1
2
3
$ git clone https://gitlab.com/purelb/bird_router.git
$ ls bird*yml
bird-cm.yml bird.yml

接下来我们对其进行一些修改,首先是configmap文件bird-cm.yml,我们只需要修改descriptionasneighbor这三个字段:

  • description:建立BGP连接的路由器的描述,一般我习惯命名为IP的数字加横杠
  • as:自己的ASN
  • neighbor:建立BGP连接的路由器的IP地址
  • namespace:官方默认新建了一个routernamespace来管理,这里我们为了方便统一到purelb
1
2
3
4
5
6
7
8
9
10
11
12
13
14
15
16
17
18
19
20
21
22
23
apiVersion: v1
kind: ConfigMap
metadata:
name: bird-cm
namespace: purelb
# 中间略过一堆配置
protocol bgp uplink1 {
description "10-31-254-251";
local k8sipaddr as 64515;
neighbor 10.31.254.251 external;

ipv4 { # IPv4 unicast (1/1)
# RTS_DEVICE matches routes added to kube-lb0 by protocol device
export where source ~ [ RTS_STATIC, RTS_BGP, RTS_DEVICE ];
import filter bgp_reject; # we are only advertizing
};

ipv6 { # IPv6 unicast
# RTS_DEVICE matches routes added to kube-lb0 by protocol device
export where source ~ [ RTS_STATIC, RTS_BGP, RTS_DEVICE ];
import filter bgp_reject;
};
}

接下来是bird的daemonset配置文件,这里不一定要根据我的步骤修改,大家可以按照实际需求来处理

  • namespace:官方默认新建了一个routernamespace来管理,这里我们为了方便统一到purelb
  • imagePullPolicy:官方默认是Always,这里我们修改为IfNotPresent
1
2
3
4
5
6
7
8
apiVersion: apps/v1
kind: DaemonSet
metadata:
name: bird
namespace: purelb
# 中间略过一堆配置
image: registry.gitlab.com/purelb/bird_router:latest
imagePullPolicy: IfNotPresent

3.2 部署bird

部署的话非常简单,直接部署上面的两个配置文件即可,注意上面我们把namespace修改为了purelb,因此这里创建namespace这一步可以省略

1
2
3
4
5
6
7
8
# Create the router namespace
$ kubectl create namespace router

# Apply the edited configmap
$ kubectl apply -f bird-cm.yml

# Deploy the Bird Router
$ kubectl apply -f bird.yml

接着我们检查一下部署的状态

1
2
3
4
5
6
7
8
9
10
11
12
13
14
15
16
17
18
$ kubectl get ds -n purelb
NAME DESIRED CURRENT READY UP-TO-DATE AVAILABLE NODE SELECTOR AGE
bird 2 2 2 0 2 <none> 27m
lbnodeagent 3 3 3 3 3 kubernetes.io/os=linux 42h

$ kubectl get cm -n purelb
NAME DATA AGE
bird-cm 1 28m
kube-root-ca.crt 1 42h

$ kubectl get pods -n purelb
NAME READY STATUS RESTARTS AGE
allocator-5bf9ddbf9b-p976d 1/1 Running 0 42h
bird-4qtrm 1/1 Running 0 16s
bird-z9cq2 1/1 Running 0 49s
lbnodeagent-df2hn 1/1 Running 0 42h
lbnodeagent-jxn9h 1/1 Running 0 42h
lbnodeagent-xn8dz 1/1 Running 0 42h

默认情况下bird不会调度到master节点,这样可以保证master节点不参与到ECMP的负载均衡中,减少master节点上面的网络流量从而提高master的稳定性

如果想让master也参与到ECMP中,可以在bird.yaml的daemonset配置中新增如下配置

1
2
3
tolerations:
- effect: NoSchedule
key: node-role.kubernetes.io/master

3.3 配置路由器

路由器我们还是使用frr来进行配置

1
2
3
4
5
6
7
8
9
10
11
12
13
14
15
16
17
18
19
20
21
22
23
24
25
26
27
28
29
30
root@tiny-openwrt-plus:~# cat /etc/frr/frr.conf
frr version 8.2.2
frr defaults traditional
hostname tiny-openwrt-plus
log file /home/frr/frr.log
log syslog
password zebra
!
router bgp 64512
bgp router-id 10.31.254.251
no bgp ebgp-requires-policy
!
neighbor 10.31.188.11 remote-as 64515
neighbor 10.31.188.11 description 10-31-188-11
neighbor 10.31.188.12 remote-as 64515
neighbor 10.31.188.12 description 10-31-188-12
!
!
address-family ipv4 unicast
!maximum-paths 3
exit-address-family
exit
!
access-list vty seq 5 permit 127.0.0.0/8
access-list vty seq 10 deny any
!
line vty
access-class vty
exit
!

配置完成之后我们重启服务,然后查看路由器这端的BGP状态,这时候看到和两个worker节点之间的BGP状态建立正常就说明配置没有问题

1
2
3
4
5
6
7
8
9
tiny-openwrt-plus# show ip bgp summary

IPv4 Unicast Summary (VRF default):
BGP router identifier 10.31.254.251, local AS number 64512 vrf-id 0

Neighbor V AS MsgRcvd MsgSent TblVer InQ OutQ Up/Down State/PfxRcd PfxSnt Desc
10.31.188.11 4 64515 3 4 0 0 0 00:00:13 0 3 10-31-188-11
10.31.188.12 4 64515 3 4 0 0 0 00:00:13 0 3 10-31-188-12

3.4 创建ServiceGroup

我们还需要给BGP模式创建一个ServiceGroup,用于管理BGP网段的IP,建议IP段使用和k8s的宿主机节点不同网段的IP

1
2
3
4
5
6
7
8
9
10
11
apiVersion: purelb.io/v1
kind: ServiceGroup
metadata:
name: bgp-ippool
namespace: purelb
spec:
local:
v4pool:
subnet: '10.189.0.0/16'
pool: '10.189.0.0-10.189.255.254'
aggregation: /32

完成之后我们直接部署并检查

1
2
3
4
5
6
7
$ kubectl apply -f purelb-sg-bgp.yaml
servicegroup.purelb.io/bgp-ippool created

$ kubectl get sg -n purelb
NAME AGE
bgp-ippool 7s
layer2-ippool 41h

3.5 部署测试服务

这里我们还是直接使用上面已经创建的nginx-lb这个deployments,然后直接新建两个service进行测试

1
2
3
4
5
6
7
8
9
10
11
12
13
14
15
16
17
18
19
20
21
22
23
24
25
26
27
28
29
30
31
32
33
34
35
36
37
38
39
40
41
apiVersion: v1
kind: Service
metadata:
annotations:
purelb.io/service-group: bgp-ippool
name: nginx-lb5-service
namespace: nginx-quic
spec:
allocateLoadBalancerNodePorts: false
externalTrafficPolicy: Cluster
internalTrafficPolicy: Cluster
selector:
app: nginx-lb
ports:
- protocol: TCP
port: 80 # match for service access port
targetPort: 80 # match for pod access port
type: LoadBalancer


---

apiVersion: v1
kind: Service
metadata:
annotations:
purelb.io/service-group: bgp-ippool
name: nginx-lb6-service
namespace: nginx-quic
spec:
allocateLoadBalancerNodePorts: false
externalTrafficPolicy: Cluster
internalTrafficPolicy: Cluster
selector:
app: nginx-lb
ports:
- protocol: TCP
port: 80 # match for service access port
targetPort: 80 # match for pod access port
type: LoadBalancer
loadBalancerIP: 10.189.100.100

此时我们检查部署的状态

1
2
3
4
5
6
7
8
$ kubectl get svc -n nginx-quic
NAME TYPE CLUSTER-IP EXTERNAL-IP PORT(S) AGE
nginx-lb-service LoadBalancer 10.188.54.81 10.31.188.64 80/TCP 40h
nginx-lb2-service LoadBalancer 10.188.34.171 10.31.188.65 80/TCP 40h
nginx-lb3-service LoadBalancer 10.188.6.24 10.31.188.66 80/TCP 40h
nginx-lb4-service LoadBalancer 10.188.50.164 10.31.188.100 80/TCP 40h
nginx-lb5-service LoadBalancer 10.188.7.75 10.189.0.0 80/TCP 11s
nginx-lb6-service LoadBalancer 10.188.27.208 10.189.100.100 80/TCP 11s

再使用curl进行测试

1
2
3
4
5
6
7
8
9
10
11
12
13
14
15
16
17
18
19
20
21
22
23
24
25
[root@tiny-centos7-100-2 ~]# curl 10.189.100.100
10.0.1.47:57768
[root@tiny-centos7-100-2 ~]# curl 10.189.100.100
10.0.1.47:57770
[root@tiny-centos7-100-2 ~]# curl 10.189.100.100
10.31.188.11:47439
[root@tiny-centos7-100-2 ~]# curl 10.189.100.100
10.31.188.11:33964
[root@tiny-centos7-100-2 ~]# curl 10.189.100.100
10.0.1.47:57776
[root@tiny-centos7-100-2 ~]# curl 10.189.100.100
10.0.1.47:57778

[root@tiny-centos7-100-2 ~]# curl 10.189.0.0
10.31.188.12:53078
[root@tiny-centos7-100-2 ~]# curl 10.189.0.0
10.0.2.151:59660
[root@tiny-centos7-100-2 ~]# curl 10.189.0.0
10.0.2.151:59662
[root@tiny-centos7-100-2 ~]# curl 10.189.0.0
10.31.188.12:21972
[root@tiny-centos7-100-2 ~]# curl 10.189.0.0
10.31.188.12:28855
[root@tiny-centos7-100-2 ~]# curl 10.189.0.0
10.0.2.151:59668

然后我们再查看kube-lb0网卡上面的IP信息,可以看到每台节点上面都有两个BGP模式的LoadBalancer的IP

1
2
3
4
5
6
7
8
9
10
11
12
13
14
15
16
17
18
19
20
21
22
23
24
25
26
27
28
[tinychen /root/ansible]# ansible cilium -m command -a "ip addr show kube-lb0"
10.31.188.11 | CHANGED | rc=0 >>
19: kube-lb0: <BROADCAST,NOARP,UP,LOWER_UP> mtu 1500 qdisc noqueue state UNKNOWN group default qlen 1000
link/ether d6:65:b8:31:18:ce brd ff:ff:ff:ff:ff:ff
inet 10.189.0.0/32 scope global kube-lb0
valid_lft forever preferred_lft forever
inet 10.189.100.100/32 scope global kube-lb0
valid_lft forever preferred_lft forever
inet6 fe80::d465:b8ff:fe31:18ce/64 scope link
valid_lft forever preferred_lft forever
10.31.188.12 | CHANGED | rc=0 >>
21: kube-lb0: <BROADCAST,NOARP,UP,LOWER_UP> mtu 1500 qdisc noqueue state UNKNOWN group default qlen 1000
link/ether aa:10:d5:cd:2b:98 brd ff:ff:ff:ff:ff:ff
inet 10.189.0.0/32 scope global kube-lb0
valid_lft forever preferred_lft forever
inet 10.189.100.100/32 scope global kube-lb0
valid_lft forever preferred_lft forever
inet6 fe80::a810:d5ff:fecd:2b98/64 scope link
valid_lft forever preferred_lft forever
10.31.188.1 | CHANGED | rc=0 >>
15: kube-lb0: <BROADCAST,NOARP,UP,LOWER_UP> mtu 1500 qdisc noqueue state UNKNOWN group default qlen 1000
link/ether 12:27:b1:48:4e:3a brd ff:ff:ff:ff:ff:ff
inet 10.189.0.0/32 scope global kube-lb0
valid_lft forever preferred_lft forever
inet 10.189.100.100/32 scope global kube-lb0
valid_lft forever preferred_lft forever
inet6 fe80::1027:b1ff:fe48:4e3a/64 scope link
valid_lft forever preferred_lft forever

最后我们查看路由器上面的路由表,可以确定ECMP开启成功

1
2
3
4
5
6
7
8
9
10
11
12
13
14
tiny-openwrt-plus# show ip route
Codes: K - kernel route, C - connected, S - static, R - RIP,
O - OSPF, I - IS-IS, B - BGP, E - EIGRP, N - NHRP,
T - Table, v - VNC, V - VNC-Direct, A - Babel, F - PBR,
f - OpenFabric,
> - selected route, * - FIB route, q - queued, r - rejected, b - backup
t - trapped, o - offload failure

K>* 0.0.0.0/0 [0/0] via 10.31.254.254, eth0, 00:08:51
C>* 10.31.0.0/16 is directly connected, eth0, 00:08:51
B>* 10.189.0.0/32 [20/0] via 10.31.188.11, eth0, weight 1, 00:00:19
* via 10.31.188.12, eth0, weight 1, 00:00:19
B>* 10.189.100.100/32 [20/0] via 10.31.188.11, eth0, weight 1, 00:00:19
* via 10.31.188.12, eth0, weight 1, 00:00:19

4、总结

PureLB和前面我们提到过的MetalLB以及OpenELB有着非常大的不同,尽管三者的主要工作模式都是分为Layer2模式和BGP模式。还是老规矩,我们先来看两种工作模式的优缺点,再来总结PureLB。

4.1 Layer2 mode优缺点

优点:

  • 通用性强,对比BGP模式不需要BGP路由器支持,几乎可以适用于任何网络环境;当然云厂商的网络环境例外
  • VIP会被分散到多个节点上面,解决了MetalLB和OpenELB的Layer2模式下的流量单点瓶颈问题
  • 使用了Linux网络栈,可以通过iproute之类的命令直接查看到vip所在的节点

缺点:

  • 当VIP所在节点宕机之后,需要较长时间进行故障转移(官方没说多久),PureLB和MetalLB一样都使用了memberlist来进行选主(并表示此举更优),当VIP所在节点宕机之后重新选主的时间要比传统的keepalived使用的vrrp协议(一般为1s)要更长

改进方案:

  • 有条件的可以考虑使用BGP模式
  • 可以针对一个负载workload创建多个service,并对外暴露多个VIP,由于PureLB会把VIP分散到多个节点上,这样可以一定程度上实现高可用
  • 既不能用BGP模式也不能接受Layer2模式的,基本和目前主流的三个开源负载均衡器无缘了(三者都是Layer2模式和BGP模式且原理类似,优缺点相同)

4.2 ECMP mode优缺点

ECMP模式的优缺点几乎和Layer2模式相反

优点:

  • 无单点故障,在开启ECMP的前提下,k8s集群内所有的节点都有请求流量,都会参与负载均衡并转发请求
  • 支持了Linux网络栈,因此可以使用bird、quagga、frr等各种路由软件实现标准的路由协议

缺点:

  • 条件苛刻,需要有特殊路由器支持,配置起来也更复杂;
  • ECMP的故障转移(failover)并不是特别地优雅,这个问题的严重程度取决于使用的ECMP算法;当集群的节点出现变动导致BGP连接出现变动,所有的连接都会进行重新哈希(使用三元组或五元组哈希),这对一些服务来说可能会有影响;

路由器中使用的哈希值通常 不稳定,因此每当后端集的大小发生变化时(例如,当一个节点的 BGP 会话关闭时),现有的连接将被有效地随机重新哈希,这意味着大多数现有的连接最终会突然被转发到不同的后端,而这个后端可能和此前的后端毫不相干且不清楚上下文状态信息。

改进方案:

PureLB官方只简单提及了使用路由协议的一些问题

Depending on the router and its configuration, load balancing techniques will vary however they are all generally based upon a 4 tuple hash of sourceIP, sourcePort, destinationIP, destinationPort. The router will also have a limit to the number of ECMP paths that can be used, in modern TOR switches, this can be set to a size larger than a /24 subnet, however in old routers, the count can be less than 10. This needs to be considered in the infrastructure design and PureLB combined with routing software can help create a design that avoids this limitation. Another important consideration can be how the router load balancer cache is populated and updated when paths are removed, again modern devices provide better behavior.

不过由于都是使用ECMP,我们可以参考MetalLB官方给出的资料,下面是MetalLB给出的一些改进方案,列出来给大家参考一下

  • 使用更稳定的ECMP算法来减少后端变动时对现有连接的影响,如“resilient ECMP” or “resilient LAG”
  • 将服务部署到特定的节点上减少可能带来的影响
  • 在流量低峰期进行变更
  • 将服务分开部署到两个不同的LoadBalanceIP的服务中,然后利用DNS进行流量切换
  • 在客户端加入透明的用户无感的重试逻辑
  • 在LoadBalance后面加入一层ingress来实现更优雅的failover(但是并不是所有的服务都可以使用ingress)
  • 接受现实……(Accept that there will be occasional bursts of reset connections. For low-availability internal services, this may be acceptable as-is.)

4.3 PureLB优缺点

这里尽量客观的总结概况一些客观事实,是否为优缺点可能会因人而异:

  • PureLB使用了CRD来实现更优秀的IPAM,也是三者中唯一一个支持外置IPAM的
  • PureLB对Linux网络栈有更好的支持(可以使用iproute等工具查看LoadBalancerVIP)
  • PureLB可以使用任意路由协议实现ECMP(BGP、OSPF等)
  • PureLB和使用BGP模式的CNI集成更加方便
  • PureLB的社区热度不如MetalLB和OpenELB,也没有加入CNCF,只表示CNCF提供了一个slack通道给用户进行交流(The CNCF have generously provided the PureLB community a Slack Channel in the Kubernetes workspace.)
  • PureLB的文档相对齐全,但是还是有些小纰漏
  • PureLB的Layer2模式不存在单点流量瓶颈

总的来说PureLB是一款非常不错的云原生负载均衡器,在软件本身的设计模式上面应该是参考了MetalLB等前辈的思路,同时又青出于蓝而胜于蓝。唯一美中不足的是社区热度不高,让人有些担心这个项目以后的发展情况。如果在三者中选一个使用layer2模式的话,个人推荐首选PureLB;如果是使用BGP模式,则建议结合自己的CNI组件和IPAM等情况综合考虑。