k8s系列07-负载均衡器之OpenELB

本文最后更新于:May 23, 2022 pm

本文主要在k8s原生集群上部署v0.4.4版本的OpenELB作为k8s的LoadBalancer,主要涉及OpenELBLayer2模式BGP模式两种部署方案。由于BGP的相关原理和配置比较复杂,这里仅涉及简单的BGP配置。

文中使用的k8s集群是在CentOS7系统上基于dockercalico组件部署v1.23.6版本,此前写的一些关于k8s基础知识和集群搭建的一些方案,有需要的同学可以看一下。

1、工作原理

1.1 简介

OpenELB 是一个开源的云原生负载均衡器实现,可以在基于裸金属服务器、边缘以及虚拟化的 Kubernetes 环境中使用 LoadBalancer 类型的 Service 对外暴露服务。OpenELB 项目最初由 KubeSphere 社区 发起,目前已作为 CNCF 沙箱项目 加入 CNCF 基金会,由 OpenELB 开源社区维护与支持。

与MetalLB类似,OpenELB也拥有两种主要工作模式:Layer2模式和BGP模式。OpenELB的BGP模式目前暂不支持IPv6。

无论是Layer2模式还是BGP模式,核心思路都是通过某种方式将特定VIP的流量引到k8s集群中,然后再通过kube-proxy将流量转发到后面的特定服务。

1.2 Layer2模式

Layer2模式需要我们的k8s集群基础环境支持发送anonymous ARP/NDP packets。因为OpenELB是针对裸金属服务器设计的,因此如果是在云环境中部署,需要注意是否满足条件。

下图来自OpenELB官方,这里简单阐述一下Layer2模式的工作原理:

  • 图中有一个类型为LoadBalancer的Service,其VIP为192.168.0.91(和k8s的节点相同网段),后端有两个pod(分别为pod1和pod2)
  • 安装在 Kubernetes 集群中的 OpenELB 随机选择一个节点(图中为 worker 1)来处理 Service 请求。当局域网中出现arp request数据包来查询192.168.0.91的mac地址的时候,OpenELB会进行回应(使用 worker 1 的 MAC 地址),此时路由器(也可能是交换机)将 Service 的VIP 192.168.0.91和 worker 1 的 MAC 地址绑定,之后所有请求到192.168.0.91的数据包都会被转发到worker1上
  • Service 流量到达 worker 1 后, worker 1 上的 kube-proxy 将流量转发到后端的两个pod进行负载均衡,这些pod不一定在work1上

主要的工作流程就如同上面描述的一般,但是还有几个需要额外注意的点:

  • 如果 worker 1 出现故障,OpenELB 会重新向路由器发送 APR/NDP 数据包,将 Service IP 地址映射到 worker 2 的 MAC 地址,Service 流量切换到 worker 2
  • 主备切换过程并不是瞬间完成的,中间会产生一定时间的服务中断(具体多久官方也没说,实际上应该是却决于检测到节点宕机的时间加上重新选主的时间)
  • 如果集群中已经部署了多个 openelb-manager 副本,OpenELB 使用 Kubernetes 的领导者选举特性算法来进行选主,从而确保只有一个副本响应 ARP/NDP 请求

1.3 BGP模式

OpenELB的BGP模式使用的是gobgp实现的BGP协议,通过使用BGP协议和路由器建立BGP连接并实现ECMP负载均衡,从而实现高可用的LoadBalancer。

我们还是借用官网的图来解释一下这个流程,注意BGP模式暂不支持IPv6。

  • 图中有一个类型为LoadBalancer的Service,其VIP为172.22.0.2(和k8s的节点不同网段),后端有两个pod(分别为pod1和pod2)
  • 安装在 Kubernetes 集群中的 OpenELB 与 BGP 路由器建立 BGP 连接,并将去往 172.22.0.2 的路由发布到 BGP 路由器,在配置得当的情况下,路由器上面的路由表可以看到 172.22.0.2 这个VIP的下一条有多个节点(均为k8s的宿主机节点)
  • 当外部客户端机器尝试访问 Service 时,BGP 路由器根据从 OpenELB 获取的路由,在 master、worker 1 和 worker 2 节点之间进行流量负载均衡。Service 流量到达一个节点后,该节点上的 kube-proxy 将流量转发到后端的两个pod进行负载均衡,这些pod不一定在该节点上

2、Layer2 Mode

2.1 配置ARP参数

部署Layer2模式需要把k8s集群中的ipvs配置打开strictARP,开启之后k8s集群中的kube-proxy会停止响应kube-ipvs0网卡之外的其他网卡的arp请求,而由MetalLB接手处理。

strict ARP开启之后相当于把 将 arp_ignore 设置为 1 并将 arp_announce 设置为 2 启用严格的 ARP,这个原理和LVS中的DR模式对RS的配置一样,可以参考之前的文章中的解释

strict ARP configure arp_ignore and arp_announce to avoid answering ARP queries from kube-ipvs0 interface

1
2
3
4
5
6
7
8
9
10
11
12
13
14
15
16
17
18
19
20
21
# 查看kube-proxy中的strictARP配置
$ kubectl get configmap -n kube-system kube-proxy -o yaml | grep strictARP
strictARP: false

# 手动修改strictARP配置为true
$ kubectl edit configmap -n kube-system kube-proxy
configmap/kube-proxy edited

# 使用命令直接修改并对比不同
$ kubectl get configmap kube-proxy -n kube-system -o yaml | sed -e "s/strictARP: false/strictARP: true/" | kubectl diff -f - -n kube-system

# 确认无误后使用命令直接修改并生效
$ kubectl get configmap kube-proxy -n kube-system -o yaml | sed -e "s/strictARP: false/strictARP: true/" | kubectl apply -f - -n kube-system

# 重启kube-proxy确保配置生效
$ kubectl rollout restart ds kube-proxy -n kube-system

# 确认配置生效
$ kubectl get configmap -n kube-system kube-proxy -o yaml | grep strictARP
strictARP: true

2.2 部署openelb

这里我们还是使用yaml进行部署,官方把所有部署的资源整合到了一个文件中,我们还是老规矩先下载到本地再进行部署

1
2
3
4
5
6
7
8
9
10
11
12
13
14
15
16
17
18
19
20
21
22
23
24
25
$ wget https://raw.githubusercontent.com/openelb/openelb/master/deploy/openelb.yaml

$ kubectl apply -f openelb.yaml
namespace/openelb-system created
customresourcedefinition.apiextensions.k8s.io/bgpconfs.network.kubesphere.io created
customresourcedefinition.apiextensions.k8s.io/bgppeers.network.kubesphere.io created
customresourcedefinition.apiextensions.k8s.io/eips.network.kubesphere.io created
serviceaccount/kube-keepalived-vip created
serviceaccount/openelb-admission created
role.rbac.authorization.k8s.io/leader-election-role created
role.rbac.authorization.k8s.io/openelb-admission created
clusterrole.rbac.authorization.k8s.io/kube-keepalived-vip created
clusterrole.rbac.authorization.k8s.io/openelb-admission created
clusterrole.rbac.authorization.k8s.io/openelb-manager-role created
rolebinding.rbac.authorization.k8s.io/leader-election-rolebinding created
rolebinding.rbac.authorization.k8s.io/openelb-admission created
clusterrolebinding.rbac.authorization.k8s.io/kube-keepalived-vip created
clusterrolebinding.rbac.authorization.k8s.io/openelb-admission created
clusterrolebinding.rbac.authorization.k8s.io/openelb-manager-rolebinding created
service/openelb-admission created
deployment.apps/openelb-manager created
job.batch/openelb-admission-create created
job.batch/openelb-admission-patch created
mutatingwebhookconfiguration.admissionregistration.k8s.io/openelb-admission created
validatingwebhookconfiguration.admissionregistration.k8s.io/openelb-admission created

接下来我们看看都部署了什么CRD资源,这几个CRD资源主要就是方便我们管理openelb,这也是OpenELB相对MetalLB的优势。

1
2
3
4
5
6
7
8
9
10
$ kubectl get crd
NAME CREATED AT
bgpconfs.network.kubesphere.io 2022-05-19T06:37:19Z
bgppeers.network.kubesphere.io 2022-05-19T06:37:19Z
eips.network.kubesphere.io 2022-05-19T06:37:19Z

$ kubectl get ns openelb-system -o wide
NAME STATUS AGE
openelb-system Active 2m27s

实际上主要工作的负载就是这两个jobs.batch和这一个deployment

1
2
3
4
5
6
7
8
9
10
11
12
13
14
$ kubectl get pods -n openelb-system
NAME READY STATUS RESTARTS AGE
openelb-admission-create-57tzm 0/1 Completed 0 5m11s
openelb-admission-patch-j5pl4 0/1 Completed 0 5m11s
openelb-manager-5cdc8697f9-h2wd6 1/1 Running 0 5m11s

$ kubectl get deploy -n openelb-system
NAME READY UP-TO-DATE AVAILABLE AGE
openelb-manager 1/1 1 1 5m38s

$ kubectl get jobs.batch -n openelb-system
NAME COMPLETIONS DURATION AGE
openelb-admission-create 1/1 11s 11m
openelb-admission-patch 1/1 12s 11m

2.3 创建EIP

接下来我们需要配置loadbalancerIP所在的网段资源,这里我们创建一个Eip对象来进行定义,后面对IP段的管理也是在这里进行。

1
2
3
4
5
6
7
8
9
10
11
12
13
14
15
16
17
18
19
20
21
22
23
24
25
26
27
28
29
30
31
32
33
34
35
36
37
38
39
40
41
42
43
44
apiVersion: network.kubesphere.io/v1alpha2
kind: Eip
metadata:
# Eip 对象的名称。
name: eip-layer2-pool
spec:
# Eip 对象的地址池
address: 10.31.88.101-10.31.88.200

# openELB的运行模式,默认为bgp
protocol: layer2

# OpenELB 在其上侦听 ARP/NDP 请求的网卡。该字段仅在protocol设置为时有效layer2。
interface: eth0

# 指定是否禁用 Eip 对象
# false表示可以继续分配
# true表示不再继续分配
disable: false

status:

# 指定 Eip 对象中的IP地址是否已用完。
occupied: false

# 指定 Eip 对象中有多少个 IP 地址已分配给服务。
# 直接留空,系统会自动生成
usage:

# Eip 对象中的 IP 地址总数。
poolSize: 100

# 指定使用的 IP 地址和使用 IP 地址的服务。服务以Namespace/Service name格式显示(例如,default/test-svc)。
# 直接留空,系统会自动生成
used:

# Eip 对象中的第一个 IP 地址。
firstIP: 10.31.88.101
# Eip 对象中的最后一个 IP 地址。
lastIP: 10.31.88.200

ready: true
# 指定IP协议栈是否为 IPv4。目前,OpenELB 仅支持 IPv4,其值只能是true.
v4: true

配置完成后我们直接部署即可

1
2
$ kubectl apply -f openelb/openelb-eip.yaml
eip.network.kubesphere.io/eip-layer2-pool created

部署完成后检查eip的状态

1
2
3
$ kubectl get eip
NAME CIDR USAGE TOTAL
eip-layer2-pool 10.31.88.101-10.31.88.200 100

2.4 创建测试服务

然后我们创建对应的服务

1
2
3
4
5
6
7
8
9
10
11
12
13
14
15
16
17
18
19
20
21
22
23
24
25
26
27
28
29
30
31
32
33
34
35
36
37
38
39
40
41
42
43
44
45
46
47
48
49
50
51
52
53
54
55
56
57
58
59
60
61
62
63
64
65
66
67
68
69
70
71
72
73
74
75
76
77
78
79
80
81
82
83
84
85
86
87
88
apiVersion: v1
kind: Namespace
metadata:
name: nginx-quic

---

apiVersion: apps/v1
kind: Deployment
metadata:
name: nginx-lb
namespace: nginx-quic
spec:
selector:
matchLabels:
app: nginx-lb
replicas: 4
template:
metadata:
labels:
app: nginx-lb
spec:
containers:
- name: nginx-lb
image: tinychen777/nginx-quic:latest
imagePullPolicy: IfNotPresent
ports:
- containerPort: 80

---

apiVersion: v1
kind: Service
metadata:
name: nginx-lb-service
namespace: nginx-quic
spec:
allocateLoadBalancerNodePorts: false
externalTrafficPolicy: Cluster
internalTrafficPolicy: Cluster
selector:
app: nginx-lb
ports:
- protocol: TCP
port: 80 # match for service access port
targetPort: 80 # match for pod access port
type: LoadBalancer


---

apiVersion: v1
kind: Service
metadata:
name: nginx-lb2-service
namespace: nginx-quic
spec:
allocateLoadBalancerNodePorts: false
externalTrafficPolicy: Cluster
internalTrafficPolicy: Cluster
selector:
app: nginx-lb
ports:
- protocol: TCP
port: 80 # match for service access port
targetPort: 80 # match for pod access port
type: LoadBalancer

---

apiVersion: v1
kind: Service
metadata:
name: nginx-lb3-service
namespace: nginx-quic
spec:
allocateLoadBalancerNodePorts: false
externalTrafficPolicy: Cluster
internalTrafficPolicy: Cluster
selector:
app: nginx-lb
ports:
- protocol: TCP
port: 80 # match for service access port
targetPort: 80 # match for pod access port
type: LoadBalancer


然后我们检查部署状态:

1
2
3
4
5
6
7
8
9
10
11
12
$ kubectl apply -f nginx-quic-lb.yaml
namespace/nginx-quic unchanged
deployment.apps/nginx-lb created
service/nginx-lb-service created
service/nginx-lb2-service created
service/nginx-lb3-service created

$ kubectl get svc -n nginx-quic
NAME TYPE CLUSTER-IP EXTERNAL-IP PORT(S) AGE
nginx-lb-service LoadBalancer 10.88.17.248 10.31.88.101 80:30643/TCP 58m
nginx-lb2-service LoadBalancer 10.88.13.220 10.31.88.102 80:31114/TCP 58m
nginx-lb3-service LoadBalancer 10.88.18.110 10.31.88.103 80:30485/TCP 58m

此时我们再查看eip的状态可以看到新部署的三个LoadBalancer服务:

1
2
3
4
5
6
7
8
9
10
11
12
13
14
15
16
17
18
19
20
21
22
23
24
25
26
27
28
29
30
31
32
33
34
35
36
37
38
39
$ kubectl get eip
NAME CIDR USAGE TOTAL
eip-layer2-pool 10.31.88.101-10.31.88.200 3 100

[root@tiny-calico-master-88-1 tiny-calico]# kubectl get eip -o yaml
apiVersion: v1
items:
- apiVersion: network.kubesphere.io/v1alpha2
kind: Eip
metadata:
annotations:
kubectl.kubernetes.io/last-applied-configuration: |
{"apiVersion":"network.kubesphere.io/v1alpha2","kind":"Eip","metadata":{"annotations":{},"name":"eip-layer2-pool"},"spec":{"address":"10.31.88.101-10.31.88.200","disable":false,"interface":"eth0","protocol":"layer2"},"status":{"firstIP":"10.31.88.101","lastIP":"10.31.88.200","occupied":false,"poolSize":100,"ready":true,"usage":1,"used":{"10.31.88.101":"nginx-quic/nginx-lb-service"},"v4":true}}
creationTimestamp: "2022-05-19T08:21:58Z"
finalizers:
- finalizer.ipam.kubesphere.io/v1alpha1
generation: 2
name: eip-layer2-pool
resourceVersion: "1623927"
uid: 9b091518-7b64-43ae-9fd4-abaf50563160
spec:
address: 10.31.88.101-10.31.88.200
interface: eth0
protocol: layer2
status:
firstIP: 10.31.88.101
lastIP: 10.31.88.200
poolSize: 100
ready: true
usage: 3
used:
10.31.88.101: nginx-quic/nginx-lb-service
10.31.88.102: nginx-quic/nginx-lb2-service
10.31.88.103: nginx-quic/nginx-lb3-service
v4: true
kind: List
metadata:
resourceVersion: ""
selfLink: ""

2.5 关于nodeport

openELB似乎并不支持allocateLoadBalancerNodePorts字段,在指定了allocateLoadBalancerNodePortsfalse的情况下还是为服务创建了nodeport,查看部署后的配置可以发现参数被修改回了true,并且无法修改为false

1
2
3
4
5
6
7
8
[root@tiny-calico-master-88-1 tiny-calico]# kubectl get svc -n nginx-quic
NAME TYPE CLUSTER-IP EXTERNAL-IP PORT(S) AGE
nginx-lb-service LoadBalancer 10.88.17.248 10.31.88.101 80:30643/TCP 106m
nginx-lb2-service LoadBalancer 10.88.13.220 10.31.88.102 80:31114/TCP 106m
nginx-lb3-service LoadBalancer 10.88.18.110 10.31.88.113 80:30485/TCP 106m

[root@tiny-calico-master-88-1 tiny-calico]# kubectl get svc -n nginx-quic nginx-lb-service -o yaml | grep "allocateLoadBalancerNodePorts:"
allocateLoadBalancerNodePorts: true

2.6 关于VIP

2.6.1 如何查找VIP

Layer2模式下,所有的k8s节点的kube-ipvs0接口上都会看到所有的VIP,因此确定VIP的节点还是和MetalLB一样,需要通过查看pod中的日志,或者是看arp表来确定

1
2
3
4
5
6
7
$ kubectl logs -f -n  openelb-system openelb-manager-5cdc8697f9-h2wd6
...省略一堆日志输出...
{"level":"info","ts":1652949142.6426723,"logger":"IPAM","msg":"assignIP","args":{"Key":"nginx-quic/nginx-lb3-service","Addr":"10.31.88.113","Eip":"eip-layer2-pool","Protocol":"layer2","Unalloc":false},"result":{"Addr":"10.31.88.113","Eip":"eip-layer2-pool","Protocol":"layer2","Sp":{}},"err":null}
{"level":"info","ts":1652949142.65095,"logger":"arpSpeaker","msg":"map ingress ip","ingress":"10.31.88.113","nodeIP":"10.31.88.1","nodeMac":"52:54:00:74:eb:11"}
{"level":"info","ts":1652949142.6509972,"logger":"arpSpeaker","msg":"send gratuitous arp packet","eip":"10.31.88.113","nodeIP":"10.31.88.1","hwAddr":"52:54:00:74:eb:11"}
{"level":"info","ts":1652949142.6510363,"logger":"arpSpeaker","msg":"send gratuitous arp packet","eip":"10.31.88.113","nodeIP":"10.31.88.1","hwAddr":"52:54:00:74:eb:11"}
{"level":"info","ts":1652949142.6849823,"msg":"setup openelb service","service":"nginx-quic/nginx-lb3-service"}

查看arp表来确定MAC地址从而确定VIP所在的节点

1
2
3
4
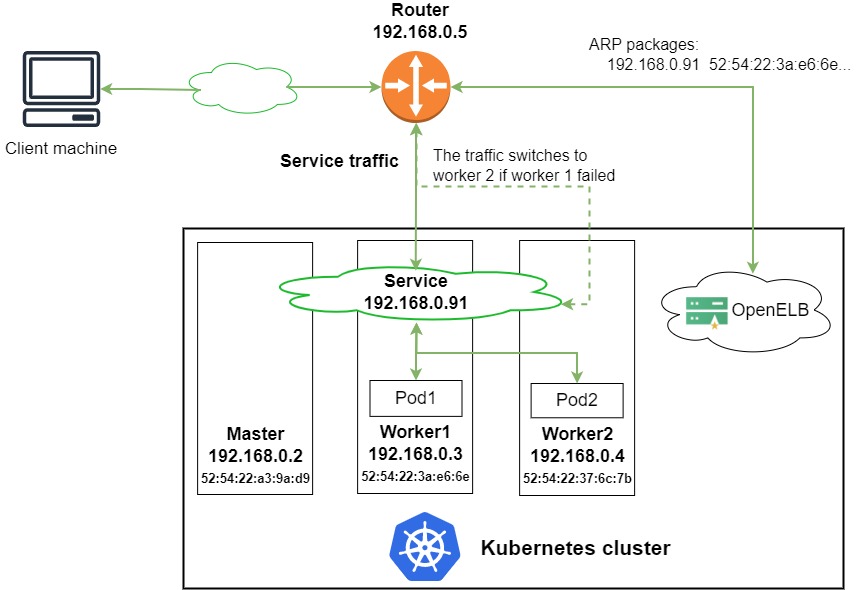
$ ip neigh  | grep 10.31.88.113
10.31.88.113 dev eth0 lladdr 52:54:00:74:eb:11 STALE
$ arp -a | grep 10.31.88.113
? (10.31.88.113) at 52:54:00:74:eb:11 [ether] on eth0

2.6.2 如何指定VIP

如果需要指定VIP,我们还是在service中修改loadBalancerIP字段从而指定VIP:

1
2
3
4
5
6
7
8
9
10
11
12
13
14
15
16
17
18
19
20
21
22
apiVersion: v1
kind: Service
metadata:
name: nginx-lb3-service
namespace: nginx-quic
annotations:
lb.kubesphere.io/v1alpha1: openelb
protocol.openelb.kubesphere.io/v1alpha1: layer2
eip.openelb.kubesphere.io/v1alpha2: eip-layer2-pool
spec:
allocateLoadBalancerNodePorts: true
externalTrafficPolicy: Cluster
internalTrafficPolicy: Cluster
selector:
app: nginx-lb
ports:
- protocol: TCP
port: 80 # match for service access port
targetPort: 80 # match for pod access port
type: LoadBalancer
# 使用 loadBalancerIP 字段从而指定VIP
loadBalancerIP: 10.31.88.113

修改完成之后我们重新部署,openelb会自动生效并且将服务的EXTERNAL-IP变更为新IP。

1
2
3
4
5
$ kubectl get svc -n nginx-quic -o wide
NAME TYPE CLUSTER-IP EXTERNAL-IP PORT(S) AGE SELECTOR
nginx-lb-service LoadBalancer 10.88.17.248 10.31.88.101 80:30643/TCP 18h app=nginx-lb
nginx-lb2-service LoadBalancer 10.88.13.220 10.31.88.102 80:31114/TCP 18h app=nginx-lb
nginx-lb3-service LoadBalancer 10.88.18.110 10.31.88.113 80:30485/TCP 18h app=nginx-lb

2.7 Layer2 工作原理

我们查看pod的日志,可以看到更多的详细信息:

1
2
3
4
5
6
7
8
9
$ kubectl logs -f -n  openelb-system openelb-manager-5cdc8697f9-h2wd6
...省略一堆日志输出...
{"level":"info","ts":1652950197.1421876,"logger":"arpSpeaker","msg":"got ARP request, sending response","interface":"eth0","ip":"10.31.88.101","senderIP":"10.31.254.250","senderMAC":"6c:b1:58:56:e9:d4","responseMAC":"52:54:00:56:df:ae"}
{"level":"info","ts":1652950496.9334905,"logger":"arpSpeaker","msg":"got ARP request, sending response","interface":"eth0","ip":"10.31.88.102","senderIP":"10.31.254.250","senderMAC":"6c:b1:58:56:e9:d4","responseMAC":"52:54:00:74:eb:11"}
{"level":"info","ts":1652950497.1327593,"logger":"arpSpeaker","msg":"got ARP request, sending response","interface":"eth0","ip":"10.31.88.113","senderIP":"10.31.254.250","senderMAC":"6c:b1:58:56:e9:d4","responseMAC":"52:54:00:74:eb:11"}
{"level":"info","ts":1652950497.1528928,"logger":"arpSpeaker","msg":"got ARP request, sending response","interface":"eth0","ip":"10.31.88.101","senderIP":"10.31.254.250","senderMAC":"6c:b1:58:56:e9:d4","responseMAC":"52:54:00:56:df:ae"}
{"level":"info","ts":1652950796.9339302,"logger":"arpSpeaker","msg":"got ARP request, sending response","interface":"eth0","ip":"10.31.88.102","senderIP":"10.31.254.250","senderMAC":"6c:b1:58:56:e9:d4","responseMAC":"52:54:00:74:eb:11"}
{"level":"info","ts":1652950797.1334393,"logger":"arpSpeaker","msg":"got ARP request, sending response","interface":"eth0","ip":"10.31.88.113","senderIP":"10.31.254.250","senderMAC":"6c:b1:58:56:e9:d4","responseMAC":"52:54:00:74:eb:11"}
{"level":"info","ts":1652950797.1572392,"logger":"arpSpeaker","msg":"got ARP request, sending response","interface":"eth0","ip":"10.31.88.101","senderIP":"10.31.254.250","senderMAC":"6c:b1:58:56:e9:d4","responseMAC":"52:54:00:56:df:ae"}

可以看到openelb-manager会持续的监听局域网中的ARP request请求,当遇到请求的IP是自己IP池里面已经使用的VIP时会主动响应。如果openelb-manager存在多个副本的时候,它们会先使用k8s的选主算法来进行选主,然后再由选举出来的主节点进行ARP报文的响应。

  • In Layer 2 mode, OpenELB uses the leader election feature of Kubernetes to ensure that only one replica responds to ARP/NDP requests.

3、OpenELB-manager高可用

默认情况下,openelb-manager只会部署一个副本,对于可用性要求较高的生产环境可能无法满足需求,官方也给出了部署多个副本的教程。

官方教程的方式是推荐通过给节点添加label的方式来控制副本的部署数量和位置,这里我们将其配置为每个节点都运行一个服务(类似于daemonset)。首先我们给需要部署的节点打上labels。

1
2
3
4
5
6
7
8
9
# 我们给集群内的三个节点都打上label
$ kubectl label --overwrite nodes tiny-calico-master-88-1.k8s.tcinternal tiny-calico-worker-88-11.k8s.tcinternal tiny-calico-worker-88-12.k8s.tcinternal lb.kubesphere.io/v1alpha1=openelb


# 查看当前节点的labels
$ kubectl get nodes -o wide --show-labels=true | grep openelb
tiny-calico-master-88-1.k8s.tcinternal Ready control-plane,master 16d v1.23.6 10.31.88.1 <none> CentOS Linux 7 (Core) 3.10.0-1160.62.1.el7.x86_64 docker://20.10.14 beta.kubernetes.io/arch=amd64,beta.kubernetes.io/os=linux,kubernetes.io/arch=amd64,kubernetes.io/hostname=tiny-calico-master-88-1.k8s.tcinternal,kubernetes.io/os=linux,lb.kubesphere.io/v1alpha1=openelb,node-role.kubernetes.io/control-plane=,node-role.kubernetes.io/master=,node.kubernetes.io/exclude-from-external-load-balancers=
tiny-calico-worker-88-11.k8s.tcinternal Ready <none> 16d v1.23.6 10.31.88.11 <none> CentOS Linux 7 (Core) 3.10.0-1160.62.1.el7.x86_64 docker://20.10.14 beta.kubernetes.io/arch=amd64,beta.kubernetes.io/os=linux,kubernetes.io/arch=amd64,kubernetes.io/hostname=tiny-calico-worker-88-11.k8s.tcinternal,kubernetes.io/os=linux,lb.kubesphere.io/v1alpha1=openelb
tiny-calico-worker-88-12.k8s.tcinternal Ready <none> 16d v1.23.6 10.31.88.12 <none> CentOS Linux 7 (Core) 3.10.0-1160.62.1.el7.x86_64 docker://20.10.14 beta.kubernetes.io/arch=amd64,beta.kubernetes.io/os=linux,kubernetes.io/arch=amd64,kubernetes.io/hostname=tiny-calico-worker-88-12.k8s.tcinternal,kubernetes.io/os=linux,lb.kubesphere.io/v1alpha1=openelb

然后我们先把副本的数量缩容到0。

1
$ kubectl scale deployment openelb-manager --replicas=0 -n openelb-system

接着修改配置,在部署节点的nodeSelector字段中增加我们前面新加的labels

1
2
3
4
5
6
$ kubectl get deployment openelb-manager -n openelb-system -o yaml
...略去一堆输出...
nodeSelector:
kubernetes.io/os: linux
lb.kubesphere.io/v1alpha1: openelb
...略去一堆输出...

扩容副本数量到3。

1
$ kubectl scale deployment openelb-manager --replicas=3 -n openelb-system

检查deployment状态

1
2
3
4
5
6
7
$ kubectl get po -n openelb-system -o wide
NAME READY STATUS RESTARTS AGE IP NODE NOMINATED NODE READINESS GATES
openelb-admission-create-fvfzk 0/1 Completed 0 78m 10.88.84.89 tiny-calico-worker-88-11.k8s.tcinternal <none> <none>
openelb-admission-patch-tlmns 0/1 Completed 1 78m 10.88.84.90 tiny-calico-worker-88-11.k8s.tcinternal <none> <none>
openelb-manager-6457bdd569-6n9zr 1/1 Running 0 62m 10.31.88.1 tiny-calico-master-88-1.k8s.tcinternal <none> <none>
openelb-manager-6457bdd569-c6qfd 1/1 Running 0 62m 10.31.88.12 tiny-calico-worker-88-12.k8s.tcinternal <none> <none>
openelb-manager-6457bdd569-gh995 1/1 Running 0 62m 10.31.88.11 tiny-calico-worker-88-11.k8s.tcinternal <none> <none>

至此就完成了openelb-manager的高可用部署改造。

4、BGP Mode

IP Hostname
10.31.88.1 tiny-calico-master-88-1.k8s.tcinternal
10.31.88.11 tiny-calico-worker-88-11.k8s.tcinternal
10.31.88.12 tiny-calico-worker-88-12.k8s.tcinternal
10.88.64.0/18 podSubnet
10.88.0.0/18 serviceSubnet
10.89.0.0/16 OpenELB-BGP-IPpool
10.31.254.251 BGP Router

这里路由器的AS号为64512,OpenELB的AS号为64154。

4.1 创建BGP配置

这里我们需要创建两个CRD,分别为BgpConfBgpPeer,用来配置对端BGP路由器的信息和自己OpenELB的BGP配置。

  • 需要特别注意的是bgpconf这里配置的监听端口,OpenELB在默认情况下会同时监听IPv4和IPv6网络栈,因此需要确保集群开启了IPv6网络栈,否则会无法正确建立BGP连接。pod内的报错日志类似"listen tcp6 [::]:17900: socket: address family not supported by protocol"
  • 如果k8s集群的CNI插件使用的是类似calico的bgp模式,已经使用了服务器的179端口,那么listenPort就要修改为其他端口避免冲突,这里我们修改为17900避免和集群的calico使用的bird冲突
1
2
3
4
5
6
7
8
9
10
11
12
13
14
15
16
17
18
19
20
21
22
23
24
25
26
27
28
29
30
31
32
33
34
35
36
37
38
39
40
41
42
43
44
45
46
47
48
49
50
51
52
53
54
apiVersion: network.kubesphere.io/v1alpha2

kind: BgpConf

metadata:
# BgpConf 对象的名称,无需设置,因此openelb只认default,设置成别的会被忽略
name: default

spec:
# openelb 的ASN,必须与BgpPeer配置中的spec:conf:peerAS值不同。
as: 64514

# OpenELB 监听的端口。默认值为179(默认 BGP 端口号)。
# 如果 Kubernetes 集群中的其他组件(例如 Calico)也使用 BGP 和 179 端口,则必须设置不同的值以避免冲突。
listenPort: 17900

# 本地路由器ID,通常设置为Kubernetes主节点的主网卡IP地址。
# 如果不指定该字段,则使用openelb-manager所在节点的第一个IP地址。
routerId: 10.31.88.1

---

apiVersion: network.kubesphere.io/v1alpha2

kind: BgpPeer

metadata:

# BgpPeer 对象的名称
name: bgppeer-openwrt-plus
spec:
conf:
# 对端BGP路由器的ASN,必须与BgpConf配置中的spec:as值不同。
peerAs: 64512
# 对端BGP路由器的IP
neighborAddress: 10.31.254.251

# 指定IP协议栈(IPv4/IPv6)。
# 不用修改,因此目前,OpenELB 仅支持 IPv4。
afiSafis:
- config:
family:
afi: AFI_IP
safi: SAFI_UNICAST
enabled: true
addPaths:
config:
# OpenELB 可以发送到对等 BGP 路由器以进行等价多路径 (ECMP) 路由的最大等效路由数。
sendMax: 10
nodeSelector:
matchLabels:
# 如果 Kubernetes 集群节点部署在不同的路由器下,并且每个节点都有一个 OpenELB 副本,则需要配置此字段,以便正确节点上的 OpenELB 副本与对端 BGP 路由器建立 BGP 连接。
# 默认情况下,所有 openelb-manager 副本都会响应 BgpPeer 配置并尝试与对等 BGP 路由器建立 BGP 连接。
openelb.kubesphere.io/rack: leaf1

然后我们部署并查看信息

1
2
3
4
5
6
7
8
9
$ kubectl apply -f openelb/openelb-bgp.yaml
bgpconf.network.kubesphere.io/default created
bgppeer.network.kubesphere.io/bgppeer-openwrt-plus created
$ kubectl get bgpconf
NAME AGE
default 16s
$ kubectl get bgppeer
NAME AGE
bgppeer-openwrt-plus 20s

4.2 修改EIP

和之前的Layer2模式类似,我们也需要创建一个BGP模式使用的Eip。

1
2
3
4
5
6
7
8
9
10
11
12
13
14
15
16
17
18
19
20
21
22
23
24
25
26
27
28
29
30
31
32
33
34
35
36
37
38
39
40
41
42
43
apiVersion: network.kubesphere.io/v1alpha2
kind: Eip
metadata:
# Eip 对象的名称。
name: eip-bgp-pool
spec:
# Eip 对象的地址池
address: 10.89.0.1-10.89.255.254

# openELB的运行模式,默认为bgp
protocol: bgp

# OpenELB 在其上侦听 ARP/NDP 请求的网卡。该字段仅在protocol设置为时有效layer2。
interface: eth0

# 指定是否禁用 Eip 对象
# false表示可以继续分配
# true表示不再继续分配
disable: false
status:

# 指定 Eip 对象中的IP地址是否已用完。
occupied: false

# 指定 Eip 对象中有多少个 IP 地址已分配给服务。
# 直接留空,系统会自动生成
usage:

# Eip 对象中的 IP 地址总数。
poolSize: 65534

# 指定使用的 IP 地址和使用 IP 地址的服务。服务以Namespace/Service name格式显示(例如,default/test-svc)。
# 直接留空,系统会自动生成
used:

# Eip 对象中的第一个 IP 地址。
firstIP: 10.89.0.1
# Eip 对象中的最后一个 IP 地址。
lastIP: 10.89.255.254

ready: true
# 指定IP协议栈是否为 IPv4。目前,OpenELB 仅支持 IPv4,其值只能是true.
v4: true

然后我们部署并查看信息,可以看到两个eip资源都存在系统中。

1
2
3
4
5
6
$ kubectl apply -f openelb/openelb-eip-bgp.yaml
eip.network.kubesphere.io/eip-bgp-pool created
[root@tiny-calico-master-88-1 tiny-calico]# kubectl get eip
NAME CIDR USAGE TOTAL
eip-bgp-pool 10.89.0.1-10.89.255.254 65534
eip-layer2-pool 10.31.88.101-10.31.88.200 3 100

4.3 配置路由器

以家里常见的openwrt路由器为例,我们先在上面安装quagga组件,当然要是使用的openwrt版本编译了frr模块的话推荐使用frr来进行配置。

如果使用的是别的发行版Linux(如CentOS或者Debian)推荐直接使用frr进行配置。

我们先在openwrt上面直接使用opkg安装quagga

1
2
$ opkg update 
$ opkg install quagga quagga-zebra quagga-bgpd quagga-vtysh

如果使用的openwrt版本足够新,是可以直接使用opkg安装frr组件的

1
2
$ opkg update 
$ opkg install frr frr-babeld frr-bfdd frr-bgpd frr-eigrpd frr-fabricd frr-isisd frr-ldpd frr-libfrr frr-nhrpd frr-ospf6d frr-ospfd frr-pbrd frr-pimd frr-ripd frr-ripngd frr-staticd frr-vrrpd frr-vtysh frr-watchfrr frr-zebra

如果是使用frr记得在配置中开启bgpd参数再重启frr

1
2
$ sed -i 's/bgpd=no/bgpd=yes/g' /etc/frr/daemons
$ /etc/init.d/frr restart

路由器这边我们使用frr进行BGP协议的配置,需要注意的是因为前面我们把端口修改为17900,因此这里也需要进行同步配置节点端口为17900。

1
2
3
4
5
6
7
8
9
10
11
12
13
14
15
16
17
18
19
20
21
22
23
24
25
26
27
28
29
30
31
32
33
34
35
36
37
38
39
root@tiny-openwrt-plus:~# cat /etc/frr/frr.conf
frr version 8.2.2
frr defaults traditional
hostname tiny-openwrt-plus
log file /home/frr/frr.log
log syslog
!
password zebra
!
router bgp 64512
bgp router-id 10.31.254.251
no bgp ebgp-requires-policy
!
!
neighbor 10.31.88.1 remote-as 64514
neighbor 10.31.88.1 port 17900
neighbor 10.31.88.1 description 10-31-88-1

neighbor 10.31.88.11 remote-as 64514
neighbor 10.31.88.11 port 17900
neighbor 10.31.88.11 description 10-31-88-11

neighbor 10.31.88.12 remote-as 64514
neighbor 10.31.88.12 port 17900
neighbor 10.31.88.12 description 10-31-88-12
!
!
address-family ipv4 unicast
!maximum-paths 3
exit-address-family
exit
!
access-list vty seq 5 permit 127.0.0.0/8
access-list vty seq 10 deny any
!
line vty
access-class vty
exit
!

4.4 部署测试服务

这里我们创建两个服务进行测试,需要注意和上面的layer2模式不同,这里的注解要同步修改为使用bgp和对应的eip。

1
2
3
4
5
6
7
8
9
10
11
12
13
14
15
16
17
18
19
20
21
22
23
24
25
26
27
28
29
30
31
32
33
34
35
36
37
38
39
40
41
42
43
44
apiVersion: v1
kind: Service
metadata:
name: nginx-lb2-service
namespace: nginx-quic
annotations:
lb.kubesphere.io/v1alpha1: openelb
protocol.openelb.kubesphere.io/v1alpha1: bgp
eip.openelb.kubesphere.io/v1alpha2: eip-bgp-pool
spec:
allocateLoadBalancerNodePorts: false
externalTrafficPolicy: Cluster
internalTrafficPolicy: Cluster
selector:
app: nginx-lb
ports:
- protocol: TCP
port: 80 # match for service access port
targetPort: 80 # match for pod access port
type: LoadBalancer

---

apiVersion: v1
kind: Service
metadata:
name: nginx-lb3-service
namespace: nginx-quic
annotations:
lb.kubesphere.io/v1alpha1: openelb
protocol.openelb.kubesphere.io/v1alpha1: bgp
eip.openelb.kubesphere.io/v1alpha2: eip-bgp-pool
spec:
allocateLoadBalancerNodePorts: false
externalTrafficPolicy: Cluster
internalTrafficPolicy: Cluster
selector:
app: nginx-lb
ports:
- protocol: TCP
port: 80 # match for service access port
targetPort: 80 # match for pod access port
type: LoadBalancer
loadBalancerIP: 10.89.100.100

部署完成之后我们再查看服务的状态,可以看到没有指定loadBalancerIP的服务会自动按顺序分配一个可用IP,而指定了IP的会分配为我们手动指定的IP,同时layer2模式的也可以共存。

1
2
3
4
5
6
7
8
9
$ kubectl get eip -A
NAME CIDR USAGE TOTAL
eip-bgp-pool 10.89.0.1-10.89.255.254 2 65534
eip-layer2-pool 10.31.88.101-10.31.88.200 1 100
$ kubectl get svc -n nginx-quic
NAME TYPE CLUSTER-IP EXTERNAL-IP PORT(S) AGE
nginx-lb-service LoadBalancer 10.88.15.40 10.31.88.101 80:30972/TCP 2m48s
nginx-lb2-service LoadBalancer 10.88.60.227 10.89.0.1 80:30425/TCP 2m48s
nginx-lb3-service LoadBalancer 10.88.11.160 10.89.100.100 80:30597/TCP 2m48s

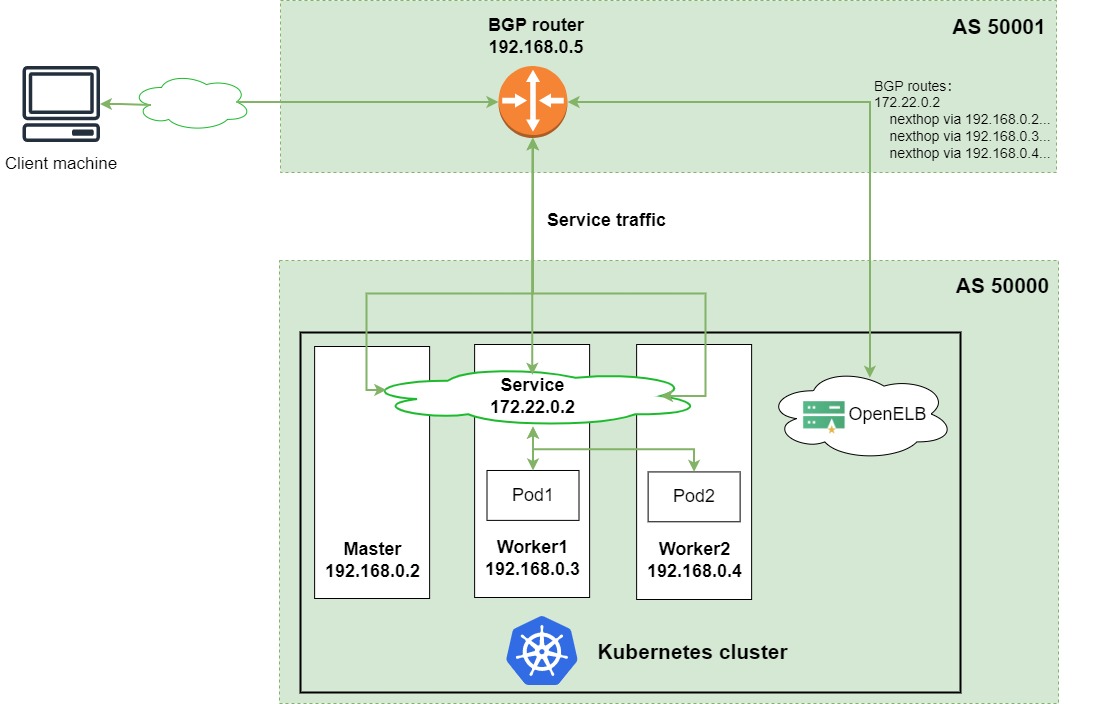
再查看路由器上面的路由表,可以看到两个BGP模式的VIP有多个下一条路由,则说明ECMP开启成功

1
2
3
4
5
6
7
8
9
10
11
12
13
14
15
16
tiny-openwrt-plus# show ip route
Codes: K - kernel route, C - connected, S - static, R - RIP,
O - OSPF, I - IS-IS, B - BGP, E - EIGRP, N - NHRP,
T - Table, v - VNC, V - VNC-Direct, A - Babel, F - PBR,
f - OpenFabric,
> - selected route, * - FIB route, q - queued, r - rejected, b - backup
t - trapped, o - offload failure

K>* 0.0.0.0/0 [0/0] via 10.31.254.254, eth0, 12:56:32
C>* 10.31.0.0/16 is directly connected, eth0, 12:56:32
B>* 10.89.0.1/32 [20/0] via 10.31.88.1, eth0, weight 1, 00:00:28
* via 10.31.88.11, eth0, weight 1, 00:00:28
* via 10.31.88.12, eth0, weight 1, 00:00:28
B>* 10.89.100.100/32 [20/0] via 10.31.88.1, eth0, weight 1, 00:00:28
* via 10.31.88.11, eth0, weight 1, 00:00:28
* via 10.31.88.12, eth0, weight 1, 00:00:28

最后再找一台机器进行curl测试

1
2
3
4
[tinychen /root]# curl 10.89.0.1
10.31.88.1:22432
[tinychen /root]# curl 10.89.100.100
10.31.88.11:59470

5、总结

OpenELB的两种模式的优缺点和MetalLB几乎一模一样,两者在这方面的优缺点概况文档可以结合起来一起看:

5.1 Layer2 mode优缺点

优点:

  • 通用性强,对比BGP模式不需要BGP路由器支持,几乎可以适用于任何网络环境;当然云厂商的网络环境例外

缺点:

  • 所有的流量都会在同一个节点上,该节点的容易成为流量的瓶颈
  • 当VIP所在节点宕机之后,需要较长时间进行故障转移(官方没说多久),这主要是因为OpenELB使用了k8s同款的选主算法来进行选主,当VIP所在节点宕机之后重新选主的时间要比传统的keepalived使用的vrrp协议(一般为1s)要更长
  • 难以定位VIP所在节点,OpenELB并没有提供一个简单直观的方式让我们查看到底哪一个节点是VIP所属节点,基本只能通过抓包或者查看pod日志来确定,当集群规模变大的时候这会变得非常的麻烦

改进方案:

  • 有条件的可以考虑使用BGP模式
  • 既不能用BGP模式也不能接受Layer2模式的,基本和目前主流的三个开源负载均衡器无缘了(三者都是Layer2模式和BGP模式且原理类似,优缺点相同)

5.2 BGP mode优缺点

BGP模式的优缺点几乎和Layer2模式相反

优点:

  • 无单点故障,在开启ECMP的前提下,k8s集群内所有的节点都有请求流量,都会参与负载均衡并转发请求

缺点:

  • 条件苛刻,需要有BGP路由器支持,配置起来也更复杂;
  • ECMP的故障转移(failover)并不是特别地优雅,这个问题的严重程度取决于使用的ECMP算法;当集群的节点出现变动导致BGP连接出现变动,所有的连接都会进行重新哈希(使用三元组或五元组哈希),这对一些服务来说可能会有影响;

路由器中使用的哈希值通常 不稳定,因此每当后端集的大小发生变化时(例如,当一个节点的 BGP 会话关闭时),现有的连接将被有效地随机重新哈希,这意味着大多数现有的连接最终会突然被转发到不同的后端,而这个后端可能和此前的后端毫不相干且不清楚上下文状态信息。

改进方案:

OpenELB官方并没有给出BGP模式的优缺点分析和改进方案,但是我们可以参考MetalLB官方给出的资料:

MetalLB给出了一些改进方案,下面列出来给大家参考一下

  • 使用更稳定的ECMP算法来减少后端变动时对现有连接的影响,如“resilient ECMP” or “resilient LAG”
  • 将服务部署到特定的节点上减少可能带来的影响
  • 在流量低峰期进行变更
  • 将服务分开部署到两个不同的LoadBalanceIP的服务中,然后利用DNS进行流量切换
  • 在客户端加入透明的用户无感的重试逻辑
  • 在LoadBalance后面加入一层ingress来实现更优雅的failover(但是并不是所有的服务都可以使用ingress)
  • 接受现实……(Accept that there will be occasional bursts of reset connections. For low-availability internal services, this may be acceptable as-is.)

5.3 OpenELB优缺点

这里尽量客观的总结概况一些客观事实,是否为优缺点可能会因人而异:

  • OpenELB是国内的青云科技团队主导开发的产品(也是kubesphere的开发团队)
  • OpenELB的部署方式并不是使用daemonset+deployment的方式,而是使用deployment+jobs.batch
  • OpenELB的deployment默认状态下并没有高可用部署,需要自己手动配置
  • OpenELB的文档非常少,比MetalLB的还要少,仅有少数几篇必要的文档,建议先全部阅读完再开始上手
  • OpenELB对IPv6的支持不完善(BGP模式下暂不支持IPv6
  • OpenELB可以通过注解来同时部署使用BGP模式和Layer2模式
  • OpenELB使用了CRD来一定程度上改善了IPAM的问题,可以通过查看EIP的状态来查看IP池的分配情况和对应服务
  • OpenELB在Layer2模式下无法快速定位当前的VIP所在节点
  • OpenELB官方表示已经有一定的数量的企业采用(包括生产和测试环境),但是没有具体披露使用的模式和规模

总的来说,OpenELB是一款不错的负载均衡器,在前人MetalLB的基础上做了一些改进,有一定的社区热度、有一定的专业团队进行维护;但是目前感觉还处于比较初级的阶段,有较多的功能还没有开发完善,使用起来偶尔会有些不大不小的问题。青云科技官方表示会在后面的kubesphere v3.3.0版本内置OpenELB用于服务暴露,届时应该会有更多的用户参与进来。