本文主要在centos7系统上基于containerd和stable版本(1.12.4)的cilium组件部署v1.25.4版本的堆叠ETCD高可用k8s原生集群,在LoadBalancer上选择了PureLB和kube-router结合cilium实现BGP路由可达的K8S集群部署。
此前写的一些关于k8s基础知识和集群搭建的一些方案,有需要的同学可以看一下。
准备工作
集群信息
机器均为16C16G的虚拟机,硬盘为100G。
| IP | Hostname |
|---|---|
| 10.31.80.0 | k8s-cilium-apiserver.tinychen.io |
| 10.31.80.1 | k8s-cilium-master-10-31-80-1.tinychen.io |
| 10.31.80.2 | k8s-cilium-master-10-31-80-2.tinychen.io |
| 10.31.80.3 | k8s-cilium-master-10-31-80-3.tinychen.io |
| 10.31.80.4 | k8s-cilium-worker-10-31-80-4.tinychen.io |
| 10.31.80.5 | k8s-cilium-worker-10-31-80-5.tinychen.io |
| 10.31.80.6 | k8s-cilium-worker-10-31-80-6.tinychen.io |
| 10.32.0.0/17 | podSubnet |
| 10.32.128.0/18 | serviceSubnet |
| 10.32.192.0/18 | LoadBalancerSubnet |
检查mac和product_uuid
同一个k8s集群内的所有节点需要确保mac地址和product_uuid均唯一,开始集群初始化之前需要检查相关信息
# 检查mac地址
ip link
ifconfig -a

# 检查product_uuid
sudo cat /sys/class/dmi/id/product_uuid
配置ssh免密登录(可选)
如果k8s集群的节点有多个网卡,确保每个节点能通过正确的网卡互联访问
# 在root用户下面生成一个公用的key,并配置可以使用该key免密登录
su root
ssh-keygen
cd /root/.ssh/
cat id_rsa.pub >> authorized_keys
chmod 600 authorized_keys


cat >> ~/.ssh/config <<EOF
Host k8s-cilium-master-10-31-80-1
    HostName 10.31.80.1
    User root
    Port 22
    IdentityFile ~/.ssh/id_rsa

Host k8s-cilium-master-10-31-80-2
    HostName 10.31.80.2
    User root
    Port 22
    IdentityFile ~/.ssh/id_rsa

Host k8s-cilium-master-10-31-80-3
    HostName 10.31.80.3
    User root
    Port 22
    IdentityFile ~/.ssh/id_rsa

Host k8s-cilium-worker-10-31-80-4
    HostName 10.31.80.4
    User root
    Port 22
    IdentityFile ~/.ssh/id_rsa

Host k8s-cilium-worker-10-31-80-5
    HostName 10.31.80.5
    User root
    Port 22
    IdentityFile ~/.ssh/id_rsa

Host k8s-cilium-worker-10-31-80-6
    HostName 10.31.80.6
    User root
    Port 22
    IdentityFile ~/.ssh/id_rsa
EOF
修改hosts文件
cat >> /etc/hosts <<EOF
10.31.80.1 k8s-cilium-master-10-31-80-1 k8s-cilium-master-10-31-80-1.tinychen.io
10.31.80.2 k8s-cilium-master-10-31-80-2 k8s-cilium-master-10-31-80-2.tinychen.io
10.31.80.3 k8s-cilium-master-10-31-80-3 k8s-cilium-master-10-31-80-3.tinychen.io
10.31.80.4 k8s-cilium-worker-10-31-80-4 k8s-cilium-worker-10-31-80-4.tinychen.io
10.31.80.5 k8s-cilium-worker-10-31-80-5 k8s-cilium-worker-10-31-80-5.tinychen.io
10.31.80.6 k8s-cilium-worker-10-31-80-6 k8s-cilium-worker-10-31-80-6.tinychen.io
10.31.80.0 k8s-cilium-apiserver k8s-cilium-apiserver.tinychen.io
EOF
关闭swap内存
# 使用命令直接关闭swap内存
swapoff -a
# 修改fstab文件禁止开机自动挂载swap分区
sed -i '/swap / s/^\(.*\)$/#\1/g' /etc/fstab
配置时间同步
这里可以根据自己的习惯选择ntp或者是chrony同步均可,同步的时间源服务器可以选择阿里云的ntp1.aliyun.com或者是国家时间中心的ntp.ntsc.ac.cn。
使用ntp同步
# 使用yum安装ntpdate工具
yum install ntpdate -y

# 使用国家时间中心的源同步时间
ntpdate ntp.ntsc.ac.cn

# 最后查看一下时间
hwclock
使用chrony同步
# 使用yum安装chrony
yum install chrony -y

# 设置开机启动并开启chony并查看运行状态
systemctl enable chronyd.service
systemctl start chronyd.service
systemctl status chronyd.service

# 当然也可以自定义时间服务器
vim /etc/chrony.conf

# 修改前
$ grep server /etc/chrony.conf
# Use public servers from the pool.ntp.org project.
server 0.centos.pool.ntp.org iburst
server 1.centos.pool.ntp.org iburst
server 2.centos.pool.ntp.org iburst
server 3.centos.pool.ntp.org iburst

# 修改后
$ grep server /etc/chrony.conf
# Use public servers from the pool.ntp.org project.
server ntp.ntsc.ac.cn iburst

# 重启服务使配置文件生效
systemctl restart chronyd.service

# 查看chrony的ntp服务器状态
chronyc sourcestats -v
chronyc sources -v
关闭selinux
# 使用命令直接关闭
setenforce 0

# 也可以直接修改/etc/selinux/config文件
sed -i 's/^SELINUX=enforcing$/SELINUX=disabled/' /etc/selinux/config
配置防火墙
k8s集群之间通信和服务暴露需要使用较多端口,为了方便,直接禁用防火墙
# centos7使用systemctl禁用默认的firewalld服务
systemctl disable firewalld.service
配置netfilter参数
这里主要是需要配置内核加载br_netfilter和iptables放行ipv6和ipv4的流量,确保集群内的容器能够正常通信。
cat <<EOF | sudo tee /etc/modules-load.d/k8s.conf
br_netfilter
EOF

cat <<EOF | sudo tee /etc/sysctl.d/k8s.conf
net.bridge.bridge-nf-call-ip6tables = 1
net.bridge.bridge-nf-call-iptables = 1
EOF
sudo sysctl --system
关闭IPV6(不建议)
和之前部署其他的CNI不一样,cilium很多服务监听默认情况下都是双栈的(使用cilium-cli操作的时候),因此建议开启系统的IPV6网络支持(即使没有可用的IPV6路由也可以)
当然没有ipv6网络也是可以的,只是在使用cilium-cli的一些开启port-forward命令时会报错而已。
# 直接在内核中添加ipv6禁用参数
grubby --update-kernel=ALL --args=ipv6.disable=1
配置IPVS
IPVS是专门设计用来应对负载均衡场景的组件,kube-proxy 中的 IPVS 实现通过减少对 iptables 的使用来增加可扩展性。在 iptables 输入链中不使用 PREROUTING,而是创建一个假的接口,叫做 kube-ipvs0,当k8s集群中的负载均衡配置变多的时候,IPVS能实现比iptables更高效的转发性能。
因为cilium需要升级系统内核,因此这里的内核版本高于4.19
注意在4.19之后的内核版本中使用
nf_conntrack模块来替换了原有的nf_conntrack_ipv4模块(Notes: use
nf_conntrackinstead ofnf_conntrack_ipv4for Linux kernel 4.19 and later)
# 在使用ipvs模式之前确保安装了ipset和ipvsadm
sudo yum install ipset ipvsadm -y

# 手动加载ipvs相关模块
modprobe -- ip_vs
modprobe -- ip_vs_rr
modprobe -- ip_vs_wrr
modprobe -- ip_vs_sh
modprobe -- nf_conntrack

# 配置开机自动加载ipvs相关模块
cat <<EOF | sudo tee /etc/modules-load.d/ipvs.conf
ip_vs
ip_vs_rr
ip_vs_wrr
ip_vs_sh
nf_conntrack
EOF


$ lsmod | grep -e ip_vs -e nf_conntrack
nf_conntrack_netlink    49152  0
nfnetlink              20480  2 nf_conntrack_netlink
ip_vs_sh               16384  0
ip_vs_wrr              16384  0
ip_vs_rr               16384  0
ip_vs                 159744  6 ip_vs_rr,ip_vs_sh,ip_vs_wrr
nf_conntrack          159744  5 xt_conntrack,nf_nat,nf_conntrack_netlink,xt_MASQUERADE,ip_vs
nf_defrag_ipv4         16384  1 nf_conntrack
nf_defrag_ipv6         24576  2 nf_conntrack,ip_vs
libcrc32c              16384  4 nf_conntrack,nf_nat,xfs,ip_vs
$ cut -f1 -d " "  /proc/modules | grep -e ip_vs -e nf_conntrack
nf_conntrack_netlink
ip_vs_sh
ip_vs_wrr
ip_vs_rr
ip_vs
nf_conntrack
配置Linux内核(cilium必选)
cilium和其他的cni组件最大的不同在于其底层使用了ebpf技术,而该技术对于Linux的系统内核版本有较高的要求,完成的要求可以查看官网的详细链接,这里我们着重看内核版本、内核参数这两个部分。
Linux内核版本
默认情况下我们可以参考cilium官方给出的一个系统要求总结。因为我们是在k8s集群中部署(使用容器),因此只需要关注Linux内核版本和etcd版本即可。根据前面部署的经验我们可以知道1.23.6版本的k8s默认使用的etcd版本是3.5.+,因此重点就来到了Linux内核版本这里。
| Requirement | Minimum Version | In cilium container |
|---|---|---|
| Linux kernel | >= 4.9.17 | no |
| Key-Value store (etcd) | >= 3.1.0 | no |
| clang+LLVM | >= 10.0 | yes |
| iproute2 | >= 5.9.0 | yes |
This requirement is only needed if you run
cilium-agentnatively. If you are using the Cilium container imagecilium/cilium, clang+LLVM is included in the container image.iproute2 is only needed if you run
cilium-agentdirectly on the host machine. iproute2 is included in thecilium/ciliumcontainer image.
毫无疑问CentOS7内置的默认内核版本3.10.x版本的内核是无法满足需求的,但是在升级内核之前,我们再看看其他的一些要求。
cilium官方还给出了一份列表描述了各项高级功能对内核版本的要求:
| Cilium Feature | Minimum Kernel Version |
|---|---|
| IPv4 fragment handling | >= 4.10 |
| Restrictions on unique prefix lengths for CIDR policy rules | >= 4.11 |
| IPsec Transparent Encryption in tunneling mode | >= 4.19 |
| WireGuard Transparent Encryption | >= 5.6 |
| Host-Reachable Services | >= 4.19.57, >= 5.1.16, >= 5.2 |
| Kubernetes Without kube-proxy | >= 4.19.57, >= 5.1.16, >= 5.2 |
| Bandwidth Manager | >= 5.1 |
| Local Redirect Policy (beta) | >= 4.19.57, >= 5.1.16, >= 5.2 |
| Full support for Session Affinity | >= 5.7 |
| BPF-based proxy redirection | >= 5.7 |
| BPF-based host routing | >= 5.10 |
| Socket-level LB bypass in pod netns | >= 5.7 |
| Egress Gateway (beta) | >= 5.2 |
| VXLAN Tunnel Endpoint (VTEP) Integration | >= 5.2 |
可以看到如果需要满足上面所有需求的话,需要内核版本高于5.10,本着学习测试研究作死的精神,反正都升级了,干脆就升级到新一些的版本吧。这里我们可以直接使用elrepo源来升级内核到较新的内核版本。
# 查看elrepo源中支持的内核版本
$ yum --disablerepo="*" --enablerepo="elrepo-kernel" list available
Loaded plugins: fastestmirror
Loading mirror speeds from cached hostfile
Available Packages
elrepo-release.noarch                                   7.0-6.el7.elrepo                                            elrepo-kernel
kernel-lt.x86_64                                        5.4.225-1.el7.elrepo                                        elrepo-kernel
kernel-lt-devel.x86_64                                  5.4.225-1.el7.elrepo                                        elrepo-kernel
kernel-lt-doc.noarch                                    5.4.225-1.el7.elrepo                                        elrepo-kernel
kernel-lt-headers.x86_64                                5.4.225-1.el7.elrepo                                        elrepo-kernel
kernel-lt-tools.x86_64                                  5.4.225-1.el7.elrepo                                        elrepo-kernel
kernel-lt-tools-libs.x86_64                             5.4.225-1.el7.elrepo                                        elrepo-kernel
kernel-lt-tools-libs-devel.x86_64                       5.4.225-1.el7.elrepo                                        elrepo-kernel
kernel-ml.x86_64                                        6.0.11-1.el7.elrepo                                         elrepo-kernel
kernel-ml-devel.x86_64                                  6.0.11-1.el7.elrepo                                         elrepo-kernel
kernel-ml-doc.noarch                                    6.0.11-1.el7.elrepo                                         elrepo-kernel
kernel-ml-headers.x86_64                                6.0.11-1.el7.elrepo                                         elrepo-kernel
kernel-ml-tools.x86_64                                  6.0.11-1.el7.elrepo                                         elrepo-kernel
kernel-ml-tools-libs.x86_64                             6.0.11-1.el7.elrepo                                         elrepo-kernel
kernel-ml-tools-libs-devel.x86_64                       6.0.11-1.el7.elrepo                                         elrepo-kernel
perf.x86_64                                             5.4.225-1.el7.elrepo                                        elrepo-kernel
python-perf.x86_64                                      5.4.225-1.el7.elrepo                                        elrepo-kernel

# 看起来ml版本的内核比较满足我们的需求,直接使用yum进行安装
sudo yum --enablerepo=elrepo-kernel install kernel-ml -y
# 使用grubby工具查看系统中已经安装的内核版本信息
sudo grubby --info=ALL
# 设置新安装的6.0.11-1版本内核为默认内核版本,此处的index=0要和上面查看的内核版本信息一致
sudo grubby --set-default-index=0
# 查看默认内核是否修改成功
sudo grubby --default-kernel
# 重启系统切换到新内核
init 6
# 重启后检查内核版本是否为新的6.0.11-1
uname -a
Linux内核参数
首先我们查看自己当前内核版本的参数,基本上可以分为y、n、m三个选项
- y:yes,Build directly into the kernel. 表示该功能被编译进内核中,默认启用
- n:no,Leave entirely out of the kernel. 表示该功能未被编译进内核中,不启用
- m:module,Build as a module, to be loaded if needed. 表示该功能被编译为模块,按需启用
# 查看当前使用的内核版本的编译参数
cat /boot/config-$(uname -r)
cilium官方对各项功能所需要开启的内核参数列举如下:
In order for the eBPF feature to be enabled properly, the following kernel configuration options must be enabled. This is typically the case with distribution kernels. When an option can be built as a module or statically linked, either choice is valid.
为了正确启用 eBPF 功能,必须启用以下内核配置选项。这通常因内核版本情况而异。任何一个选项都可以构建为模块或静态链接,两个选择都是有效的。
我们暂时只看最基本的Base Requirements
CONFIG_BPF=y
CONFIG_BPF_SYSCALL=y
CONFIG_NET_CLS_BPF=y
CONFIG_BPF_JIT=y
CONFIG_NET_CLS_ACT=y
CONFIG_NET_SCH_INGRESS=y
CONFIG_CRYPTO_SHA1=y
CONFIG_CRYPTO_USER_API_HASH=y
CONFIG_CGROUPS=y
CONFIG_CGROUP_BPF=y
对比我们使用的6.0.11-1.el7.elrepo.x86_64内核可以发现有两个模块是为m
# egrep "^CONFIG_BPF=|^CONFIG_BPF_SYSCALL=|^CONFIG_NET_CLS_BPF=|^CONFIG_BPF_JIT=|^CONFIG_NET_CLS_ACT=|^CONFIG_NET_SCH_INGRESS=|^CONFIG_CRYPTO_SHA1=|^CONFIG_CRYPTO_USER_API_HASH=|^CONFIG_CGROUPS=|^CONFIG_CGROUP_BPF=" /boot/config-6.0.11-1.el7.elrepo.x86_64
CONFIG_BPF=y
CONFIG_BPF_SYSCALL=y
CONFIG_BPF_JIT=y
CONFIG_CGROUPS=y
CONFIG_CGROUP_BPF=y
CONFIG_NET_SCH_INGRESS=m
CONFIG_NET_CLS_BPF=m
CONFIG_NET_CLS_ACT=y
CONFIG_CRYPTO_SHA1=y
CONFIG_CRYPTO_USER_API_HASH=y
缺少的这两个模块我们可以在/usr/lib/modules/$(uname -r)目录下面找到它们:
$ realpath ./kernel/net/sched/sch_ingress.ko
/usr/lib/modules/6.0.11-1.el7.elrepo.x86_64/kernel/net/sched/sch_ingress.ko
$ realpath ./kernel/net/sched/cls_bpf.ko
/usr/lib/modules/6.0.11-1.el7.elrepo.x86_64/kernel/net/sched/cls_bpf.ko
确认相关内核模块存在我们直接加载内核即可:
# 直接使用modprobe命令加载
$ modprobe cls_bpf
$ modprobe sch_ingress
$ lsmod | egrep "cls_bpf|sch_ingress"
sch_ingress            16384  0
cls_bpf                24576  0

# 配置开机自动加载cilium所需相关模块
cat <<EOF | sudo tee /etc/modules-load.d/cilium-base-requirements.conf
cls_bpf
sch_ingress
EOF
其他cilium高级功能所需要的内核功能也类似,这里不做赘述。
安装container runtime
安装containerd
详细的官方文档可以参考这里,由于在刚发布的1.24版本中移除了docker-shim,因此安装的版本≥1.24的时候需要注意容器运行时的选择。这里我们安装的版本为高于1.24,因此我们不能继续使用docker,这里我们将其换为containerd
修改Linux内核参数
# 首先生成配置文件确保配置持久化
cat <<EOF | sudo tee /etc/modules-load.d/containerd.conf
overlay
br_netfilter
EOF

sudo modprobe overlay
sudo modprobe br_netfilter

# Setup required sysctl params, these persist across reboots.
cat <<EOF | sudo tee /etc/sysctl.d/99-kubernetes-cri.conf
net.bridge.bridge-nf-call-iptables  = 1
net.ipv4.ip_forward                 = 1
net.bridge.bridge-nf-call-ip6tables = 1
EOF

# Apply sysctl params without reboot
sudo sysctl --system
安装containerd
centos7比较方便的部署方式是利用已有的yum源进行安装,这里我们可以使用docker官方的yum源来安装containerd
# 导入docker官方的yum源
sudo yum install -y yum-utils device-mapper-persistent-data lvm2

sudo yum-config-manager --add-repo  https://download.docker.com/linux/centos/docker-ce.repo

# 查看yum源中存在的各个版本的containerd.io
yum list containerd.io --showduplicates | sort -r

# 直接安装最新版本的containerd.io
yum install containerd.io -y

# 启动containerd
sudo systemctl start containerd

# 最后我们还要设置一下开机启动
sudo systemctl enable --now containerd
关于CRI
官方表示,对于k8s来说,不需要安装cri-containerd,并且该功能会在后面的2.0版本中废弃。
FAQ: For Kubernetes, do I need to download
cri-containerd-(cni-)<VERSION>-<OS-<ARCH>.tar.gztoo?Answer: No.
As the Kubernetes CRI feature has been already included in
containerd-<VERSION>-<OS>-<ARCH>.tar.gz, you do not need to download thecri-containerd-....archives to use CRI.The
cri-containerd-...archives are deprecated, do not work on old Linux distributions, and will be removed in containerd 2.0.
安装cni-plugins
使用yum源安装的方式会把runc安装好,但是并不会安装cni-plugins,因此这部分还是需要我们自行安装。
The
containerd.iopackage contains runc too, but does not contain CNI plugins.
我们直接在github上面找到系统对应的架构版本,这里为amd64,然后解压即可。
# Download the cni-plugins-<OS>-<ARCH>-<VERSION>.tgz archive from https://github.com/containernetworking/plugins/releases , verify its sha256sum, and extract it under /opt/cni/bin:

# 下载源文件和sha512文件并校验
$ wget https://github.com/containernetworking/plugins/releases/download/v1.1.1/cni-plugins-linux-amd64-v1.1.1.tgz
$ wget https://github.com/containernetworking/plugins/releases/download/v1.1.1/cni-plugins-linux-amd64-v1.1.1.tgz.sha512
$ sha512sum -c cni-plugins-linux-amd64-v1.1.1.tgz.sha512

# 创建目录并解压
$ mkdir -p /opt/cni/bin
$ tar Cxzvf /opt/cni/bin cni-plugins-linux-amd64-v1.1.1.tgz
配置cgroup drivers
CentOS7使用的是systemd来初始化系统并管理进程,初始化进程会生成并使用一个 root 控制组 (cgroup), 并充当 cgroup 管理器。 Systemd 与 cgroup 集成紧密,并将为每个 systemd 单元分配一个 cgroup。 我们也可以配置容器运行时和 kubelet 使用 cgroupfs。 连同 systemd 一起使用 cgroupfs 意味着将有两个不同的 cgroup 管理器。而当一个系统中同时存在cgroupfs和systemd两者时,容易变得不稳定,因此最好更改设置,令容器运行时和 kubelet 使用 systemd 作为 cgroup 驱动,以此使系统更为稳定。 对于containerd, 需要设置配置文件/etc/containerd/config.toml中的 SystemdCgroup 参数。
参考k8s官方的说明文档:
https://kubernetes.io/docs/setup/production-environment/container-runtimes/#containerd-systemd
[plugins."io.containerd.grpc.v1.cri".containerd.runtimes.runc]
  ...
  [plugins."io.containerd.grpc.v1.cri".containerd.runtimes.runc.options]
    SystemdCgroup = true
接下来我们开始配置containerd的cgroup driver
# 查看默认的配置文件,我们可以看到是没有启用systemd
$ containerd config default | grep SystemdCgroup
            SystemdCgroup = false

# 使用yum安装的containerd的配置文件非常简单
$ cat /etc/containerd/config.toml | egrep -v "^#|^$"
disabled_plugins = ["cri"]

# 导入一个完整版的默认配置文件模板为config.toml
$ mv /etc/containerd/config.toml /etc/containerd/config.toml.origin
$ containerd config default > /etc/containerd/config.toml
# 修改SystemdCgroup参数并重启
$ sed -i 's/SystemdCgroup = false/SystemdCgroup = true/g' /etc/containerd/config.toml
$ systemctl restart containerd
# 重启之后我们再检查配置就会发现已经启用了SystemdCgroup
$ containerd config dump | grep SystemdCgroup
            SystemdCgroup = true

# 查看containerd状态的时候我们可以看到cni相关的报错
# 这是因为我们先安装了cni-plugins但是还没有安装k8s的cni插件
# 属于正常情况
$ systemctl status containerd -l
May 12 09:57:31 tiny-kubeproxy-free-master-18-1.k8s.tcinternal containerd[5758]: time="2022-05-12T09:57:31.100285056+08:00" level=error msg="failed to load cni during init, please check CRI plugin status before setting up network for pods" error="cni config load failed: no network config found in /etc/cni/net.d: cni plugin not initialized: failed to load cni config"
关于kubelet的cgroup driver
k8s官方有详细的文档介绍了如何设置kubelet的cgroup driver,需要特别注意的是,在1.22版本开始,如果没有手动设置kubelet的cgroup driver,那么默认会设置为systemd
Note: In v1.22, if the user is not setting the
cgroupDriverfield underKubeletConfiguration,kubeadmwill default it tosystemd.
一个比较简单的指定kubelet的cgroup driver的方法就是在kubeadm-config.yaml加入cgroupDriver字段
# kubeadm-config.yaml
kind: ClusterConfiguration
apiVersion: kubeadm.k8s.io/v1beta3
kubernetesVersion: v1.21.0
---
kind: KubeletConfiguration
apiVersion: kubelet.config.k8s.io/v1beta1
cgroupDriver: systemd
我们可以直接查看configmaps来查看初始化之后集群的kubeadm-config配置。
$ kubectl describe configmaps kubeadm-config -n kube-system
Name:         kubeadm-config
Namespace:    kube-system
Labels:       <none>
Annotations:  <none>

Data
====
ClusterConfiguration:
----
apiServer:
  extraArgs:
    authorization-mode: Node,RBAC
  timeoutForControlPlane: 4m0s
apiVersion: kubeadm.k8s.io/v1beta3
certificatesDir: /etc/kubernetes/pki
clusterName: kubernetes
controllerManager: {}
dns: {}
etcd:
  local:
    dataDir: /var/lib/etcd
imageRepository: registry.aliyuncs.com/google_containers
kind: ClusterConfiguration
kubernetesVersion: v1.23.6
networking:
  dnsDomain: cali-cluster.tclocal
  serviceSubnet: 10.88.0.0/18
scheduler: {}


BinaryData
====

Events:  <none>
当然因为我们需要安装的版本高于1.22.0并且使用的就是systemd,因此可以不用再重复配置。
安装kube三件套
对应的官方文档可以参考这里
kube三件套就是kubeadm、kubelet 和 kubectl,三者的具体功能和作用如下:
kubeadm:用来初始化集群的指令。kubelet:在集群中的每个节点上用来启动 Pod 和容器等。kubectl:用来与集群通信的命令行工具。
需要注意的是:
kubeadm不会帮助我们管理kubelet和kubectl,其他两者也是一样的,也就是说这三者是相互独立的,并不存在谁管理谁的情况;kubelet的版本必须小于等于API-server的版本,否则容易出现兼容性的问题;kubectl并不是集群中的每个节点都需要安装,也并不是一定要安装在集群中的节点,可以单独安装在自己本地的机器环境上面,然后配合kubeconfig文件即可使用kubectl命令来远程管理对应的k8s集群;
CentOS7的安装比较简单,我们直接使用官方提供的yum源即可。需要注意的是这里需要设置selinux的状态,但是前面我们已经关闭了selinux,因此这里略过这步。
# 直接导入谷歌官方的yum源
cat <<EOF | sudo tee /etc/yum.repos.d/kubernetes.repo
[kubernetes]
name=Kubernetes
baseurl=https://packages.cloud.google.com/yum/repos/kubernetes-el7-\$basearch
enabled=1
gpgcheck=1
repo_gpgcheck=1
gpgkey=https://packages.cloud.google.com/yum/doc/yum-key.gpg https://packages.cloud.google.com/yum/doc/rpm-package-key.gpg
exclude=kubelet kubeadm kubectl
EOF

# 当然如果连不上谷歌的源,可以考虑使用国内的阿里镜像源
cat <<EOF > /etc/yum.repos.d/kubernetes.repo
[kubernetes]
name=Kubernetes
baseurl=https://mirrors.aliyun.com/kubernetes/yum/repos/kubernetes-el7-x86_64/
enabled=1
gpgcheck=1
repo_gpgcheck=1
gpgkey=https://mirrors.aliyun.com/kubernetes/yum/doc/yum-key.gpg https://mirrors.aliyun.com/kubernetes/yum/doc/rpm-package-key.gpg
EOF


# 接下来直接安装三件套即可
sudo yum install -y kubelet kubeadm kubectl --disableexcludes=kubernetes

# 如果网络环境不好出现gpgcheck验证失败导致无法正常读取yum源,可以考虑关闭该yum源的repo_gpgcheck
sed -i 's/repo_gpgcheck=1/repo_gpgcheck=0/g' /etc/yum.repos.d/kubernetes.repo
# 或者在安装的时候禁用gpgcheck
sudo yum install -y kubelet kubeadm kubectl --nogpgcheck --disableexcludes=kubernetes

# 如果想要安装特定版本,可以使用这个命令查看相关版本的信息
sudo yum list --nogpgcheck kubelet kubeadm kubectl --showduplicates --disableexcludes=kubernetes


# 安装完成后配置开机自启kubelet
sudo systemctl enable --now kubelet
初始化集群
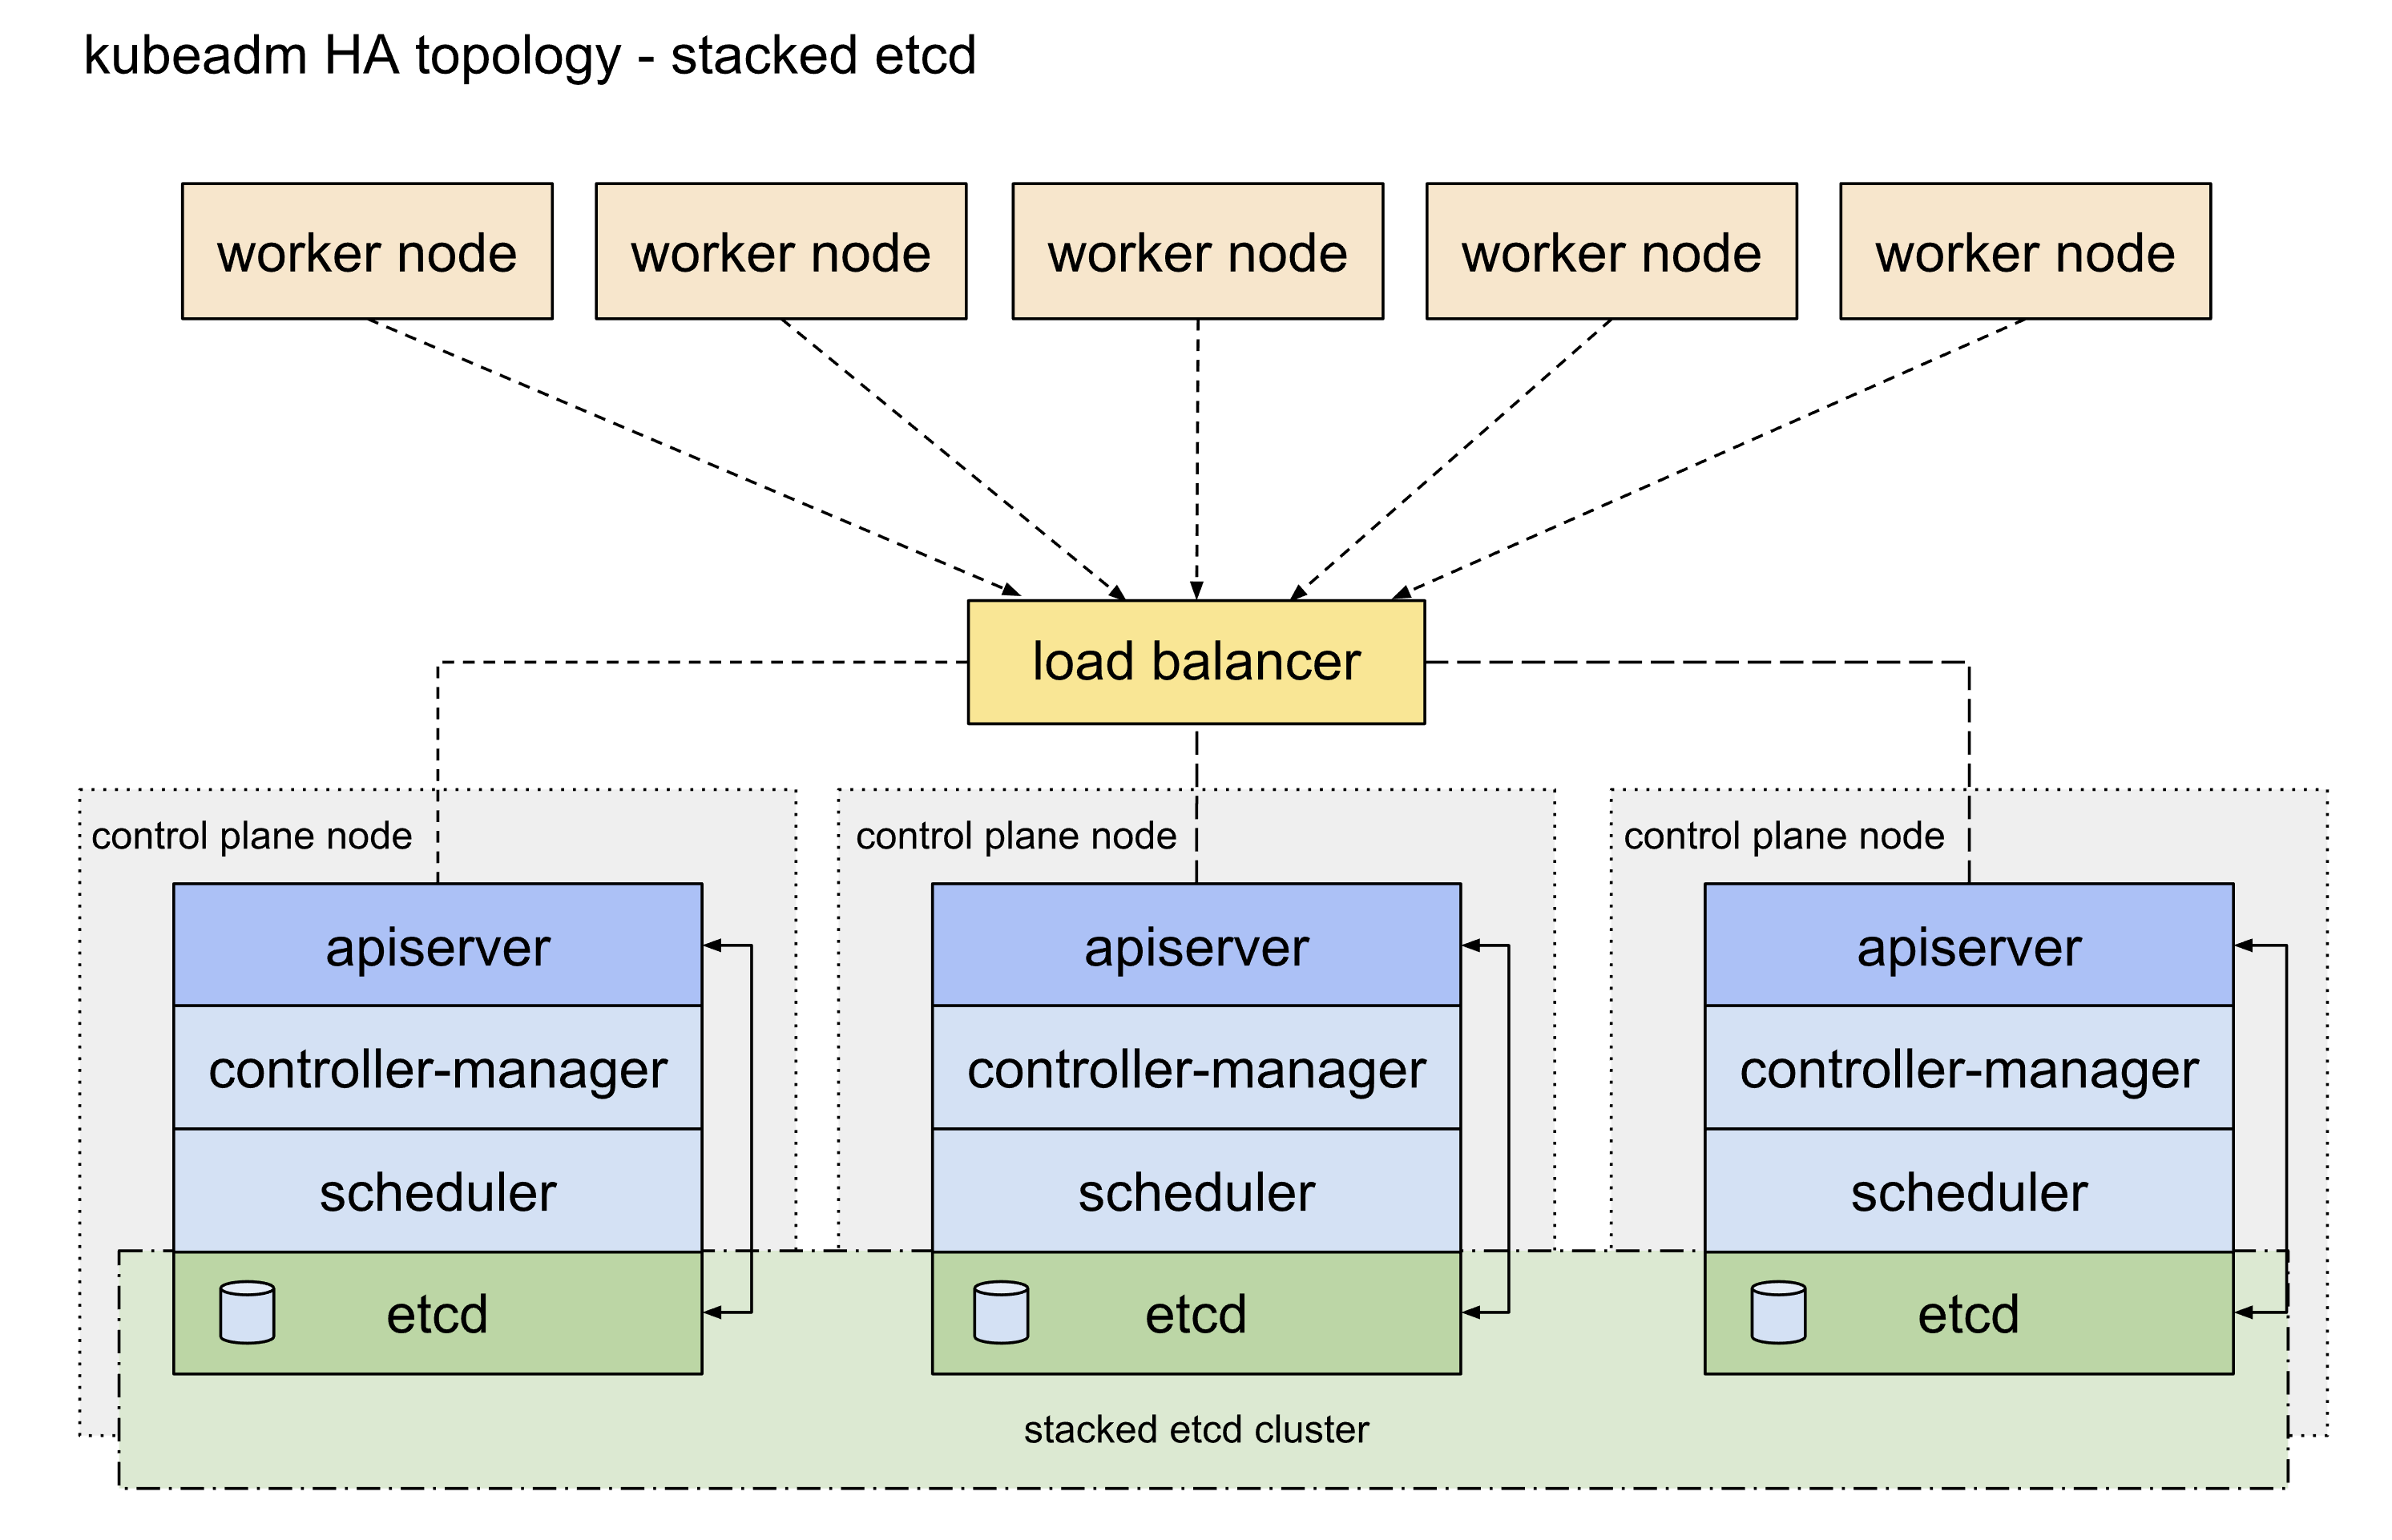
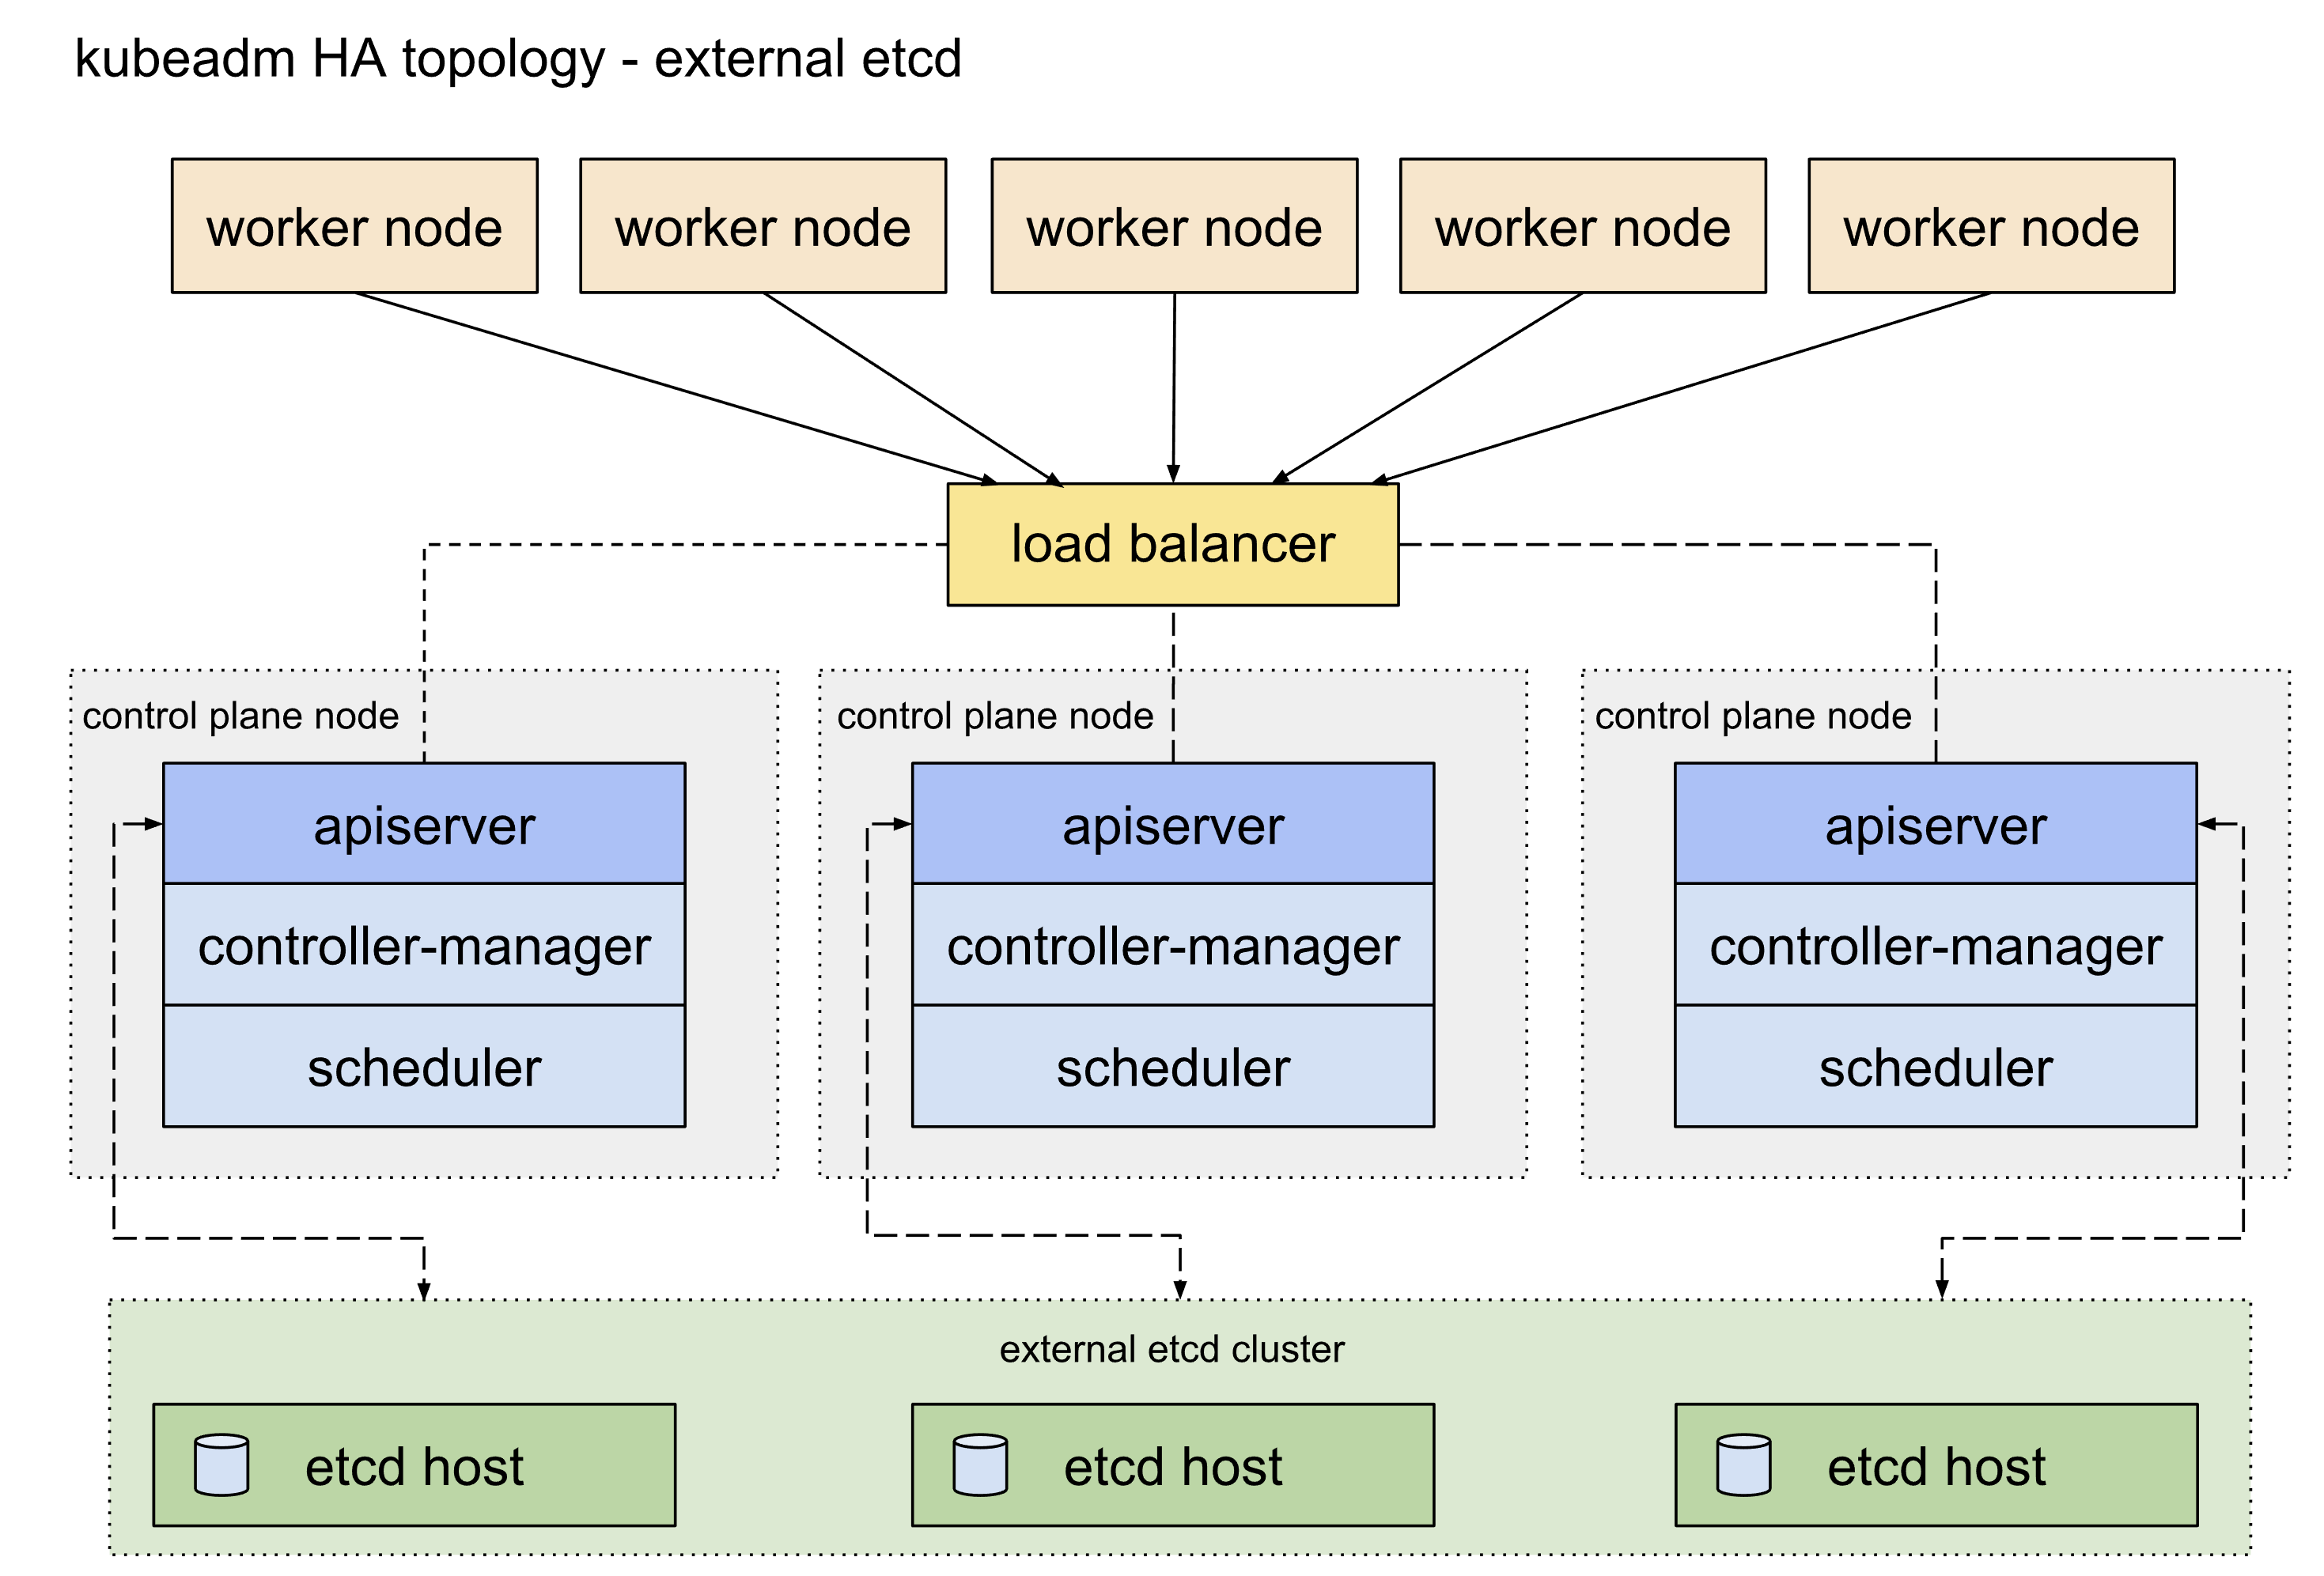
etcd高可用
etcd高可用架构参考这篇官方文档,主要可以分为堆叠etcd方案和外置etcd方案,两者的区别就是etcd是否部署在apiserver所在的node机器上面,这里我们主要使用的是堆叠etcd部署方案。
apiserver高可用
apisever高可用配置参考这篇官方文档。目前apiserver的高可用比较主流的官方推荐方案是使用keepalived和haproxy,由于centos7自带的版本较旧,重新编译又过于麻烦,因此我们可以参考官方给出的静态pod的部署方式,提前将相关的配置文件放置到/etc/kubernetes/manifests目录下即可(需要提前手动创建好目录)。官方表示对于我们这种堆叠部署控制面master节点和etcd的方式而言这是一种优雅的解决方案。
This is an elegant solution, in particular with the setup described under Stacked control plane and etcd nodes.
首先我们需要准备好三台master节点上面的keepalived配置文件和haproxy配置文件:
! /etc/keepalived/keepalived.conf
! Configuration File for keepalived
global_defs {
    router_id LVS_DEVEL
}
vrrp_script check_apiserver {
  script "/etc/keepalived/check_apiserver.sh"
  interval 3
  weight -2
  fall 10
  rise 2
}

vrrp_instance VI_1 {
    state ${STATE}
    interface ${INTERFACE}
    virtual_router_id ${ROUTER_ID}
    priority ${PRIORITY}
    authentication {
        auth_type PASS
        auth_pass ${AUTH_PASS}
    }
    virtual_ipaddress {
        ${APISERVER_VIP}
    }
    track_script {
        check_apiserver
    }
}
实际上我们需要区分三台控制面节点的状态
! /etc/keepalived/keepalived.conf
! Configuration File for keepalived
global_defs {
    router_id CILIUM_MASTER_80_1
}
vrrp_script check_apiserver {
  script "/etc/keepalived/check_apiserver.sh"
  interval 3
  weight -2
  fall 10
  rise 2
}

vrrp_instance cilium_ha_apiserver_10_31_80_0 {
    state MASTER
    interface eth0
    virtual_router_id 80
    priority 100
    authentication {
        auth_type PASS
        auth_pass pass@77
    }
    virtual_ipaddress {
        10.31.80.0
    }
    track_script {
        check_apiserver
    }
}
! /etc/keepalived/keepalived.conf
! Configuration File for keepalived
global_defs {
    router_id CILIUM_MASTER_80_2
}
vrrp_script check_apiserver {
  script "/etc/keepalived/check_apiserver.sh"
  interval 3
  weight -2
  fall 10
  rise 2
}

vrrp_instance cilium_ha_apiserver_10_31_80_0 {
    state BACKUP
    interface eth0
    virtual_router_id 80
    priority 90
    authentication {
        auth_type PASS
        auth_pass pass@77
    }
    virtual_ipaddress {
        10.31.80.0
    }
    track_script {
        check_apiserver
    }
}
! /etc/keepalived/keepalived.conf
! Configuration File for keepalived
global_defs {
    router_id CILIUM_MASTER_80_3
}
vrrp_script check_apiserver {
  script "/etc/keepalived/check_apiserver.sh"
  interval 3
  weight -2
  fall 10
  rise 2
}

vrrp_instance cilium_ha_apiserver_10_31_80_0 {
    state BACKUP
    interface eth0
    virtual_router_id 80
    priority 80
    authentication {
        auth_type PASS
        auth_pass pass@77
    }
    virtual_ipaddress {
        10.31.80.0
    }
    track_script {
        check_apiserver
    }
}
这是haproxy的配置文件模板:
# /etc/haproxy/haproxy.cfg
#---------------------------------------------------------------------
# Global settings
#---------------------------------------------------------------------
global
    log /dev/log local0
    log /dev/log local1 notice
    daemon

#---------------------------------------------------------------------
# common defaults that all the 'listen' and 'backend' sections will
# use if not designated in their block
#---------------------------------------------------------------------
defaults
    mode                    http
    log                     global
    option                  httplog
    option                  dontlognull
    option http-server-close
    option forwardfor       except 127.0.0.0/8
    option                  redispatch
    retries                 1
    timeout http-request    10s
    timeout queue           20s
    timeout connect         5s
    timeout client          20s
    timeout server          20s
    timeout http-keep-alive 10s
    timeout check           10s

#---------------------------------------------------------------------
# apiserver frontend which proxys to the control plane nodes
#---------------------------------------------------------------------
frontend apiserver
    bind *:${APISERVER_DEST_PORT}
    mode tcp
    option tcplog
    default_backend apiserver

#---------------------------------------------------------------------
# round robin balancing for apiserver
#---------------------------------------------------------------------
backend apiserver
    option httpchk GET /healthz
    http-check expect status 200
    mode tcp
    option ssl-hello-chk
    balance     roundrobin
        server ${HOST1_ID} ${HOST1_ADDRESS}:${APISERVER_SRC_PORT} check
        # [...]
这是keepalived的检测脚本,注意这里的${APISERVER_VIP}和${APISERVER_DEST_PORT}要替换为集群的实际VIP和端口
#!/bin/sh
APISERVER_VIP="10.31.80.0"
APISERVER_DEST_PORT="8443"

errorExit() {
    echo "*** $*" 1>&2
    exit 1
}

curl --silent --max-time 2 --insecure https://localhost:${APISERVER_DEST_PORT}/ -o /dev/null || errorExit "Error GET https://localhost:${APISERVER_DEST_PORT}/"
if ip addr | grep -q ${APISERVER_VIP}; then
    curl --silent --max-time 2 --insecure https://${APISERVER_VIP}:${APISERVER_DEST_PORT}/ -o /dev/null || errorExit "Error GET https://${APISERVER_VIP}:${APISERVER_DEST_PORT}/"
fi
这是keepalived的部署文件/etc/kubernetes/manifests/keepalived.yaml,注意这里的配置文件路径要和上面的对应一致。
apiVersion: v1
kind: Pod
metadata:
  creationTimestamp: null
  name: keepalived
  namespace: kube-system
spec:
  containers:
  - image: osixia/keepalived:2.0.17
    name: keepalived
    resources: {}
    securityContext:
      capabilities:
        add:
        - NET_ADMIN
        - NET_BROADCAST
        - NET_RAW
    volumeMounts:
    - mountPath: /usr/local/etc/keepalived/keepalived.conf
      name: config
    - mountPath: /etc/keepalived/check_apiserver.sh
      name: check
  hostNetwork: true
  volumes:
  - hostPath:
      path: /etc/keepalived/keepalived.conf
    name: config
  - hostPath:
      path: /etc/keepalived/check_apiserver.sh
    name: check
status: {}
这是haproxy的部署文件/etc/kubernetes/manifests/haproxy.yaml,注意这里的配置文件路径要和上面的对应一致,且${APISERVER_DEST_PORT}要换成我们对应的apiserver的端口,这里我们改为8443,避免和原有的6443端口冲突
apiVersion: v1
kind: Pod
metadata:
  name: haproxy
  namespace: kube-system
spec:
  containers:
  - image: haproxy:2.1.4
    name: haproxy
    livenessProbe:
      failureThreshold: 8
      httpGet:
        host: localhost
        path: /healthz
        #port: ${APISERVER_DEST_PORT}
        port: 8443
        scheme: HTTPS
    volumeMounts:
    - mountPath: /usr/local/etc/haproxy/haproxy.cfg
      name: haproxyconf
      readOnly: true
  hostNetwork: true
  volumes:
  - hostPath:
      path: /etc/haproxy/haproxy.cfg
      type: FileOrCreate
    name: haproxyconf
status: {}
编写配置文件
在集群中所有节点都执行完上面的操作之后,我们就可以开始创建k8s集群了。因为我们这次需要进行高可用部署,所以初始化的时候先挑任意一台master控制面节点进行操作即可。
# 我们先使用kubeadm命令查看一下主要的几个镜像版本
$ kubeadm config images list
registry.k8s.io/kube-apiserver:v1.25.4
registry.k8s.io/kube-controller-manager:v1.25.4
registry.k8s.io/kube-scheduler:v1.25.4
registry.k8s.io/kube-proxy:v1.25.4
registry.k8s.io/pause:3.8
registry.k8s.io/etcd:3.5.5-0
registry.k8s.io/coredns/coredns:v1.9.3

# 为了方便编辑和管理,我们还是把初始化参数导出成配置文件
$ kubeadm config print init-defaults > kubeadm-cilium-ha.conf
- 考虑到大多数情况下国内的网络无法使用谷歌的镜像源(1.25版本开始从
k8s.gcr.io换为registry.k8s.io),我们可以直接在配置文件中修改imageRepository参数为阿里的镜像源registry.aliyuncs.com/google_containers kubernetesVersion字段用来指定我们要安装的k8s版本localAPIEndpoint参数需要修改为我们的master节点的IP和端口,初始化之后的k8s集群的apiserver地址就是这个criSocket从1.24.0版本开始已经默认变成了containerdpodSubnet、serviceSubnet和dnsDomain两个参数默认情况下可以不用修改,这里我按照自己的需求进行了变更nodeRegistration里面的name参数修改为对应master节点的hostnamecontrolPlaneEndpoint参数配置的才是我们前面配置的集群高可用apiserver的地址- 新增配置块使用ipvs,具体可以参考官方文档
apiVersion: kubeadm.k8s.io/v1beta3
bootstrapTokens:
- groups:
  - system:bootstrappers:kubeadm:default-node-token
  token: abcdef.0123456789abcdef
  ttl: 24h0m0s
  usages:
  - signing
  - authentication
kind: InitConfiguration
localAPIEndpoint:
  advertiseAddress: 10.31.80.1
  bindPort: 6443
nodeRegistration:
  criSocket: unix:///var/run/containerd/containerd.sock
  imagePullPolicy: IfNotPresent
  name: k8s-cilium-master-10-31-80-1.tinychen.io
  taints: null
---
apiServer:
  timeoutForControlPlane: 4m0s
apiVersion: kubeadm.k8s.io/v1beta3
certificatesDir: /etc/kubernetes/pki
clusterName: kubernetes
controllerManager: {}
dns: {}
etcd:
  local:
    dataDir: /var/lib/etcd
imageRepository: registry.aliyuncs.com/google_containers
kind: ClusterConfiguration
kubernetesVersion: 1.25.4
controlPlaneEndpoint: "k8s-cilium-apiserver.tinychen.io:8443"
networking:
  dnsDomain: cili-cluster.tclocal
  serviceSubnet: 10.32.128.0/18
  podSubnet: 10.32.0.0/17
scheduler: {}
---
apiVersion: kubeproxy.config.k8s.io/v1alpha1
kind: KubeProxyConfiguration
mode: ipvs
初始化集群
此时我们再查看对应的配置文件中的镜像版本,就会发现已经变成了对应阿里云镜像源的版本
# 查看一下对应的镜像版本,确定配置文件是否生效
$ kubeadm config images list --config kubeadm-cilium-ha.conf
registry.aliyuncs.com/google_containers/kube-apiserver:v1.25.4
registry.aliyuncs.com/google_containers/kube-controller-manager:v1.25.4
registry.aliyuncs.com/google_containers/kube-scheduler:v1.25.4
registry.aliyuncs.com/google_containers/kube-proxy:v1.25.4
registry.aliyuncs.com/google_containers/pause:3.8
registry.aliyuncs.com/google_containers/etcd:3.5.5-0
registry.aliyuncs.com/google_containers/coredns:v1.9.3

# 确认没问题之后我们直接拉取镜像
$ kubeadm config images pull --config kubeadm-cilium-ha.conf
[config/images] Pulled registry.aliyuncs.com/google_containers/kube-apiserver:v1.25.4
[config/images] Pulled registry.aliyuncs.com/google_containers/kube-controller-manager:v1.25.4
[config/images] Pulled registry.aliyuncs.com/google_containers/kube-scheduler:v1.25.4
[config/images] Pulled registry.aliyuncs.com/google_containers/kube-proxy:v1.25.4
[config/images] Pulled registry.aliyuncs.com/google_containers/pause:3.8
[config/images] Pulled registry.aliyuncs.com/google_containers/etcd:3.5.5-0
[config/images] Pulled registry.aliyuncs.com/google_containers/coredns:v1.9.3

# 初始化,注意添加参数--upload-certs确保证书能够上传到kubernetes集群中以secret保存
$ kubeadm init --config kubeadm-cilium-ha.conf  --upload-certs
[init] Using Kubernetes version: v1.25.4
[preflight] Running pre-flight checks
        [WARNING Service-Kubelet]: kubelet service is not enabled, please run 'systemctl enable kubelet.service'
[preflight] Pulling images required for setting up a Kubernetes cluster
[preflight] This might take a minute or two, depending on the speed of your internet connection
[preflight] You can also perform this action in beforehand using 'kubeadm config images pull'
...此处略去一堆输出...
当我们看到下面这个输出结果的时候,我们的集群就算是初始化成功了。
Your Kubernetes control-plane has initialized successfully!

To start using your cluster, you need to run the following as a regular user:

  mkdir -p $HOME/.kube
  sudo cp -i /etc/kubernetes/admin.conf $HOME/.kube/config
  sudo chown $(id -u):$(id -g) $HOME/.kube/config

Alternatively, if you are the root user, you can run:

  export KUBECONFIG=/etc/kubernetes/admin.conf

You should now deploy a pod network to the cluster.
Run "kubectl apply -f [podnetwork].yaml" with one of the options listed at:
  https://kubernetes.io/docs/concepts/cluster-administration/addons/

You can now join any number of the control-plane node running the following command on each as root:

  kubeadm join k8s-cilium-apiserver.tinychen.io:6443 --token abcdef.0123456789abcdef \
        --discovery-token-ca-cert-hash sha256:cc68219b233262d8834ad5d6e96166be487c751b53fb9ec19a5ca3599b538a33 \
        --control-plane --certificate-key e0bfc81fd9277731611f4b4351beed53a1d0c4e1c82932734a38919ddd76a185

Please note that the certificate-key gives access to cluster sensitive data, keep it secret!
As a safeguard, uploaded-certs will be deleted in two hours; If necessary, you can use
"kubeadm init phase upload-certs --upload-certs" to reload certs afterward.

Then you can join any number of worker nodes by running the following on each as root:

kubeadm join k8s-cilium-apiserver.tinychen.io:6443 --token abcdef.0123456789abcdef \
        --discovery-token-ca-cert-hash sha256:cc68219b233262d8834ad5d6e96166be487c751b53fb9ec19a5ca3599b538a33
接下来我们在剩下的两个master节点上面执行上面输出的命令,注意要执行带有--control-plane --certificate-key这两个参数的命令,其中--control-plane参数是确定该节点为master控制面节点,而--certificate-key参数则是把我们前面初始化集群的时候通过--upload-certs上传到k8s集群中的证书下载下来使用。
This node has joined the cluster and a new control plane instance was created:

* Certificate signing request was sent to apiserver and approval was received.
* The Kubelet was informed of the new secure connection details.
* Control plane label and taint were applied to the new node.
* The Kubernetes control plane instances scaled up.
* A new etcd member was added to the local/stacked etcd cluster.

To start administering your cluster from this node, you need to run the following as a regular user:

        mkdir -p $HOME/.kube
        sudo cp -i /etc/kubernetes/admin.conf $HOME/.kube/config
        sudo chown $(id -u):$(id -g) $HOME/.kube/config

Run 'kubectl get nodes' to see this node join the cluster.
最后再对剩下的三个worker节点执行普通的加入集群命令,当看到下面的输出的时候说明节点成功加入集群了。
This node has joined the cluster:
* Certificate signing request was sent to apiserver and a response was received.
* The Kubelet was informed of the new secure connection details.

Run 'kubectl get nodes' on the control-plane to see this node join the cluster.
如果不小心没保存初始化成功的输出信息,或者是以后还需要新增节点也没有关系,我们可以使用kubectl工具查看或者生成token
# 查看现有的token列表
$ kubeadm token list
TOKEN                     TTL         EXPIRES                USAGES                   DESCRIPTION                                                EXTRA GROUPS
abcdef.0123456789abcdef   23h         2022-12-09T08:14:37Z   authentication,signing   <none>                                                     system:bootstrappers:kubeadm:default-node-token
dss91p.3r5don4a3e9r2f29   1h          2022-12-08T10:14:36Z   <none>                   Proxy for managing TTL for the kubeadm-certs secret        <none>

# 如果token已经失效,那就再创建一个新的token
$ kubeadm token create
8hmoux.jabpgvs521r8rsqm

$ kubeadm token list
TOKEN                     TTL         EXPIRES                USAGES                   DESCRIPTION                                                EXTRA GROUPS
8hmoux.jabpgvs521r8rsqm   23h         2022-12-09T08:29:29Z   authentication,signing   <none>                                                     system:bootstrappers:kubeadm:default-node-token
abcdef.0123456789abcdef   23h         2022-12-09T08:14:37Z   authentication,signing   <none>                                                     system:bootstrappers:kubeadm:default-node-token
dss91p.3r5don4a3e9r2f29   1h          2022-12-08T10:14:36Z   <none>                   Proxy for managing TTL for the kubeadm-certs secret        <none>

# 如果找不到--discovery-token-ca-cert-hash参数,则可以在master节点上使用openssl工具来获取
$ openssl x509 -pubkey -in /etc/kubernetes/pki/ca.crt | openssl rsa -pubin -outform der 2>/dev/null | openssl dgst -sha256 -hex | sed 's/^.* //'
cc68219b233262d8834ad5d6e96166be487c751b53fb9ec19a5ca3599b538a33
配置kubeconfig
刚初始化成功之后,我们还没办法马上查看k8s集群信息,需要配置kubeconfig相关参数才能正常使用kubectl连接apiserver读取集群信息。
# 对于非root用户,可以这样操作
mkdir -p $HOME/.kube
sudo cp -i /etc/kubernetes/admin.conf $HOME/.kube/config
sudo chown $(id -u):$(id -g) $HOME/.kube/config

# 如果是root用户,可以直接导入环境变量
export KUBECONFIG=/etc/kubernetes/admin.conf

# 添加kubectl的自动补全功能
echo "source <(kubectl completion bash)" >> ~/.bashrc
前面我们提到过
kubectl不一定要安装在集群内,实际上只要是任何一台能连接到apiserver的机器上面都可以安装kubectl并且根据步骤配置kubeconfig,就可以使用kubectl命令行来管理对应的k8s集群。
配置完成后,我们再执行相关命令就可以查看集群的信息了,但是此时节点的状态还是NotReady,接下来就需要部署CNI了。
$ kubectl cluster-info
Kubernetes control plane is running at https://k8s-cilium-apiserver.tinychen.io:8443
CoreDNS is running at https://k8s-cilium-apiserver.tinychen.io:8443/api/v1/namespaces/kube-system/services/kube-dns:dns/proxy

To further debug and diagnose cluster problems, use 'kubectl cluster-info dump'.


$ kubectl get nodes -o wide
NAME                                       STATUS     ROLES           AGE     VERSION   INTERNAL-IP   EXTERNAL-IP   OS-IMAGE                KERNEL-VERSION               CONTAINER-RUNTIME
k8s-cilium-master-10-31-80-1.tinychen.io   NotReady   control-plane   16m     v1.25.4   10.31.80.1    <none>        CentOS Linux 7 (Core)   6.0.11-1.el7.elrepo.x86_64   containerd://1.6.11
k8s-cilium-master-10-31-80-2.tinychen.io   NotReady   control-plane   12m     v1.25.4   10.31.80.2    <none>        CentOS Linux 7 (Core)   6.0.11-1.el7.elrepo.x86_64   containerd://1.6.11
k8s-cilium-master-10-31-80-3.tinychen.io   NotReady   control-plane   7m42s   v1.25.4   10.31.80.3    <none>        CentOS Linux 7 (Core)   6.0.11-1.el7.elrepo.x86_64   containerd://1.6.11
k8s-cilium-worker-10-31-80-4.tinychen.io   NotReady   <none>          5m28s   v1.25.4   10.31.80.4    <none>        CentOS Linux 7 (Core)   6.0.11-1.el7.elrepo.x86_64   containerd://1.6.11
k8s-cilium-worker-10-31-80-5.tinychen.io   NotReady   <none>          4m40s   v1.25.4   10.31.80.5    <none>        CentOS Linux 7 (Core)   6.0.11-1.el7.elrepo.x86_64   containerd://1.6.11
k8s-cilium-worker-10-31-80-6.tinychen.io   NotReady   <none>          4m9s    v1.25.4   10.31.80.6    <none>        CentOS Linux 7 (Core)   6.0.11-1.el7.elrepo.x86_64   containerd://1.6.11

$ kubectl get pods -A -o wide
NAMESPACE     NAME                                                               READY   STATUS    RESTARTS       AGE   IP           NODE                                       NOMINATED NODE   READINESS GATES
kube-system   coredns-c676cc86f-6jg9b                                            0/1     Pending   0              31m   <none>       <none>                                     <none>           <none>
kube-system   coredns-c676cc86f-qmx9s                                            0/1     Pending   0              31m   <none>       <none>                                     <none>           <none>
kube-system   etcd-k8s-cilium-master-10-31-80-1.tinychen.io                      1/1     Running   0              31m   10.31.80.1   k8s-cilium-master-10-31-80-1.tinychen.io   <none>           <none>
kube-system   etcd-k8s-cilium-master-10-31-80-2.tinychen.io                      1/1     Running   0              28m   10.31.80.2   k8s-cilium-master-10-31-80-2.tinychen.io   <none>           <none>
kube-system   etcd-k8s-cilium-master-10-31-80-3.tinychen.io                      1/1     Running   0              22m   10.31.80.3   k8s-cilium-master-10-31-80-3.tinychen.io   <none>           <none>
kube-system   haproxy-k8s-cilium-master-10-31-80-1.tinychen.io                   1/1     Running   12 (10m ago)   31m   10.31.80.1   k8s-cilium-master-10-31-80-1.tinychen.io   <none>           <none>
kube-system   haproxy-k8s-cilium-master-10-31-80-2.tinychen.io                   1/1     Running   9 (11m ago)    28m   10.31.80.2   k8s-cilium-master-10-31-80-2.tinychen.io   <none>           <none>
kube-system   haproxy-k8s-cilium-master-10-31-80-3.tinychen.io                   1/1     Running   8 (11m ago)    22m   10.31.80.3   k8s-cilium-master-10-31-80-3.tinychen.io   <none>           <none>
kube-system   keepalived-k8s-cilium-master-10-31-80-1.tinychen.io                1/1     Running   0              31m   10.31.80.1   k8s-cilium-master-10-31-80-1.tinychen.io   <none>           <none>
kube-system   keepalived-k8s-cilium-master-10-31-80-2.tinychen.io                1/1     Running   0              27m   10.31.80.2   k8s-cilium-master-10-31-80-2.tinychen.io   <none>           <none>
kube-system   keepalived-k8s-cilium-master-10-31-80-3.tinychen.io                1/1     Running   0              22m   10.31.80.3   k8s-cilium-master-10-31-80-3.tinychen.io   <none>           <none>
kube-system   kube-apiserver-k8s-cilium-master-10-31-80-1.tinychen.io            1/1     Running   0              31m   10.31.80.1   k8s-cilium-master-10-31-80-1.tinychen.io   <none>           <none>
kube-system   kube-apiserver-k8s-cilium-master-10-31-80-2.tinychen.io            1/1     Running   0              27m   10.31.80.2   k8s-cilium-master-10-31-80-2.tinychen.io   <none>           <none>
kube-system   kube-apiserver-k8s-cilium-master-10-31-80-3.tinychen.io            1/1     Running   0              22m   10.31.80.3   k8s-cilium-master-10-31-80-3.tinychen.io   <none>           <none>
kube-system   kube-controller-manager-k8s-cilium-master-10-31-80-1.tinychen.io   1/1     Running   1 (28m ago)    31m   10.31.80.1   k8s-cilium-master-10-31-80-1.tinychen.io   <none>           <none>
kube-system   kube-controller-manager-k8s-cilium-master-10-31-80-2.tinychen.io   1/1     Running   0              28m   10.31.80.2   k8s-cilium-master-10-31-80-2.tinychen.io   <none>           <none>
kube-system   kube-controller-manager-k8s-cilium-master-10-31-80-3.tinychen.io   1/1     Running   0              22m   10.31.80.3   k8s-cilium-master-10-31-80-3.tinychen.io   <none>           <none>
kube-system   kube-proxy-52zmk                                                   1/1     Running   0              31m   10.31.80.1   k8s-cilium-master-10-31-80-1.tinychen.io   <none>           <none>
kube-system   kube-proxy-dg4nt                                                   1/1     Running   0              20m   10.31.80.5   k8s-cilium-worker-10-31-80-5.tinychen.io   <none>           <none>
kube-system   kube-proxy-gbgr5                                                   1/1     Running   0              28m   10.31.80.2   k8s-cilium-master-10-31-80-2.tinychen.io   <none>           <none>
kube-system   kube-proxy-gpzxv                                                   1/1     Running   0              19m   10.31.80.6   k8s-cilium-worker-10-31-80-6.tinychen.io   <none>           <none>
kube-system   kube-proxy-kn9gq                                                   1/1     Running   0              23m   10.31.80.3   k8s-cilium-master-10-31-80-3.tinychen.io   <none>           <none>
kube-system   kube-proxy-xw8nl                                                   1/1     Running   0              20m   10.31.80.4   k8s-cilium-worker-10-31-80-4.tinychen.io   <none>           <none>
kube-system   kube-scheduler-k8s-cilium-master-10-31-80-1.tinychen.io            1/1     Running   1 (28m ago)    31m   10.31.80.1   k8s-cilium-master-10-31-80-1.tinychen.io   <none>           <none>
kube-system   kube-scheduler-k8s-cilium-master-10-31-80-2.tinychen.io            1/1     Running   0              28m   10.31.80.2   k8s-cilium-master-10-31-80-2.tinychen.io   <none>           <none>
kube-system   kube-scheduler-k8s-cilium-master-10-31-80-3.tinychen.io            1/1     Running   0              22m   10.31.80.3   k8s-cilium-master-10-31-80-3.tinychen.io   <none>           <none>
安装CNI
部署helm3
cilium的部署依赖helm3,因此我们在部署cilium之前需要先安装helm3。
helm3的部署非常的简单,我们只要去GitHub找到对应系统版本的二进制文件,下载解压后放到系统的执行目录就可以使用了。
$ wget https://get.helm.sh/helm-v3.10.2-linux-amd64.tar.gz
$ tar -zxvf helm-v3.10.2-linux-amd64.tar.gz
$ cp -rp linux-amd64/helm /usr/local/bin/
$ helm version
version.BuildInfo{Version:"v3.10.2", GitCommit:"50f003e5ee8704ec937a756c646870227d7c8b58", GitTreeState:"clean", GoVersion:"go1.18.8"}
部署cilium
完整的部署指南可以参考官方文档,首先我们添加helm的repo。
$ helm repo add cilium https://helm.cilium.io/
"cilium" has been added to your repositories
$ helm repo list
NAME    URL
cilium  https://helm.cilium.io/
参考官网的文档,这里我们需要指定集群的APIserver的IP和端口
 helm install cilium ./cilium \
     --namespace kube-system \
     --set kubeProxyReplacement=strict \
     --set k8sServiceHost=REPLACE_WITH_API_SERVER_IP \
     --set k8sServicePort=REPLACE_WITH_API_SERVER_PORT
但是考虑到cilium默认使用的podCIDR为10.0.0.0/8,很可能会和我们集群内的网络冲突,最好的方案就是初始化的时候指定podCIDR,关于初始化的时候podCIDR的设置,可以参考官方的这个文章。
helm install cilium cilium/cilium --version 1.12.4 \
    --namespace kube-system \
    --set k8sServiceHost=REPLACE_WITH_API_SERVER_IP \
    --set k8sServicePort=REPLACE_WITH_API_SERVER_PORT \
	--set ipam.operator.clusterPoolIPv4PodCIDRList=<IPv4CIDR> \
	--set ipam.operator.clusterPoolIPv4MaskSize=<IPv4MaskSize>
最后可以得到我们的初始化安装参数
helm install cilium cilium/cilium --version 1.12.4 \
	--namespace kube-system \
	--set k8sServiceHost=k8s-cilium-apiserver.tinychen.io \
	--set k8sServicePort=8443 \
	--set ipam.operator.clusterPoolIPv4PodCIDRList=10.32.0.0/17 \
	--set ipam.operator.clusterPoolIPv4MaskSize=24
然后我们使用指令进行安装
$ helm install cilium cilium/cilium --version 1.12.4 \
> --namespace kube-system \
> --set k8sServiceHost=k8s-cilium-apiserver.tinychen.io \
> --set k8sServicePort=8443 \
> --set ipam.operator.clusterPoolIPv4PodCIDRList=10.32.0.0/17 \
> --set ipam.operator.clusterPoolIPv4MaskSize=24
NAME: cilium
LAST DEPLOYED: Thu Dec  8 17:01:13 2022
NAMESPACE: kube-system
STATUS: deployed
REVISION: 1
TEST SUITE: None
NOTES:
You have successfully installed Cilium with Hubble.

Your release version is 1.12.4.

For any further help, visit https://docs.cilium.io/en/v1.12/gettinghelp
此时我们再查看集群的daemonset和deployment状态:
# 这时候查看集群的daemonset和deployment状态可以看到cilium相关的服务已经正常
$ kubectl get ds -A
NAMESPACE     NAME         DESIRED   CURRENT   READY   UP-TO-DATE   AVAILABLE   NODE SELECTOR            AGE
kube-system   cilium       6         6         6       6            6           kubernetes.io/os=linux   3m14s
kube-system   kube-proxy   6         6         6       6            6           kubernetes.io/os=linux   49m

$ kubectl get deploy -A
NAMESPACE     NAME              READY   UP-TO-DATE   AVAILABLE   AGE
kube-system   cilium-operator   2/2     2            2           3m29s
kube-system   coredns           2/2     2            2           50m
再查看所有的pod,状态都正常,ip也和我们初始化的时候分配的ip段一致,说明初始化的参数设置生效了。
# 再查看所有的pod,状态都正常,ip按预期进行了分配
$# kubectl get pods -A -o wide
NAMESPACE     NAME                                                               READY   STATUS    RESTARTS       AGE    IP            NODE                                       NOMINATED NODE   READINESS GATES
kube-system   cilium-5ppb6                                                       1/1     Running   0              3m4s   10.31.80.1    k8s-cilium-master-10-31-80-1.tinychen.io   <none>           <none>
kube-system   cilium-chrch                                                       1/1     Running   0              3m4s   10.31.80.5    k8s-cilium-worker-10-31-80-5.tinychen.io   <none>           <none>
kube-system   cilium-f2sdc                                                       1/1     Running   0              3m4s   10.31.80.4    k8s-cilium-worker-10-31-80-4.tinychen.io   <none>           <none>
kube-system   cilium-fbrdl                                                       1/1     Running   0              3m4s   10.31.80.6    k8s-cilium-worker-10-31-80-6.tinychen.io   <none>           <none>
kube-system   cilium-g7dzj                                                       1/1     Running   0              3m4s   10.31.80.3    k8s-cilium-master-10-31-80-3.tinychen.io   <none>           <none>
kube-system   cilium-g7k5m                                                       1/1     Running   0              3m4s   10.31.80.2    k8s-cilium-master-10-31-80-2.tinychen.io   <none>           <none>
kube-system   cilium-operator-5598954549-62q7t                                   1/1     Running   0              3m4s   10.31.80.4    k8s-cilium-worker-10-31-80-4.tinychen.io   <none>           <none>
kube-system   cilium-operator-5598954549-zctb8                                   1/1     Running   0              3m4s   10.31.80.6    k8s-cilium-worker-10-31-80-6.tinychen.io   <none>           <none>
kube-system   coredns-c676cc86f-6jg9b                                            1/1     Running   0              49m    10.32.0.64    k8s-cilium-worker-10-31-80-6.tinychen.io   <none>           <none>
kube-system   coredns-c676cc86f-qmx9s                                            1/1     Running   0              49m    10.32.0.145   k8s-cilium-worker-10-31-80-6.tinychen.io   <none>           <none>
kube-system   etcd-k8s-cilium-master-10-31-80-1.tinychen.io                      1/1     Running   0              49m    10.31.80.1    k8s-cilium-master-10-31-80-1.tinychen.io   <none>           <none>
kube-system   etcd-k8s-cilium-master-10-31-80-2.tinychen.io                      1/1     Running   0              45m    10.31.80.2    k8s-cilium-master-10-31-80-2.tinychen.io   <none>           <none>
kube-system   etcd-k8s-cilium-master-10-31-80-3.tinychen.io                      1/1     Running   0              40m    10.31.80.3    k8s-cilium-master-10-31-80-3.tinychen.io   <none>           <none>
kube-system   haproxy-k8s-cilium-master-10-31-80-1.tinychen.io                   1/1     Running   12 (28m ago)   49m    10.31.80.1    k8s-cilium-master-10-31-80-1.tinychen.io   <none>           <none>
kube-system   haproxy-k8s-cilium-master-10-31-80-2.tinychen.io                   1/1     Running   9 (29m ago)    45m    10.31.80.2    k8s-cilium-master-10-31-80-2.tinychen.io   <none>           <none>
kube-system   haproxy-k8s-cilium-master-10-31-80-3.tinychen.io                   1/1     Running   8 (29m ago)    40m    10.31.80.3    k8s-cilium-master-10-31-80-3.tinychen.io   <none>           <none>
kube-system   keepalived-k8s-cilium-master-10-31-80-1.tinychen.io                1/1     Running   0              49m    10.31.80.1    k8s-cilium-master-10-31-80-1.tinychen.io   <none>           <none>
kube-system   keepalived-k8s-cilium-master-10-31-80-2.tinychen.io                1/1     Running   0              45m    10.31.80.2    k8s-cilium-master-10-31-80-2.tinychen.io   <none>           <none>
kube-system   keepalived-k8s-cilium-master-10-31-80-3.tinychen.io                1/1     Running   0              40m    10.31.80.3    k8s-cilium-master-10-31-80-3.tinychen.io   <none>           <none>
kube-system   kube-apiserver-k8s-cilium-master-10-31-80-1.tinychen.io            1/1     Running   0              49m    10.31.80.1    k8s-cilium-master-10-31-80-1.tinychen.io   <none>           <none>
kube-system   kube-apiserver-k8s-cilium-master-10-31-80-2.tinychen.io            1/1     Running   0              45m    10.31.80.2    k8s-cilium-master-10-31-80-2.tinychen.io   <none>           <none>
kube-system   kube-apiserver-k8s-cilium-master-10-31-80-3.tinychen.io            1/1     Running   0              40m    10.31.80.3    k8s-cilium-master-10-31-80-3.tinychen.io   <none>           <none>
kube-system   kube-controller-manager-k8s-cilium-master-10-31-80-1.tinychen.io   1/1     Running   1 (45m ago)    49m    10.31.80.1    k8s-cilium-master-10-31-80-1.tinychen.io   <none>           <none>
kube-system   kube-controller-manager-k8s-cilium-master-10-31-80-2.tinychen.io   1/1     Running   0              45m    10.31.80.2    k8s-cilium-master-10-31-80-2.tinychen.io   <none>           <none>
kube-system   kube-controller-manager-k8s-cilium-master-10-31-80-3.tinychen.io   1/1     Running   0              40m    10.31.80.3    k8s-cilium-master-10-31-80-3.tinychen.io   <none>           <none>
kube-system   kube-proxy-52zmk                                                   1/1     Running   0              49m    10.31.80.1    k8s-cilium-master-10-31-80-1.tinychen.io   <none>           <none>
kube-system   kube-proxy-dg4nt                                                   1/1     Running   0              37m    10.31.80.5    k8s-cilium-worker-10-31-80-5.tinychen.io   <none>           <none>
kube-system   kube-proxy-gbgr5                                                   1/1     Running   0              45m    10.31.80.2    k8s-cilium-master-10-31-80-2.tinychen.io   <none>           <none>
kube-system   kube-proxy-gpzxv                                                   1/1     Running   0              37m    10.31.80.6    k8s-cilium-worker-10-31-80-6.tinychen.io   <none>           <none>
kube-system   kube-proxy-kn9gq                                                   1/1     Running   0              40m    10.31.80.3    k8s-cilium-master-10-31-80-3.tinychen.io   <none>           <none>
kube-system   kube-proxy-xw8nl                                                   1/1     Running   0              38m    10.31.80.4    k8s-cilium-worker-10-31-80-4.tinychen.io   <none>           <none>
kube-system   kube-scheduler-k8s-cilium-master-10-31-80-1.tinychen.io            1/1     Running   1 (45m ago)    49m    10.31.80.1    k8s-cilium-master-10-31-80-1.tinychen.io   <none>           <none>
kube-system   kube-scheduler-k8s-cilium-master-10-31-80-2.tinychen.io            1/1     Running   0              45m    10.31.80.2    k8s-cilium-master-10-31-80-2.tinychen.io   <none>           <none>
kube-system   kube-scheduler-k8s-cilium-master-10-31-80-3.tinychen.io            1/1     Running   0              40m    10.31.80.3    k8s-cilium-master-10-31-80-3.tinychen.io   <none>           <none>
这时候我们再进入pod中检查cilium的状态
# --verbose参数可以查看详细的状态信息
# cilium-97fn7需要替换为任意一个cilium的pod
$ kubectl exec -it -n kube-system cilium-5ppb6 -- cilium status --verbose
Defaulted container "cilium-agent" out of: cilium-agent, mount-cgroup (init), apply-sysctl-overwrites (init), mount-bpf-fs (init), clean-cilium-state (init)
KVStore:                Ok   Disabled
Kubernetes:             Ok   1.25 (v1.25.4) [linux/amd64]
Kubernetes APIs:        ["cilium/v2::CiliumClusterwideNetworkPolicy", "cilium/v2::CiliumEndpoint", "cilium/v2::CiliumNetworkPolicy", "cilium/v2::CiliumNode", "core/v1::Namespace", "core/v1::Node", "core/v1::Pods", "core/v1::Service", "discovery/v1::EndpointSlice", "networking.k8s.io/v1::NetworkPolicy"]
KubeProxyReplacement:   Disabled
Host firewall:          Disabled
CNI Chaining:           none
Cilium:                 Ok   1.12.4 (v1.12.4-6eaecaf)
NodeMonitor:            Listening for events on 16 CPUs with 64x4096 of shared memory
Cilium health daemon:   Ok
IPAM:                   IPv4: 2/254 allocated from 10.32.3.0/24,
Allocated addresses:
  10.32.3.145 (router)
  10.32.3.170 (health)
BandwidthManager:       Disabled
Host Routing:           Legacy
Masquerading:           IPTables [IPv4: Enabled, IPv6: Disabled]
Clock Source for BPF:   ktime
Controller Status:      18/18 healthy
  Name                                  Last success   Last error   Count   Message
  cilium-health-ep                      10s ago        never        0       no error
  dns-garbage-collector-job             16s ago        never        0       no error
  endpoint-1050-regeneration-recovery   never          never        0       no error
  endpoint-671-regeneration-recovery    never          never        0       no error
  endpoint-gc                           2m17s ago      never        0       no error
  ipcache-inject-labels                 2m13s ago      2m15s ago    0       no error
  k8s-heartbeat                         17s ago        never        0       no error
  link-cache                            11s ago        never        0       no error
  metricsmap-bpf-prom-sync              1s ago         never        0       no error
  resolve-identity-1050                 2m10s ago      never        0       no error
  resolve-identity-671                  2m11s ago      never        0       no error
  sync-endpoints-and-host-ips           11s ago        never        0       no error
  sync-lb-maps-with-k8s-services        2m11s ago      never        0       no error
  sync-policymap-1050                   1m1s ago       never        0       no error
  sync-policymap-671                    9s ago         never        0       no error
  sync-to-k8s-ciliumendpoint (1050)     10s ago        never        0       no error
  sync-to-k8s-ciliumendpoint (671)      1s ago         never        0       no error
  template-dir-watcher                  never          never        0       no error
Proxy Status:            OK, ip 10.32.3.145, 0 redirects active on ports 10000-20000
Global Identity Range:   min 256, max 65535
Hubble:                  Ok   Current/Max Flows: 250/4095 (6.11%), Flows/s: 1.74   Metrics: Disabled
KubeProxyReplacement Details:
  Status:                 Disabled
  Socket LB:              Disabled
  Session Affinity:       Disabled
  Graceful Termination:   Enabled
  NAT46/64 Support:       Disabled
  Services:
  - ClusterIP:      Enabled
  - NodePort:       Disabled
  - LoadBalancer:   Disabled
  - externalIPs:    Disabled
  - HostPort:       Disabled
BPF Maps:   dynamic sizing: on (ratio: 0.002500)
  Name                          Size
  Non-TCP connection tracking   73621
  TCP connection tracking       147243
  Endpoint policy               65535
  Events                        16
  IP cache                      512000
  IP masquerading agent         16384
  IPv4 fragmentation            8192
  IPv4 service                  65536
  IPv6 service                  65536
  IPv4 service backend          65536
  IPv6 service backend          65536
  IPv4 service reverse NAT      65536
  IPv6 service reverse NAT      65536
  Metrics                       1024
  NAT                           147243
  Neighbor table                147243
  Global policy                 16384
  Per endpoint policy           65536
  Session affinity              65536
  Signal                        16
  Sockmap                       65535
  Sock reverse NAT              73621
  Tunnel                        65536
Encryption:                                              Disabled
Cluster health:                                          6/6 reachable   (2022-12-08T09:03:25Z)
  Name                                                   IP              Node        Endpoints
  k8s-cilium-master-10-31-80-1.tinychen.io (localhost)   10.31.80.1      reachable   reachable
  k8s-cilium-master-10-31-80-2.tinychen.io               10.31.80.2      reachable   reachable
  k8s-cilium-master-10-31-80-3.tinychen.io               10.31.80.3      reachable   reachable
  k8s-cilium-worker-10-31-80-4.tinychen.io               10.31.80.4      reachable   reachable
  k8s-cilium-worker-10-31-80-5.tinychen.io               10.31.80.5      reachable   reachable
  k8s-cilium-worker-10-31-80-6.tinychen.io               10.31.80.6      reachable   reachable
其实到这里cilium的部署就可以说是ok了的,整个集群的cni都处于正常状态,其余的工作负载也都能够正常运行了。
部署hubble
cilium还有一大特点就是其可观测性比其他的cni要优秀很多,想要体验到cilium的可观测性,我们就需要在k8s集群中安装hubble。同时hubble提供了ui界面来更好的实现集群内网络的可观测性,这里我们也一并把hubble-ui安装上。
helm3安装hubble
我们继续接着上面的helm3来安装hubble,因为我们已经安装了cilium,因此这里需要使用upgrade来进行升级安装,并且使用--reuse-values来复用之前的安装参数
helm upgrade cilium cilium/cilium --version 1.12.4 \
   --namespace kube-system \
   --reuse-values \
   --set hubble.relay.enabled=true \
   --set hubble.ui.enabled=true
然后我们直接进行安装
$ helm upgrade cilium cilium/cilium --version 1.12.4 \
>    --namespace kube-system \
>    --reuse-values \
>    --set hubble.relay.enabled=true \
>    --set hubble.ui.enabled=true
Release "cilium" has been upgraded. Happy Helming!
NAME: cilium
LAST DEPLOYED: Thu Dec  8 17:06:51 2022
NAMESPACE: kube-system
STATUS: deployed
REVISION: 2
TEST SUITE: None
NOTES:
You have successfully installed Cilium with Hubble Relay and Hubble UI.

Your release version is 1.12.4.

For any further help, visit https://docs.cilium.io/en/v1.12/gettinghelp
随后我们查看相关的集群状态,可以看到相对应的pod、deploy和svc都工作正常
$ kubectl get pod -A | grep hubble
kube-system   hubble-relay-67ffc5f588-qr8nt                                      1/1     Running   0              56s
kube-system   hubble-ui-5dc4d884b6-84qlp                                         2/2     Running   0              56s
$ kubectl get deploy -A | grep hubble
kube-system   hubble-relay      1/1     1            1           3m12s
kube-system   hubble-ui         1/1     1            1           3m12s
$ kubectl get svc -A | grep hubble
kube-system   hubble-peer    ClusterIP   10.32.131.127   <none>        443/TCP                  9m3s
kube-system   hubble-relay   ClusterIP   10.32.171.0     <none>        80/TCP                   3m22s
kube-system   hubble-ui      ClusterIP   10.32.184.206   <none>        80/TCP                   3m22s
cilium-cli安装hubble
使用cilium-cli功能来安装hubble也非常简单:
# 首先安装cilium-cli工具
# cilium的cli工具是一个二进制的可执行文件
$ curl -L --remote-name-all https://github.com/cilium/cilium-cli/releases/latest/download/cilium-linux-amd64.tar.gz{,.sha256sum}
$ sha256sum --check cilium-linux-amd64.tar.gz.sha256sum
cilium-linux-amd64.tar.gz: OK
$ sudo tar xzvfC cilium-linux-amd64.tar.gz /usr/local/bin
cilium

# 然后直接启用hubble
$ cilium hubble enable
# 再启用hubble-ui
$ cilium hubble enable --ui
# 接着查看cilium状态
$ cilium status
    /¯¯\
 /¯¯\__/¯¯\    Cilium:         OK
 \__/¯¯\__/    Operator:       OK
 /¯¯\__/¯¯\    Hubble:         OK
 \__/¯¯\__/    ClusterMesh:    disabled
    \__/

Deployment        hubble-ui          Desired: 1, Ready: 1/1, Available: 1/1
DaemonSet         cilium             Desired: 6, Ready: 6/6, Available: 6/6
Deployment        hubble-relay       Desired: 1, Ready: 1/1, Available: 1/1
Deployment        cilium-operator    Desired: 2, Ready: 2/2, Available: 2/2
Containers:       cilium             Running: 6
                  hubble-relay       Running: 1
                  cilium-operator    Running: 2
                  hubble-ui          Running: 1
Cluster Pods:     4/4 managed by Cilium
Image versions    cilium-operator    quay.io/cilium/operator-generic:v1.12.4@sha256:071089ec5bca1f556afb8e541d9972a0dfb09d1e25504ae642ced021ecbedbd1: 2
                  hubble-ui          quay.io/cilium/hubble-ui-backend:v0.9.2@sha256:a3ac4d5b87889c9f7cc6323e86d3126b0d382933bd64f44382a92778b0cde5d7: 1
                  hubble-ui          quay.io/cilium/hubble-ui:v0.9.2@sha256:d3596efc94a41c6b772b9afe6fe47c17417658956e04c3e2a28d293f2670663e: 1
                  cilium             quay.io/cilium/cilium:v1.12.4@sha256:4b074fcfba9325c18e97569ed1988464309a5ebf64bbc79bec6f3d58cafcb8cf: 6
                  hubble-relay       quay.io/cilium/hubble-relay:v1.12.4@sha256:dc5b396e94f986f83ccef89f13a91c29df482d4af491ff3bd4d40c05873d351a: 1
安装hubble客户端
和cilium一样,hubble也提供了一个客户端来让我们操作
# 首先我们需要安装hubble的客户端,安装原理和过程与安装cilium几乎一致
$ export HUBBLE_VERSION=$(curl -s https://raw.githubusercontent.com/cilium/hubble/master/stable.txt)
$ curl -L --remote-name-all https://github.com/cilium/hubble/releases/download/$HUBBLE_VERSION/hubble-linux-amd64.tar.gz{,.sha256sum}
$ sha256sum --check hubble-linux-amd64.tar.gz.sha256sum
$ sudo tar xzvfC hubble-linux-amd64.tar.gz /usr/local/bin
$ rm hubble-linux-amd64.tar.gz{,.sha256sum}
$ hubble --version
hubble v0.10.0
然后我们需要暴露hubble api服务的端口,直接使用kubectl的port-forward功能把hubble-relay这个服务的80端口暴露到4245端口上
# 仅暴露在IPV4网络中
$ kubectl port-forward -n kube-system svc/hubble-relay --address 0.0.0.0 4245:80 &
# 同时暴露在IPV6和IPV4网络中
$ kubectl port-forward -n kube-system svc/hubble-relay --address 0.0.0.0 --address :: 4245:80 &
如果使用cilium-cli工具安装的hubble也可以使用cilium暴露api端口,需要注意的是该命令默认会暴露到IPV6和IPV4网络中,如果宿主机节点不支持ipv6网络会报错
$ cilium hubble port-forward&
api端口暴露完成之后我们就可以测试一下hubble客户端的工作状态是否正常
$ hubble status
Handling connection for 4245
Healthcheck (via localhost:4245): Ok
Current/Max Flows: 10,903/12,285 (88.75%)
Flows/s: 5.98
Connected Nodes: 3/3
这里需要注意如果发现hubble的状态不正常,查看日志发现
$ kubectl logs -f  hubble-relay-67ffc5f588-qr8nt -n kube-system
 level=warning msg="Failed to create peer client for peers synchronization; will try again after the timeout has expired" error="context deadline exceeded" subsys=hubble-relay target="hubble-peer.kube-system.svc.cluster.local:443"
主要是因为前面初始化的时候我们定义了集群名为cili-cluster.tclocal,因此集群中coredns的配置没有cluster.local的解析,我们手动增加一个即可。
$ kubectl get cm coredns -n kube-system -o yaml
apiVersion: v1
data:
  Corefile: |
    .:53 {
        errors
        health {
           lameduck 5s
        }
        ready
        kubernetes cili-cluster.tclocal in-addr.arpa ip6.arpa {
           pods insecure
           fallthrough in-addr.arpa ip6.arpa
           ttl 30
        }
        prometheus :9153
        forward . /etc/resolv.conf {
           max_concurrent 1000
        }
        cache 30
        loop
        reload
        loadbalance
    }
    cluster.local.:53 {
        errors
        health {
           lameduck 5s
        }
        ready
        kubernetes cluster.local in-addr.arpa ip6.arpa {
           pods insecure
           fallthrough in-addr.arpa ip6.arpa
           ttl 30
        }
        prometheus :9153
        cache 30
        loop
        reload
        loadbalance
    }
kind: ConfigMap
metadata:
  creationTimestamp: "2022-12-08T08:14:37Z"
  name: coredns
  namespace: kube-system
  resourceVersion: "11835"
  uid: fbdcef03-87a6-4ddb-b620-c55a17c0d7d7
暴露hubble-ui
官方介绍里面是使用cilium工具直接暴露hubble-ui的访问端口到宿主机上面的12000端口
# 将hubble-ui这个服务的80端口暴露到宿主机上面的12000端口上面
$ cilium hubble ui&
[2] 5809
ℹ️  Opening "http://localhost:12000" in your browser...
实际上执行的操作等同于下面这个命令
# 同时暴露在IPV6和IPV4网络中
# kubectl port-forward -n kube-system svc/hubble-ui --address 0.0.0.0 --address :: 12000:80

# 仅暴露在IPV4网络中
# kubectl port-forward -n kube-system svc/hubble-ui --address 0.0.0.0 12000:80
这里我们使用nodeport的方式来暴露hubble-ui,首先我们查看原来的hubble-ui这个svc的配置
$ kubectl get svc -n kube-system hubble-ui -o yaml
...此处略去一堆输出...
  - name: http
    port: 80
    protocol: TCP
    targetPort: 8081
  selector:
    k8s-app: hubble-ui
  sessionAffinity: None
  type: ClusterIP
...此处略去一堆输出...
我们把默认的ClusterIP修改为NodePort,并且指定端口为nodePort: 30081
$ kubectl get svc -n kube-system hubble-ui -o yaml
...此处略去一堆输出...
  ports:
  - name: http
    nodePort: 30081
    port: 80
    protocol: TCP
    targetPort: 8081
  selector:
    k8s-app: hubble-ui
  sessionAffinity: None
  type: NodePort
...此处略去一堆输出...
修改前后对比查看状态
# 修改前,使用ClusterIP
$ kubectl get svc -A | grep hubble-ui
kube-system   hubble-ui      ClusterIP   10.32.184.206   <none>        80/TCP                   82s

# 修改后,使用NodePort
$ kubectl get svc -A | grep hubble-ui
kube-system   hubble-ui      NodePort    10.32.184.206   <none>        80:30081/TCP             13m
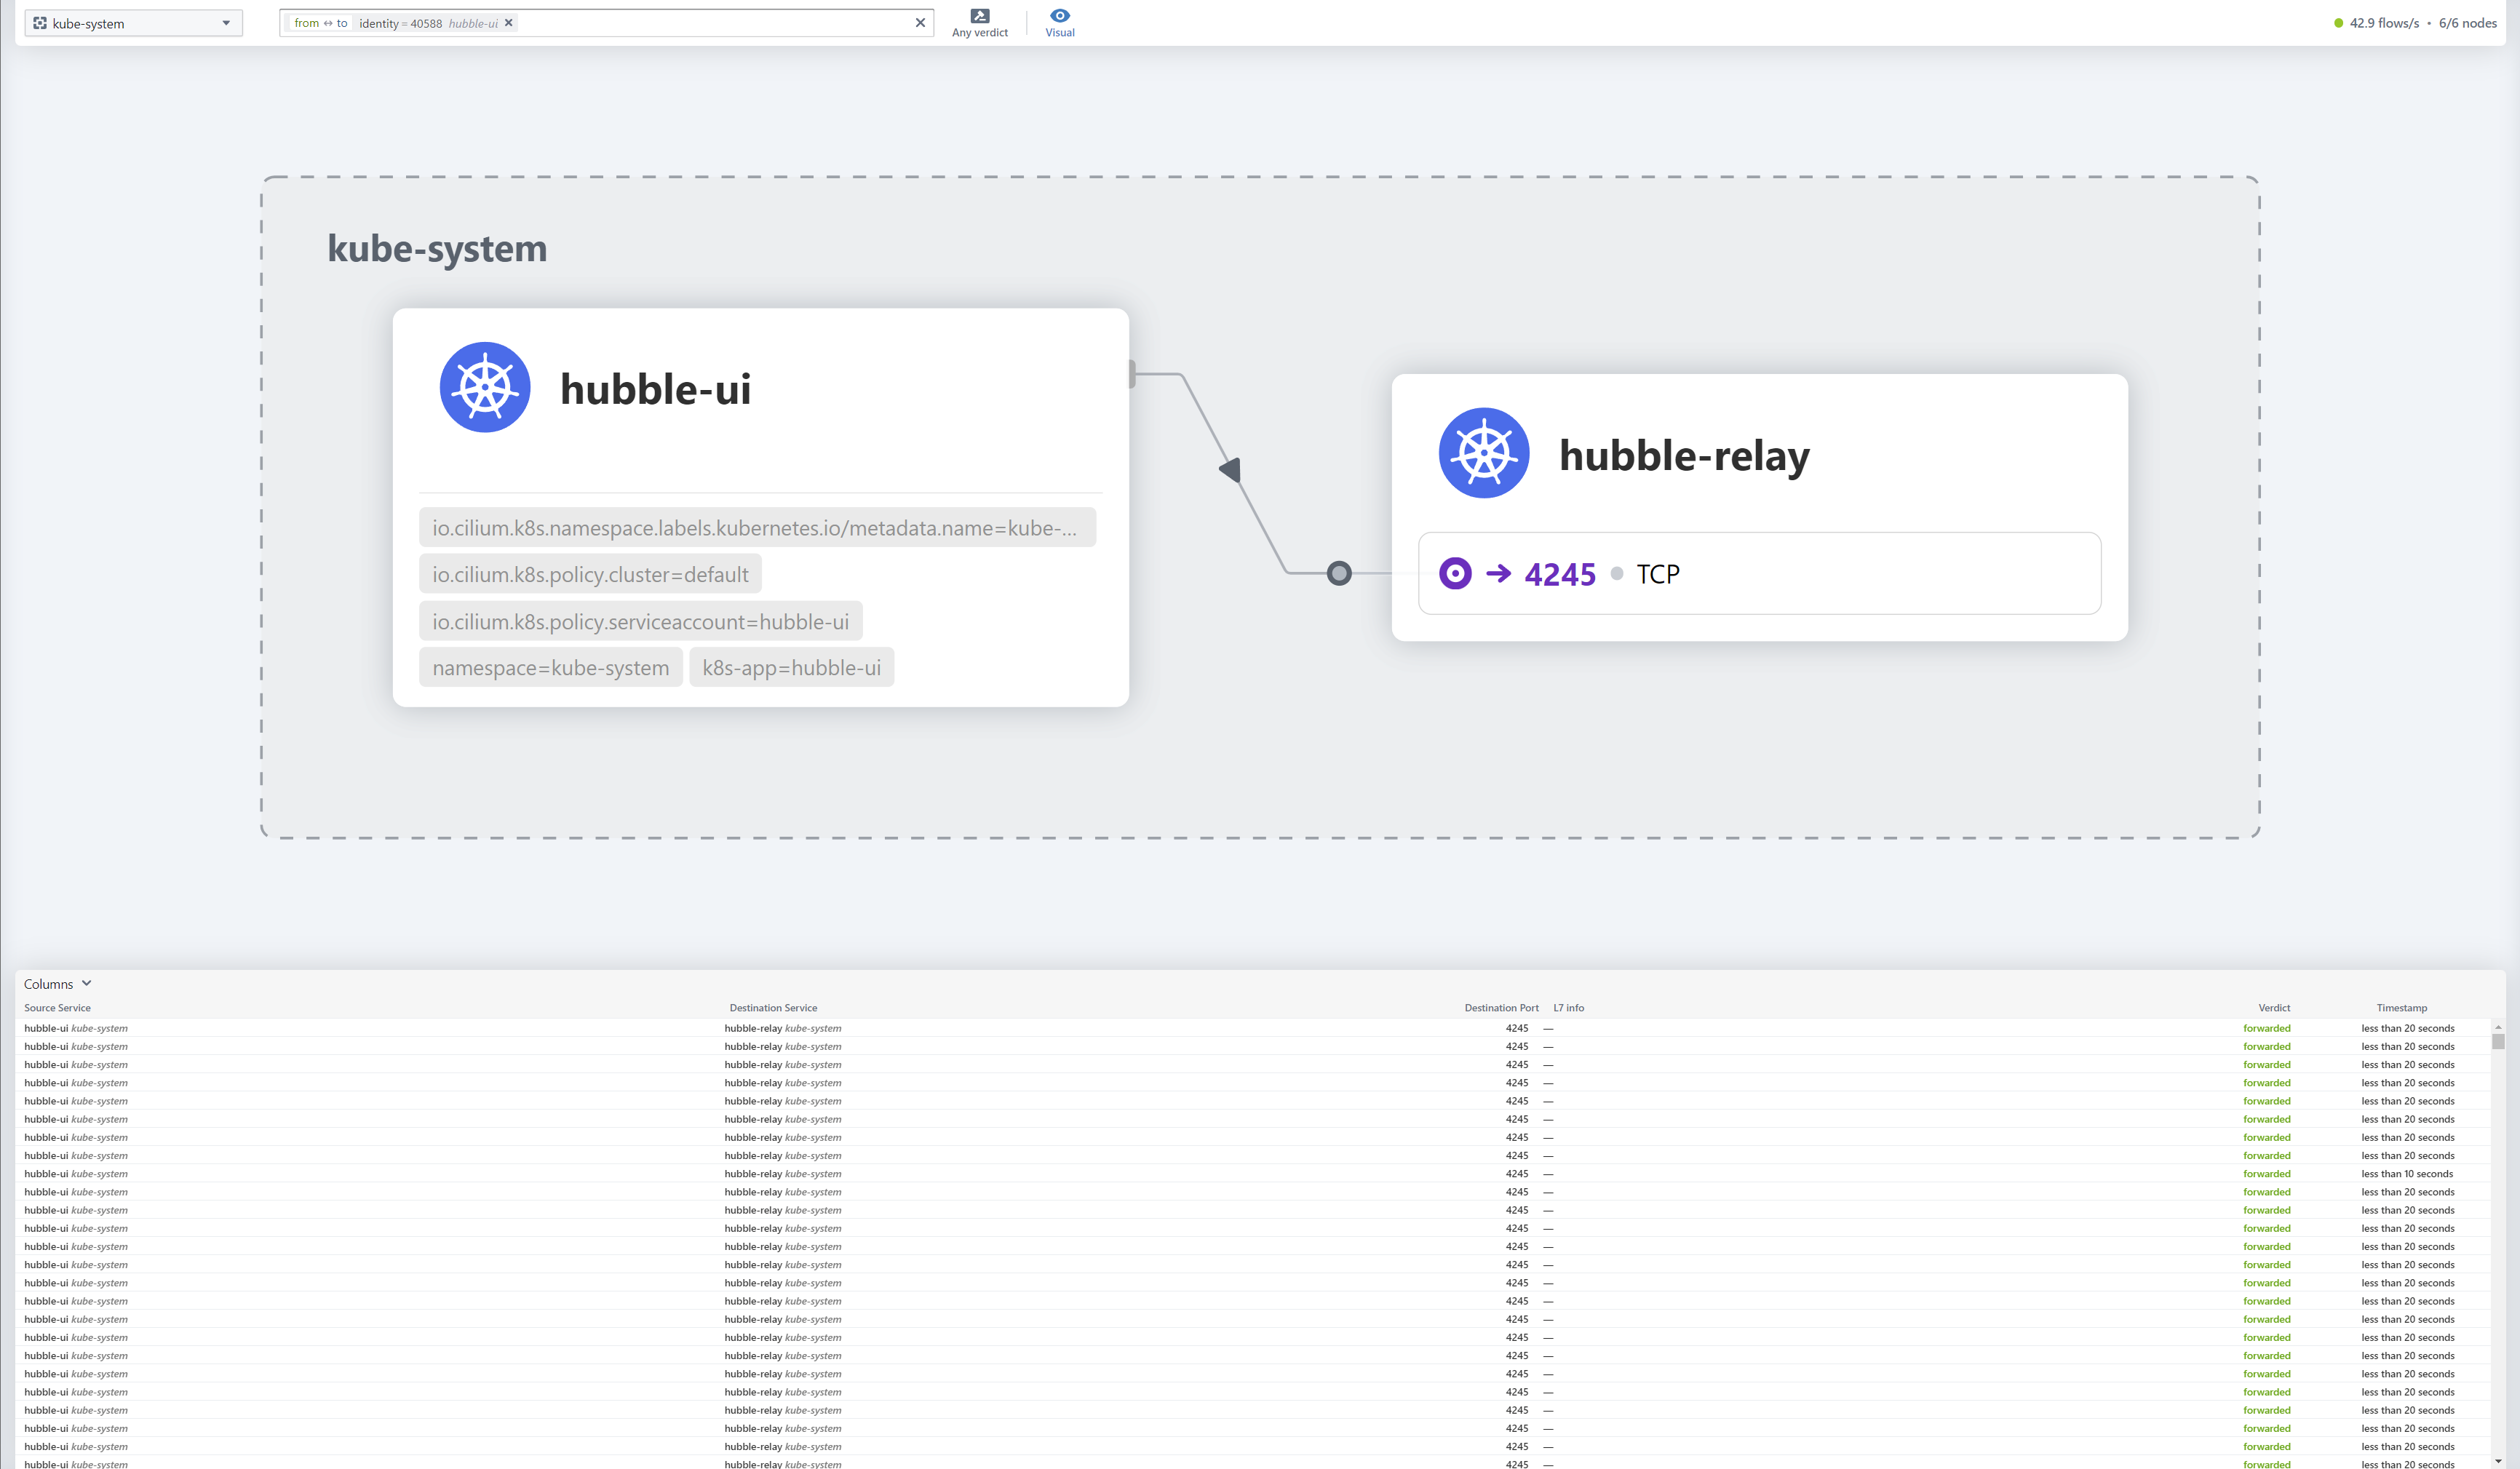
这时候我们在浏览器中访问http://10.31.80.1:30081就可以看到hubble的ui界面了
配置BGP路由
使用bird2
cilium官方给出的基于bird宣告BGP路由的架构图如下:
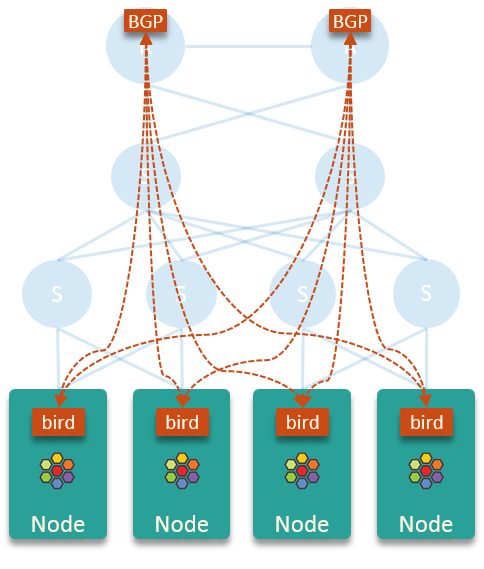
- 这里假设的是存在两个核心路由器,实际上根据网络环境的不同可以动态变化(可以是多个路由器或者是能跑BGP路由的三层交换机),在下面的测试环境中我们只使用一个openwrt来充当路由器的角色
bird不从核心路由器和其他节点学习路由,这使得每个节点的内核路由表保持干净和小,并且没有性能问题(这里的性能问题指的是bird的性能问题)。- 在这个方案中,每个节点只是将 pod 出口流量发送到节点的默认网关(核心路由器),并让后者进行路由。
上述的这个方案最大的特点就是每个node节点都会把整个pod的CIDR发布到对端路由器上,并不会精确控制每个node的路由条目。
好处是只要还有一个node的BGP连接正常,那么集群外部就能够访问所有node节点上面的pod;坏处就是集群外部访问pod的流量不一定会直接转发到对应pod所在的node上面,很可能会转发到其他的node上面,再通过这个node上面的具体路由走隧道转发到对应的pod上。
# 首先使用yum安装bird2
$ yum install bird2 -y

# 如果没有bird2的话可以先添加epel源
$ yum install epel-release -y

# 配置好开机启动
$ systemctl enable bird
$ systemctl restart bird

$ birdc show route
BIRD 2.0.10 ready.
bird的配置文件也是相对比较简单,下面是其中一台机器的配置,这里10.31.80.1是本机IP,64515是cilium集群的ASN号,而10.31.254.253是路由器的IP,64512是路由器端的ASN号。
注意这里的配置开启了BFD、ECMP和graceful restart,更详细的高级配置可以参考cilium的官方文档。
log syslog all;

router id 10.31.80.1;

protocol device {
        scan time 10;           # Scan interfaces every 10 seconds
}

# Disable automatically generating direct routes to all network interfaces.
protocol direct {
        disabled;               # Disable by default
}

# Forbid synchronizing BIRD routing tables with the OS kernel.
protocol kernel {
        ipv4 {                    # Connect protocol to IPv4 table by channel
                import none;      # Import to table, default is import all
                export none;      # Export to protocol. default is export none
        };

        # Configure ECMP
        merge paths yes limit 16 ;
}

# Static IPv4 routes.
protocol static {
      ipv4;
      route 10.32.0.0/17 via "cilium_host";
}

protocol bfd {
      interface "{{ grains['node_mgnt_device'] }}" {
              min rx interval 100 ms;
              min tx interval 100 ms;
              idle tx interval 300 ms;
              multiplier 10;
      };

      neighbor 10.31.254.253;
}

# BGP peers
protocol bgp uplink0 {
      description "OpenWRT BGP uplink 0";
      local 10.31.80.1 as 64515;
      neighbor 10.31.254.253 as 64512;
      graceful restart;
      bfd on;

      ipv4 {
              import filter {reject;};
              export filter {accept;};
      };
}
六个机器都成功配置之后我们在路由器侧应该是可以看到类似的路由条目,此时在集群外的机器上面如果添加了对应pod网段的路由的话,是可以通过pod IP直接访问到集群内的pod。
# 查看路由器上面的状态
tiny-openwrt# show ip route
......
B>* 10.32.0.0/17 [20/0] via 10.31.80.1, eth0, weight 1, 00:00:12
  *                     via 10.31.80.2, eth0, weight 1, 00:00:12
  *                     via 10.31.80.3, eth0, weight 1, 00:00:12
  *                     via 10.31.80.4, eth0, weight 1, 00:00:12
  *                     via 10.31.80.5, eth0, weight 1, 00:00:12
  *                     via 10.31.80.6, eth0, weight 1, 00:00:12
......

# 查看对应node上面的bird状态
[root@k8s-cilium-master-10-31-80-1 ~]# birdc
BIRD 2.0.10 ready.
bird> show route
Table master4:
10.32.0.0/17         unicast [static1 15:33:26.703] * (200)
        dev cilium_host
bird>
使用kube-router
配置kube-router
curl -LO https://raw.githubusercontent.com/cloudnativelabs/kube-router/v1.2/daemonset/generic-kuberouter-only-advertise-routes.yaml
默认的arg参数如下,完整的配置参考官方文档
        args:
        - "--run-router=true"
        - "--run-firewall=false"
        - "--run-service-proxy=false"
        - "--bgp-graceful-restart=true"
        - "--enable-cni=false"
        - "--enable-ibgp=false"
        - "--enable-overlay=false"
        - "--peer-router-ips=<CHANGE ME>"
        - "--peer-router-asns=<CHANGE ME>"
        - "--cluster-asn=<CHANGE ME>"
        - "--advertise-cluster-ip=true"
        - "--advertise-external-ip=true"
        - "--advertise-loadbalancer-ip=true"
我们需要对其进行修改,官方表示下面的这些参数必须要和要求的一致:
- "--run-router=true"
- "--run-firewall=false"
- "--run-service-proxy=false"
- "--enable-cni=false"
- "--enable-pod-egress=false"
这些参数建议一致:
- "--enable-ibgp=true"
- "--enable-overlay=true"
- "--advertise-cluster-ip=true"
- "--advertise-external-ip=true"
- "--advertise-loadbalancer-ip=true"
最后剩下的参数就是根据实际的网络状态来进行配置
- "--peer-router-ips=10.31.254.253"
- "--peer-router-asns=64512"
- "--cluster-asn=64515"
如果需要同时和多个BGP peer建立连接可以参考官方的这个配置
- "--cluster-asn=65001"
- "--peer-router-ips=10.0.0.1,10.0.2"
- "--peer-router-asns=65000,65000"
最后我这里使用的参数如下
- "--run-router=true"
- "--run-firewall=false"
- "--run-service-proxy=false"
- "--enable-cni=false"
- "--enable-pod-egress=false"

- "--enable-ibgp=true"
- "--enable-overlay=true"
- "--advertise-cluster-ip=true"
- "--advertise-external-ip=true"
- "--advertise-loadbalancer-ip=true"

- "--bgp-graceful-restart=true"
- "--peer-router-ips=10.31.254.253"
- "--peer-router-asns=64512"
- "--cluster-asn=64515"
注意在官方文档中说明了–advertise-pod-cidr这个参数才是真正的把pod对应的CIDR发布出去的,但是由于这个值默认是true,因此我们不需要在这里进行显性配置。
–advertise-pod-cidr Add Node’s POD cidr to the RIB so that it gets advertised to the BGP peers. (default true)
配置完成之后我们直接进行部署
# 直接使用kubectl 进行部署
$ kubectl apply -f generic-kuberouter-only-advertise-routes.yaml
daemonset.apps/kube-router created
serviceaccount/kube-router created
clusterrole.rbac.authorization.k8s.io/kube-router created
clusterrolebinding.rbac.authorization.k8s.io/kube-router created

# 最后我们检查一下pod的运行状态
$ kubectl -n kube-system get pods -l k8s-app=kube-router
NAME                READY   STATUS    RESTARTS   AGE
kube-router-498zv   1/1     Running   0          78s
kube-router-8jm6b   1/1     Running   0          78s
kube-router-cknvc   1/1     Running   0          78s
kube-router-hgglx   1/1     Running   0          78s
kube-router-p5tks   1/1     Running   0          78s
kube-router-rjdbh   1/1     Running   0          78s
配置cilium
随后我们还需要修改cilium的配置:
- 将
ipam修改为kubernetes,因为kube-router是从k8s直接获取CIDR信息的 - 将
tunnel修改为disabled,因为可以通过kube-router获取路由信息直接路由到对应的节点上,就不需要再进行IP隧道/封装了
# 默认情况下的值
$ kubectl get cm -n kube-system cilium-config -o yaml | egrep "tunnel|ipam"
  ipam: cluster-pool
  tunnel: vxlan
# 修改前的路由条目
$ ip r
default via 10.31.254.253 dev eth0 proto static metric 100
10.31.0.0/16 dev eth0 proto kernel scope link src 10.31.80.1 metric 100
10.32.0.0/24 via 10.32.3.145 dev cilium_host src 10.32.3.145 mtu 1450
10.32.1.0/24 via 10.32.3.145 dev cilium_host src 10.32.3.145 mtu 1450
10.32.2.0/24 via 10.32.3.145 dev cilium_host src 10.32.3.145 mtu 1450
10.32.3.0/24 via 10.32.3.145 dev cilium_host src 10.32.3.145
10.32.3.145 dev cilium_host scope link
10.32.4.0/24 via 10.32.3.145 dev cilium_host src 10.32.3.145 mtu 1450
10.32.5.0/24 via 10.32.3.145 dev cilium_host src 10.32.3.145 mtu 1450

# 修改后的值
$ kubectl get cm -n kube-system cilium-config -o yaml | egrep "tunnel|ipam"
  ipam: kubernetes
  tunnel: disabled

# 修改后的路由条目
$ ip r
default via 10.31.254.253 dev eth0 proto static metric 100
10.31.0.0/16 dev eth0 proto kernel scope link src 10.31.80.1 metric 100
10.32.0.0/24 via 10.32.3.145 dev cilium_host src 10.32.3.145 mtu 1450
10.32.1.0/24 via 10.31.80.2 dev eth0 proto 17
10.32.2.0/24 via 10.31.80.3 dev eth0 proto 17
10.32.3.0/24 via 10.31.80.4 dev eth0 proto 17
10.32.3.145 dev cilium_host scope link
10.32.4.0/24 via 10.31.80.5 dev eth0 proto 17
10.32.5.0/24 via 10.31.80.6 dev eth0 proto 17
需要注意的是如果cilium-config配置里面没有
ipv4-native-routing-cidr这个参数的话也需要加上,配置为pod的CIDR即可(ipv4-native-routing-cidr: 10.32.0.0/17),否则在重启cilium的时候会出现下面这个报错,关于Native-Routing的配置和原理可以参考官方的这个文档level=fatal msg=“Error while creating daemon” error=“invalid daemon configuration: native routing cidr must be configured with option –ipv4-native-routing-cidr in combination with –enable-ipv4-masquerade –tunnel=disabled –ipam=kubernetes –enable-ipv4=true” subsys=daemon
可以明显的看到修改之后的路由条目默认情况下都不再通过封装的隧道接口cilium_host,而是直接通过kube-router发布的BGP路由直达对应的node节点上面。
部署loadbalancer
因为这里我们没有使用cilium的withoutkubeproxy模式,因此有部分cilium的高级功能无法使用,尽管我们前面已经把clusterIP和podIP都通过BGP宣告出去,在部分场景下面还是需要有LoadBalancer类型的服务作为补充。
目前市面上开源的K8S-LoadBalancer主要就是MetalLB、OpenELB和PureLB这三种,三者的工作原理和使用教程我都写文章分析过,针对目前这种使用场景,我个人认为最合适的是使用PureLB,因为他的组件高度模块化,并且可以自由选择实现ECMP模式的路由协议和软件(MetalLB和OpenELB都是自己通过gobgp实现的BGP协议),能更好的和我们前面的cilium+kube-router组合在一起。
原理架构
关于purelb的详细工作原理和部署使用方式可以参考我之前写的这篇文章,这里不再赘述。
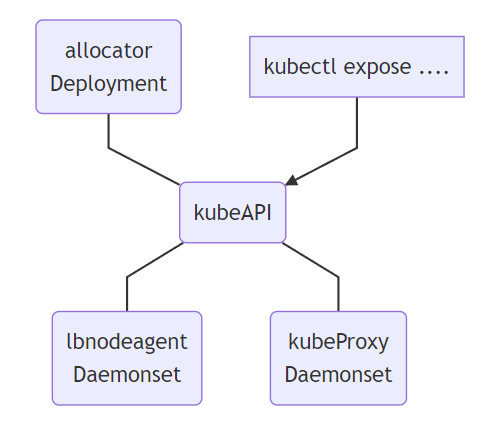
- Allocator:用来监听API中的
LoadBalancer类型服务,并且负责分配IP。 - LBnodeagent: 作为
daemonset部署到每个可以暴露请求并吸引流量的节点上,并且负责监听服务的状态变化同时负责把VIP添加到本地网卡或者是虚拟网卡 - KubeProxy:k8s的内置组件,并非是PureLB的一部分,但是PureLB依赖其进行正常工作,当对VIP的请求达到某个具体的节点之后,需要由kube-proxy来负责将其转发到对应的pod
因为我们此前已经部署了kube-router,并且会由它来负责BGP宣告的相关操作,因此在这里我们直接使用purelb的BGP模式,并且不需要自己再额外部署bird或frr来进行BGP路由发布,同时也不需要LBnodeagent组件来帮助暴露并吸引流量,只需要Allocator帮助我们完成LoadBalancerIP的分配操作即可。
部署purelb
# 下载官方提供的yaml文件到本地进行部署
$ wget https://gitlab.com/api/v4/projects/purelb%2Fpurelb/packages/generic/manifest/0.0.1/purelb-complete.yaml

# 请注意,由于 Kubernetes 的最终一致性架构,此manifest清单的第一个应用程序可能会失败。发生这种情况是因为清单既定义了CRD,又使用该CRD创建了资源。如果发生这种情况,请再次应用manifest清单,应该就会部署成功。

$ kubectl apply -f purelb-complete.yaml
$ kubectl apply -f purelb-complete.yaml


# 检测部署后的各个资源及工作负载是否正常
$ kubectl get pods -n purelb -o wide
NAME                         READY   STATUS    RESTARTS   AGE   IP            NODE                                       NOMINATED NODE   READINESS GATES
allocator-8657d47b5c-rdd46   1/1     Running   0          71s   10.32.3.149   k8s-cilium-worker-10-31-80-4.tinychen.io   <none>           <none>
lbnodeagent-hnffq            1/1     Running   0          71s   10.31.80.4    k8s-cilium-worker-10-31-80-4.tinychen.io   <none>           <none>
lbnodeagent-jzs8s            1/1     Running   0          71s   10.31.80.6    k8s-cilium-worker-10-31-80-6.tinychen.io   <none>           <none>
lbnodeagent-qr4cb            1/1     Running   0          71s   10.31.80.5    k8s-cilium-worker-10-31-80-5.tinychen.io   <none>           <none>
$ kubectl get deploy -n purelb
NAME        READY   UP-TO-DATE   AVAILABLE   AGE
allocator   1/1     1            1           86s
$ kubectl get crd | grep purelb
lbnodeagents.purelb.io                       2022-12-09T12:38:13Z
servicegroups.purelb.io                      2022-12-09T12:38:13Z
$ kubectl get --namespace=purelb servicegroups.purelb.io
No resources found in purelb namespace.
$ kubectl get --namespace=purelb lbnodeagent.purelb.io
NAME      AGE
default   89s


# 查看创建的相关API资源,注意这里的lbnodeagents我们此处用不到,可以忽略
$ kubectl api-resources --api-group=purelb.io
NAME            SHORTNAMES   APIVERSION     NAMESPACED   KIND
lbnodeagents    lbna,lbnas   purelb.io/v1   true         LBNodeAgent
servicegroups   sg,sgs       purelb.io/v1   true         ServiceGroup
lbnodeagent的这个ds我们这里用不到,因此可以直接删除。
$ kubectl delete ds -n purelb lbnodeagent
daemonset.apps "lbnodeagent" deleted
$ kubectl get ds -n purelb
No resources found in purelb namespace.
配置IP池
接下来我们部署一个ipam的sg,命名为bgp-ippool,ip段就使用我们预留的10.32.192.0/18
$ cat purelb-ipam.yaml
apiVersion: purelb.io/v1
kind: ServiceGroup
metadata:
  name: bgp-ippool
  namespace: purelb
spec:
  local:
    v4pool:
      subnet: '10.32.192.0/18'
      pool: '10.32.192.0-10.32.255.254'
      aggregation: /32


$ kubectl apply -f purelb-ipam.yaml
servicegroup.purelb.io/bgp-ippool created
$ kubectl get sg -n purelb
NAME         AGE
bgp-ippool   8s
到这里我们的PureLB就部署完了,相比完整的ECMP模式要少部署了路由协议软件和额外删除了lbnodeagent,接下来可以开始测试了。
部署测试用例
集群部署完成之后我们在k8s集群中部署一个nginx测试一下是否能够正常工作。首先我们创建一个名为nginx-quic的命名空间(namespace),然后在这个命名空间内创建一个名为nginx-quic-deployment的deployment用来部署pod,最后再创建一个service用来暴露服务,这里我们同时使用nodeport和LoadBalancer两种方式来暴露服务,并且其中一个LoadBalancer的服务还要指定LoadBalancerIP方便我们测试。
$ cat nginx-quic.yaml
apiVersion: v1
kind: Namespace
metadata:
  name: nginx-quic

---

apiVersion: apps/v1
kind: Deployment
metadata:
  name: nginx-quic-deployment
  namespace: nginx-quic
spec:
  selector:
    matchLabels:
      app: nginx-quic
  replicas: 4
  template:
    metadata:
      labels:
        app: nginx-quic
    spec:
      containers:
      - name: nginx-quic
        image: tinychen777/nginx-quic:latest
        imagePullPolicy: IfNotPresent
        ports:
        - containerPort: 80

---

apiVersion: v1
kind: Service
metadata:
  name: nginx-quic-service
  namespace: nginx-quic
spec:
  externalTrafficPolicy: Cluster
  selector:
    app: nginx-quic
  ports:
  - protocol: TCP
    port: 8080 # match for service access port
    targetPort: 80 # match for pod access port
    nodePort: 30088 # match for external access port
  type: NodePort


---

apiVersion: v1
kind: Service
metadata:
  annotations:
    purelb.io/service-group: bgp-ippool
  name: nginx-lb-service
  namespace: nginx-quic
spec:
  allocateLoadBalancerNodePorts: false
  externalTrafficPolicy: Cluster
  internalTrafficPolicy: Cluster
  selector:
    app: nginx-quic
  ports:
  - protocol: TCP
    port: 80 # match for service access port
    targetPort: 80 # match for pod access port
  type: LoadBalancer
  loadBalancerIP: 10.32.192.192


---

apiVersion: v1
kind: Service
metadata:
  annotations:
    purelb.io/service-group: bgp-ippool
  name: nginx-lb2-service
  namespace: nginx-quic
spec:
  allocateLoadBalancerNodePorts: false
  externalTrafficPolicy: Cluster
  internalTrafficPolicy: Cluster
  selector:
    app: nginx-quic
  ports:
  - protocol: TCP
    port: 80 # match for service access port
    targetPort: 80 # match for pod access port
  type: LoadBalancer
部署完成后我们直接查看状态
# 直接部署
$ kubectl apply -f nginx-quic.yaml
namespace/nginx-quic created
deployment.apps/nginx-quic-deployment created
service/nginx-quic-service created

# 查看deployment的运行状态
$ kubectl get deployment -o wide -n nginx-quic
NAME                    READY   UP-TO-DATE   AVAILABLE   AGE   CONTAINERS   IMAGES                          SELECTOR
nginx-quic-deployment   4/4     4            4           63m   nginx-quic   tinychen777/nginx-quic:latest   app=nginx-quic

# 查看service的运行状态
$ kubectl get svc -n nginx-quic
NAME                 TYPE           CLUSTER-IP      EXTERNAL-IP     PORT(S)          AGE
nginx-lb-service     LoadBalancer   10.32.169.6     10.32.192.192   80/TCP           86m
nginx-lb2-service    LoadBalancer   10.32.172.208   10.32.192.0     80/TCP           8m52s
nginx-quic-service   NodePort       10.32.176.164   <none>          8080:30088/TCP   3h9m

# 查看pod的运行状态
$ kubectl get pods -n nginx-quic
NAME                                     READY   STATUS    RESTARTS   AGE
nginx-quic-deployment-748867774b-75xrq   1/1     Running   0          3h14m
nginx-quic-deployment-748867774b-pwqpg   1/1     Running   0          3h14m
nginx-quic-deployment-748867774b-tm2p5   1/1     Running   0          3h14m
nginx-quic-deployment-748867774b-tw86v   1/1     Running   0          3h14m

# 查看IPVS规则
$ ipvsadm -lnt 10.32.176.164:8080
Prot LocalAddress:Port Scheduler Flags
  -> RemoteAddress:Port           Forward Weight ActiveConn InActConn
TCP  10.32.176.164:8080 rr
  -> 10.32.3.138:80               Masq    1      0          0
  -> 10.32.3.223:80               Masq    1      0          0
  -> 10.32.4.80:80                Masq    1      0          0
  -> 10.32.5.88:80                Masq    1      0          0

$ ipvsadm -lnt 10.31.80.1:30088
Prot LocalAddress:Port Scheduler Flags
  -> RemoteAddress:Port           Forward Weight ActiveConn InActConn
TCP  10.31.80.1:30088 rr
  -> 10.32.3.138:80               Masq    1      0          0
  -> 10.32.3.223:80               Masq    1      0          0
  -> 10.32.4.80:80                Masq    1      0          0
  -> 10.32.5.88:80                Masq    1      0          0

$ ipvsadm -lnt 10.32.192.192:80
Prot LocalAddress:Port Scheduler Flags
  -> RemoteAddress:Port           Forward Weight ActiveConn InActConn
TCP  10.32.192.192:80 rr
  -> 10.32.3.138:80               Masq    1      0          0
  -> 10.32.3.223:80               Masq    1      0          0
  -> 10.32.4.80:80                Masq    1      0          0
  -> 10.32.5.88:80                Masq    1      0          0

$ ipvsadm -lnt 10.32.192.0:80
Prot LocalAddress:Port Scheduler Flags
  -> RemoteAddress:Port           Forward Weight ActiveConn InActConn
TCP  10.32.192.0:80 rr
  -> 10.32.3.138:80               Masq    1      0          0
  -> 10.32.3.223:80               Masq    1      0          0
  -> 10.32.4.80:80                Masq    1      0          0
  -> 10.32.5.88:80                Masq    1      0          0
最后我们进行测试,这个nginx-quic的镜像默认情况下会返回在nginx容器中获得的用户请求的IP和端口,由于我们前面配置的时候把podIP和clusterIP都通过BGP发布出去了,因此我们在集群外直接访问podIP、clusterIP、nodeport和loadbalancerIP都可以成功访问。
# root @ tiny-openwrt in ~ [22:17:46]
$  curl 10.32.192.0
10.31.80.4:50151

# root @ tiny-openwrt in ~ [22:17:47]
$  curl 10.32.192.192
10.31.80.3:1969

# root @ tiny-openwrt in ~ [22:17:50]
$ curl 10.32.5.88:80
10.31.254.253:52160

# root @ tiny-openwrt in ~ [22:17:58]
$ curl 10.32.176.164:8080
10.31.80.5:20972

# root @ tiny-openwrt in ~ [22:18:02]
$ curl 10.31.80.4:30088
10.31.80.4:3220
最后我们检查一下路由器侧的情况,正常情况下可以看到kube-router发布的ECMP路由:
B>* 10.32.192.0/32 [20/0] via 10.31.80.1, eth0, weight 1, 00:00:14
  *                       via 10.31.80.2, eth0, weight 1, 00:00:14
  *                       via 10.31.80.3, eth0, weight 1, 00:00:14
  *                       via 10.31.80.4, eth0, weight 1, 00:00:14
  *                       via 10.31.80.5, eth0, weight 1, 00:00:14
  *                       via 10.31.80.6, eth0, weight 1, 00:00:14
B>* 10.32.192.192/32 [20/0] via 10.31.80.1, eth0, weight 1, 01:17:54
  *                         via 10.31.80.2, eth0, weight 1, 01:17:54
  *                         via 10.31.80.3, eth0, weight 1, 01:17:54
  *                         via 10.31.80.4, eth0, weight 1, 01:17:54
  *                         via 10.31.80.5, eth0, weight 1, 01:17:54
  *                         via 10.31.80.6, eth0, weight 1, 01:17:54
到这里整个K8S集群就部署完成了。