PowerDNS篇1-简介和安装

本文最后更新于:February 24, 2021 am

本文主要介绍PowerDNS的主要特性和初始化安装的配置方法,侧重点是对复杂程度相对较高PowerDNS Authoritative Server进行介绍,同时会夹杂部分PowerDNS-Recursor的初始化安装和配置。

1、PowerDNS简介

PowerDNS(PDNS)成立于20世纪90年代末,是开源DNS软件、服务和支持的主要供应商,它们提供的权威认证DNS服务器递归认证DNS服务器都是100%开源的软件,同时也和红帽等开源方案提供商一样提供了付费的技术支持版本。同时官方表示为了避免和软件使用者出现竞争,他们只提供服务支持而不提供DNS托管服务。

Our Authoritative Server, Recursor and dnsdist products are 100% open source. For the service provider market, OX also sells the PowerDNS Platform which builds on our Open Source products to deliver an integrated DNS solution with 24/7 support and includes features as parental control, malware filtering, automated attack mitigation, and long-term query logging & searching.
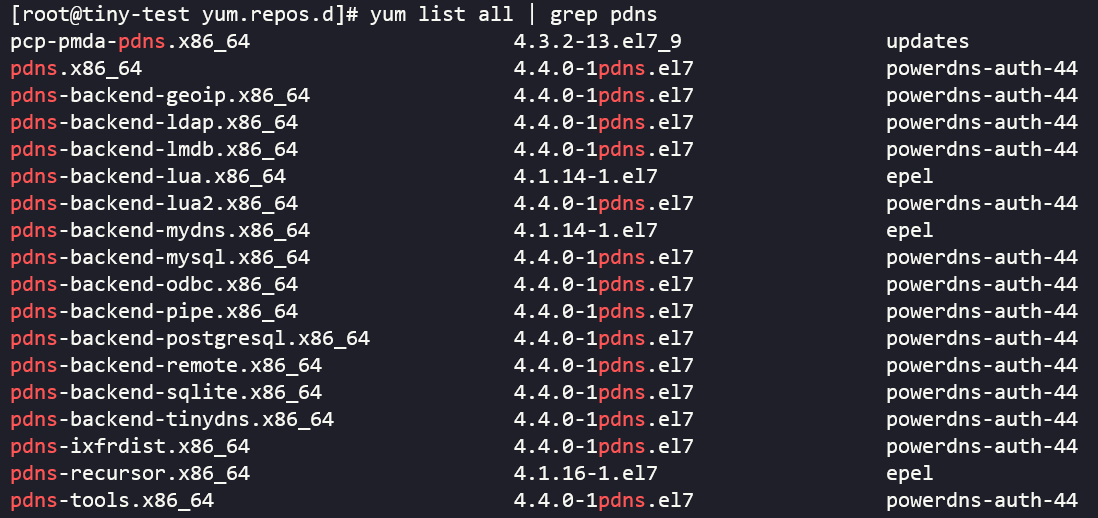
熟悉DNS工作原理的同学可以大致地将DNS记录的查询分为两种:查询本地缓存向上递归查询。和其他的如BIND、dnsmasq等将这些功能集成到一起的DNS软件不同,PowerDNS将其一分为二,分为了PowerDNS Authoritative ServerPowerDNS Recursor,分别对应这两种主要的需求,而我们常说的pdns指的就是PowerDNS Authoritative Server (后面简称PDNS Auth),主要用途就是作为权威域名服务器,当然也可以作为普通的DNS服务器提供DNS查询功能。

对于PowerDNS-Recursor,PowerDNS官网介绍其是一个内置脚本能力的高性能的DNS递归查询服务器,并且已经为一亿五千万个互联网连接提供支持。

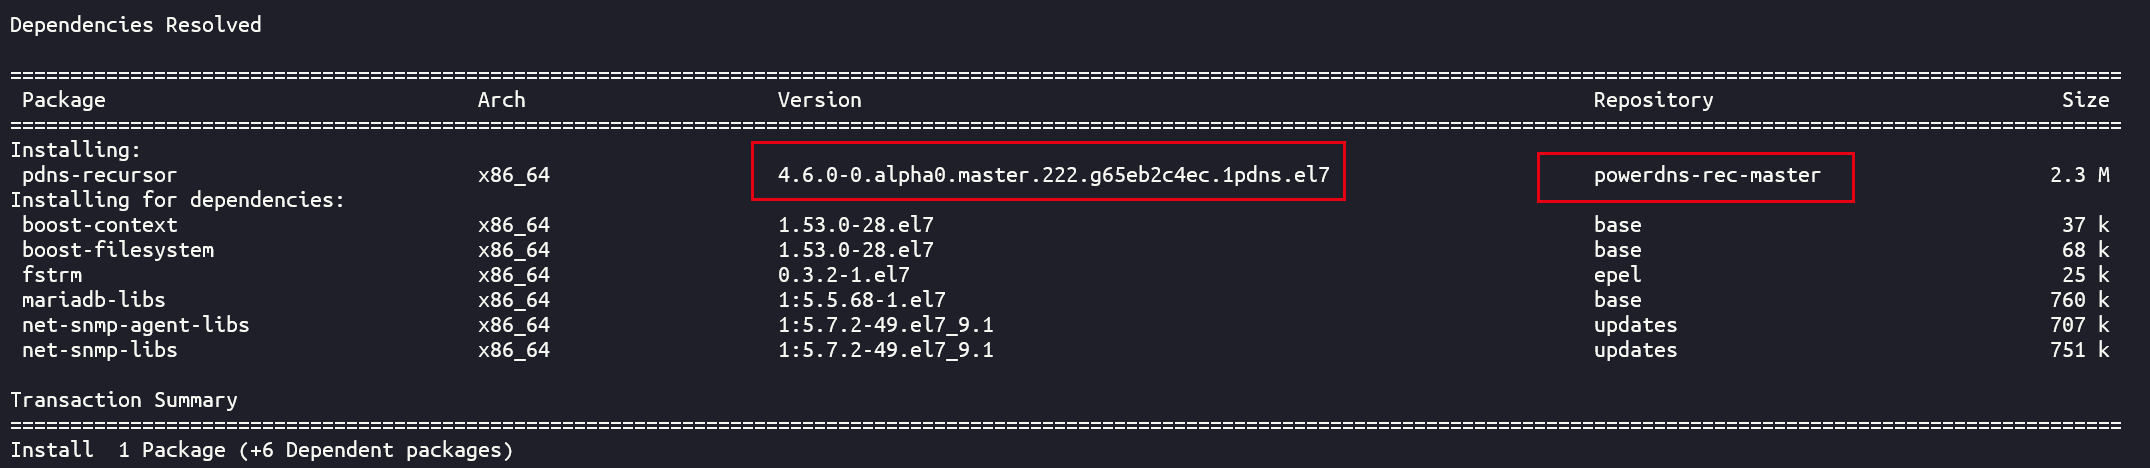
The PowerDNS Recursor is a high-performance DNS recursor with built-in scripting capabilities. It is known to power the resolving needs of over 150 million internet connections.

PowerDNS-Recursor(以下简称pdns-rec)的官方文档可以点击这里查看。官方指的内置脚本能力是指在4.0.0版本之后的配置文件里面添加了对lua脚本的支持。

2、PowerDNS安装

2.1 PowerDNS Authoritative Server安装

这里我们还是使用经典的CentOS7系统进行安装测试,系统的相关版本和内核信息如下:

1
2
3
4
5
6
7
8
$ lsb_release -a
LSB Version: :core-4.1-amd64:core-4.1-noarch:cxx-4.1-amd64:cxx-4.1-noarch:desktop-4.1-amd64:desktop-4.1-noarch:languages-4.1-amd64:languages-4.1-noarch:printing-4.1-amd64:printing-4.1-noarch
Distributor ID: CentOS
Description: CentOS Linux release 7.9.2009 (Core)
Release: 7.9.2009
Codename: Core
$ uname -r
3.10.0-1160.11.1.el7.x86_64

pdns对主流的操作系统都有着较好的支持,在centos上面可以直接通过repo仓库来安装,红帽系的Linux可以通过epel源,monshouwer提供的第三方源和powerdns官方源三种源来进行安装。

On RedHat based systems there are 3 options to install PowerDNS, from EPEL, the repository from Kees Monshouwer or from the PowerDNS repositories:

使用epel源来进行安装的话可能会导致无法安装最新版本

如果网络条件允许的话,最好的办法是直接通过官方的repo源来进行安装,如果使用的是master源,则可以安装到最新的测试版本:

1
2
3
4
yum install epel-release yum-plugin-priorities
curl -o /etc/yum.repos.d/powerdns-auth-master.repo https://repo.powerdns.com/repo-files/centos-auth-master.repo
yum install pdns
yum install pdns-backend-$backend

这里我们使用最新的稳定版4.4版本进行安装,backend这里我们选择pdns-backend-mysql

1
2
3
4
yum install epel-release yum-plugin-priorities
curl -o /etc/yum.repos.d/powerdns-auth-44.repo https://repo.powerdns.com/repo-files/centos-auth-44.repo
yum install pdns
yum install pdns-backend-$backend

请注意对于某些软件包源,bind backend作为基本pdns软件包的一部分提供,并且没有单独的pdns-backend-bind软件包。

2.2 PowerDNS-Recursor安装

这里我们还是使用经典的CentOS7系统进行安装测试,系统的相关版本和内核信息如下:

1
2
3
4
5
6
7
8
[root@tiny-cloud /home]# lsb_release -a
LSB Version: :core-4.1-amd64:core-4.1-noarch:cxx-4.1-amd64:cxx-4.1-noarch:desktop-4.1-amd64:desktop-4.1-noarch:languages-4.1-amd64:languages-4.1-noarch:printing-4.1-amd64:printing-4.1-noarch
Distributor ID: CentOS
Description: CentOS Linux release 7.9.2009 (Core)
Release: 7.9.2009
Codename: Core
[root@tiny-cloud /home]# uname -r
3.10.0-1160.24.1.el7.x86_64

pdns对主流的操作系统都有着较好的支持,在红帽系和CentOS系相关的发行版本上面可以之间通过epel源来进行安装,不过使用epel源来进行安装的话可能会导致无法安装最新版本。

On Red Hat, CentOS and related distributions, ensure that EPEL is available. To install the PowerDNS Recursor, run yum install pdns-recursor as root.

如果网络条件允许的话,最好的办法是直接通过官方的repo源来进行安装,如果使用的是master分支的repo源,则可以安装到最新的测试版本。官方表示master存储库对应的是他们在github上面正在开发的master分支。

1
2
3
yum install epel-release yum-plugin-priorities &&
curl -o /etc/yum.repos.d/powerdns-rec-master.repo https://repo.powerdns.com/repo-files/centos-rec-master.repo &&
yum install pdns-recursor

当然我们也可以通过官方提供的不同版本yum源来安装对应版本的pdns,不同的版本分支对应的支持时间也是不一样的,官方表示在对应版本的生命周期结束之后,对应的仓库也不会再提供支持,pdns-rec的EOL信息可以点击这里查看。由于目前4.5.x版本还处于rc阶段,因此这里我们还是安装最新的稳定版本4.4.x版本。

1
2
3
yum install epel-release yum-plugin-priorities &&
curl -o /etc/yum.repos.d/powerdns-rec-44.repo https://repo.powerdns.com/repo-files/centos-rec-44.repo &&
yum install pdns-recursor

3、pdns-auth的mysql安装配置

3.1 安装mysql

pdns对于mysql的版本和安装方式并没有什么特殊的要求,个人推荐版本在5.7+或者8.0+都可以,这里使用yum安装8.0版本的mysql。

最新版的mysql的repo文件我们可以直接前往官网下载:https://dev.mysql.com/downloads/repo/yum/

如果需要使用5.7的版本可以到这里下载

1
wget http://repo.mysql.com/mysql57-community-release-el7-9.noarch.rpm
1
2
3
4
5
6
7
8
9
$ rpm -ivh mysql80-community-release-el7-3.noarch.rpm
$ yum update
$ yum install mysql-server
$ mysqladmin --version
mysqladmin Ver 8.0.23 for Linux on x86_64 (MySQL Community Server - GPL)

# MYSQL8的初始密码可以在log中查看
$ grep 'temporary password' /var/log/mysqld.log
$ mysql -u root -p

3.2 创建用户

接下来需要进行基本的数据库操作,给pdns创建对应的数据库和用户并简单设置相关权限:

1
2
3
4
5
6
7
8
9
10
11
12
13
14
-- 修改密码
ALTER user 'root'@'localhost' IDENTIFIED BY '你的新密码';
-- 注意这里的'localhost'也有可能是别的参数,具体可以通过下面这条命令来进行查询:
select user, host, authentication_string, plugin from mysql.user;

-- 创建一个mysql的用户名为powerdns,只能本机登录
-- 创建一个mysql的数据库名为powerdns,并允许powerdns用户访问
CREATE USER 'powerdns'@'localhost' IDENTIFIED BY '你的新密码';
CREATE DATABASE powerdns;
GRANT ALL ON powerdns.* TO 'powerdns'@'localhost';
FLUSH PRIVILEGES;

-- 对于MYSQL8需要额外指定加密方式避免ERROR 2059 (HY000)的问题
ALTER USER 'powerdns'@'localhost' IDENTIFIED WITH mysql_native_password BY '你的新密码';

3.3 创建数据表

创建数据表的操作完全按照官方的文档进行,有特殊需要的也可以根据实际情况进行修改:

1
2
3
4
5
6
7
8
9
10
11
12
13
14
15
16
17
18
19
20
21
22
23
24
25
26
27
28
29
30
31
32
33
34
35
36
37
38
39
40
41
42
43
44
45
46
47
48
49
50
51
52
53
54
55
56
57
58
59
60
61
62
63
64
65
66
67
68
69
70
71
72
73
74
75
76
77
78
79
80
81
82
83
84
85
86
87
88
89
CREATE TABLE domains (
id INT AUTO_INCREMENT,
name VARCHAR(255) NOT NULL,
master VARCHAR(128) DEFAULT NULL,
last_check INT DEFAULT NULL,
type VARCHAR(6) NOT NULL,
notified_serial INT UNSIGNED DEFAULT NULL,
account VARCHAR(40) CHARACTER SET 'utf8' DEFAULT NULL,
PRIMARY KEY (id)
) Engine=InnoDB CHARACTER SET 'latin1';

CREATE UNIQUE INDEX name_index ON domains(name);


CREATE TABLE records (
id BIGINT AUTO_INCREMENT,
domain_id INT DEFAULT NULL,
name VARCHAR(255) DEFAULT NULL,
type VARCHAR(10) DEFAULT NULL,
content VARCHAR(64000) DEFAULT NULL,
ttl INT DEFAULT NULL,
prio INT DEFAULT NULL,
disabled TINYINT(1) DEFAULT 0,
ordername VARCHAR(255) BINARY DEFAULT NULL,
auth TINYINT(1) DEFAULT 1,
PRIMARY KEY (id)
) Engine=InnoDB CHARACTER SET 'latin1';

CREATE INDEX nametype_index ON records(name,type);
CREATE INDEX domain_id ON records(domain_id);
CREATE INDEX ordername ON records (ordername);


CREATE TABLE supermasters (
ip VARCHAR(64) NOT NULL,
nameserver VARCHAR(255) NOT NULL,
account VARCHAR(40) CHARACTER SET 'utf8' NOT NULL,
PRIMARY KEY (ip, nameserver)
) Engine=InnoDB CHARACTER SET 'latin1';


CREATE TABLE comments (
id INT AUTO_INCREMENT,
domain_id INT NOT NULL,
name VARCHAR(255) NOT NULL,
type VARCHAR(10) NOT NULL,
modified_at INT NOT NULL,
account VARCHAR(40) CHARACTER SET 'utf8' DEFAULT NULL,
comment TEXT CHARACTER SET 'utf8' NOT NULL,
PRIMARY KEY (id)
) Engine=InnoDB CHARACTER SET 'latin1';

CREATE INDEX comments_name_type_idx ON comments (name, type);
CREATE INDEX comments_order_idx ON comments (domain_id, modified_at);


CREATE TABLE domainmetadata (
id INT AUTO_INCREMENT,
domain_id INT NOT NULL,
kind VARCHAR(32),
content TEXT,
PRIMARY KEY (id)
) Engine=InnoDB CHARACTER SET 'latin1';

CREATE INDEX domainmetadata_idx ON domainmetadata (domain_id, kind);


CREATE TABLE cryptokeys (
id INT AUTO_INCREMENT,
domain_id INT NOT NULL,
flags INT NOT NULL,
active BOOL,
published BOOL DEFAULT 1,
content TEXT,
PRIMARY KEY(id)
) Engine=InnoDB CHARACTER SET 'latin1';

CREATE INDEX domainidindex ON cryptokeys(domain_id);


CREATE TABLE tsigkeys (
id INT AUTO_INCREMENT,
name VARCHAR(255),
algorithm VARCHAR(50),
secret VARCHAR(255),
PRIMARY KEY (id)
) Engine=InnoDB CHARACTER SET 'latin1';

CREATE UNIQUE INDEX namealgoindex ON tsigkeys(name, algorithm);

4、pdns配置mysql

4.1 mysql 相关配置

1
2
3
4
5
6
7
8
9
10
11
12
13
14
15
16
17
18
19
20
21
22
23
24
25
26
27
28
29
30
31
32
33
34
35
36
# gmysql-host
# 需要连接的mysql的IP地址,和gmysql-socket变量互斥

# gmysql-port
# 需要连接的mysql的端口号,默认是3306

# gmysql-socket
# 需要连接的mysql的UNIX socket地址,和gmysql-host互斥

# gmysql-dbname
# 需要连接的数据库,默认:powerdns

# gmysql-user
# 连接数据库的用户名,默认:powerdns

# gmysql-group
# 连接数据库的组,默认:client

# gmysql-password
# 连接数据库的用户的密码

# gmysql-dnssec
# 是否启用dnssec功能,默认:no

# gmysql-innodb-read-committed
# 使用InnoDB的READ-COMMITTED事务隔离,默认:yes

# gmysql-ssl
# 是否开启SSL支持,默认:no

# gmysql-timeout
# 尝试读取数据库的超时时间,0为禁用,默认:10

# gmysql-thread-cleanup
# 对于一些老旧版本的MySQL/MariaDB(比如RHEL7内置的版本)会出现内存泄露的问题,除非应用程序明确向该库报告每个线程的结束。启用gmysql-thread-cleanup告诉PowerDNS每当线程结束时就调用mysql_thread_end()。
# 只有当确定自己需要开启这个功能的时候再开启,详情可以查看https://github.com/PowerDNS/pdns/issues/6231.

4.2 pdns.conf配置

1
2
3
4
5
6
7
8
9
10
11
12
13
14
15
16
17
18
19
20
21
22
23
24
25
26
27
28
29
30
31
32
33
34
35
$ cat /etc/pdns/pdns.conf
api=yes
api-key=你的API-KEY
config-dir=/etc/pdns
write-pid=yes

daemon=no
guardian=no

launch=gmysql
gmysql-host=localhost
gmysql-port=3306
gmysql-dbname=你的数据库名
gmysql-user=你的用户名
gmysql-password=你的密码

log-dns-details=yes
log-dns-queries=yes
log-timestamp=yes
loglevel=9
logging-facility=0
log-timestamp=yes

setgid=root
setuid=root

webserver=yes
webserver-address=192.168.100.100
webserver-loglevel=detailed
webserver-port=8081
# webserver-allow-from指定允许访问webserver和API的IP白名单,多个IP可以使用英文逗号隔开
webserver-allow-from=192.168.100.0/24
# pdns服务监听的地址,多个IP可以使用英文逗号隔开
local-address=192.168.100.100
query-local-address=192.168.100.100

4.3 pdns-rec配置

pdns-rec的配置文件除了默认文件命名和少数特殊的配置项外,其他的绝大部分配置都和pdns-auth一致,这里不作赘述。

1
2
[root@tiny-cloud /etc/pdns-recursor]# realpath recursor.conf
/etc/pdns-recursor/recursor.conf

5、pdns日志处理

官网的相关文档可以点击这里查看,debug阶段我们把日志级别调到了最高的9,为了避免错过重要信息,我们把日志按照不同的级别分别写入不同的文件中。

修改centos对应的rsyslog配置文件并且重启服务

1
2
3
4
5
6
7
8
# mkdir -p /etc/pdns/logs

# cat /etc/rsyslog.conf | grep pdns
local0.info /etc/pdns/logs/pdns.info.log
local0.warn /etc/pdns/logs/pdns.warn.log
local0.err /etc/pdns/logs/pdns.err.log

systemctl restart rsyslog.service

修改pdns的systemdunit文件,将里面的禁用syslog参数去掉,同时将其他多余的控制选项也一并去除,统一将各类参数设置集中到pdns.conf文件中,方便后期的管理和运维。

1
2
3
4
5
6
7
8
vim /usr/lib/systemd/system/pdns.service

# 将原来的启动参数全部替换掉
# ExecStart=/usr/sbin/pdns_server --socket-dir=%t/pdns --guardian=no --daemon=no --disable-syslog --log-timestamp=no --write-pid=no
# 替换为
ExecStart=/usr/sbin/pdns_server --socket-dir=%t/pdns

systemctl daemon-reload

6、pdns-auth的API请求

PDNS提供了API功能,请求的时候需要注意正确携带配置中的api-key,否则会无法返回正确的结果,而是显示401 Unauthorized错误。

1
2
3
4
5
6
7
8
9
10
11
12
13
14
15
16
17
18
$ curl -v http://192.168.100.100:8081/api/v1/servers
* Trying 192.168.100.100...
* TCP_NODELAY set
* Connected to 192.168.100.100 (192.168.100.100) port 8081 (#0)
> GET /api/v1/servers HTTP/1.1
> Host: 192.168.100.100:8081
> User-Agent: curl/7.61.1
> Accept: */*
>
< HTTP/1.1 401 Unauthorized
< Connection: close
< Content-Length: 12
< Content-Type: text/plain; charset=utf-8
< Server: PowerDNS/4.4.0
< Www-Authenticate: X-API-Key realm="PowerDNS"
<
* Closing connection 0
Unauthorized

请求正确的情况下会返回json格式的信息。

1
2
3
4
5
6
7
8
9
10
11
12
13
14
15
16
17
18
19
20
21
22
23
24
$ curl -v -H 'X-API-Key: 配置中的api-key' http://192.168.100.100:8081/api/v1/servers
* Trying 192.168.100.100...
* TCP_NODELAY set
* Connected to 192.168.100.100 (192.168.100.100) port 8081 (#0)
> GET /api/v1/servers HTTP/1.1
> Host: 192.168.100.100:8081
> User-Agent: curl/7.61.1
> Accept: */*
> X-API-Key: 配置中的api-key
>
< HTTP/1.1 200 OK
< Access-Control-Allow-Origin: *
< Connection: close
< Content-Length: 249
< Content-Security-Policy: default-src 'self'; style-src 'self' 'unsafe-inline'
< Content-Type: application/json
< Server: PowerDNS/4.4.0
< X-Content-Type-Options: nosniff
< X-Frame-Options: deny
< X-Permitted-Cross-Domain-Policies: none
< X-Xss-Protection: 1; mode=block
<
* Closing connection 0
[{"config_url": "/api/v1/servers/localhost/config{/config_setting}", "daemon_type": "authoritative", "id": "localhost", "type": "Server", "url": "/api/v1/servers/localhost", "version": "4.4.0", "zones_url": "/api/v1/servers/localhost/zones{/zone}"}]

7、DNS解析

对于pdns-rec而言,是单纯的一个递归查询器(Recursor),会根据设置的缓存时间来缓存向上查询到的DNS记录。

理论上PDNS Auth只会查询自己已有的DNS记录,如果不存在则会直接返回空,而不是继续向上递归查询。这里我们使用轻量型的DNS服务器dnsmasq作为对比,两者都没有手动添加任何的DNS解析记录。

从上面的测试结果我们可以看出pdns auth只会返回自己的数据库中存在的记录。于是我们手动添加记录到pdns中再进行查询。

这里我们使用pdnsutil工具来简单测试,首先我们简单的创建一个关于example.org的zone,然后我们再创建关于example.org的一条A记录和MX记录,接着使用dig命令来进行测试:

1
2
3
4
5
6
7
8
9
10
11
12
13
14
15
16
17
18
19
20
21
22
23
24
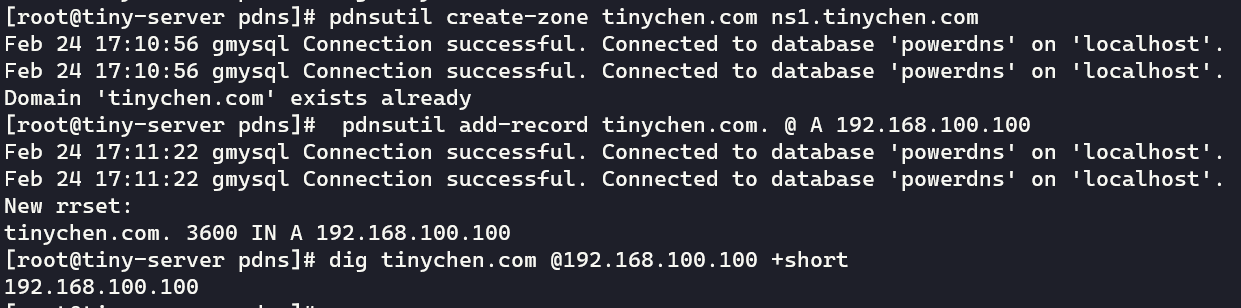
$ pdnsutil create-zone example.org ns1.example.com
Feb 24 16:54:48 gmysql Connection successful. Connected to database 'powerdns' on 'localhost'.
Creating empty zone 'example.org'
Feb 24 16:54:48 No serial for 'example.org' found - zone is missing?
Also adding one NS record

$ pdnsutil list-all-zones
Feb 24 16:54:59 gmysql Connection successful. Connected to database 'powerdns' on 'localhost'.
tinychen.com
example.org

$ pdnsutil add-record example.org '' MX '25 mail.example.org'
Feb 24 16:55:36 gmysql Connection successful. Connected to database 'powerdns' on 'localhost'.
New rrset:
example.org. 3600 IN MX 25 mail.example.org

$ pdnsutil add-record example.org. www A 192.168.100.100
Feb 24 16:56:09 gmysql Connection successful. Connected to database 'powerdns' on 'localhost'.
New rrset:
www.example.org. 3600 IN A 192.168.100.100

同样的我们对tinychen.com进行相同的操作,可以看到这时已经能够解析出对应的IP了。

从上图中我们可以看到对应的tinychen.com域名解析出来的记录是我们手动设定的IP值。