nginx篇07-启用HTTP2和TLSv1.3
本文最后更新于:May 19, 2020 am
本文主要介绍如何使用编译的方式升级openssl库和nginx用于支持HTTP2和TLSv1.3并且介绍了一些简单的提高nginx安全性的配置。
1、编译安装openssl
考虑到Linux系统中有许多组件都需要使用openssl库,而现在默认使用的openssl库绝大多数都没到达能够支持TLS1.3的openssl1.1.1版本以上,因此个人建议不要直接修改系统已有的默认openssl库而是另外使用一个新目录来编译安装新版本的openssl。
具体的支持信息可以查看openssl官网的TLSv1.3部分。
解压下载的稳定版openssl1.1.1g进行编译安装,注意使用--prefix=指定安装目录
1 | |
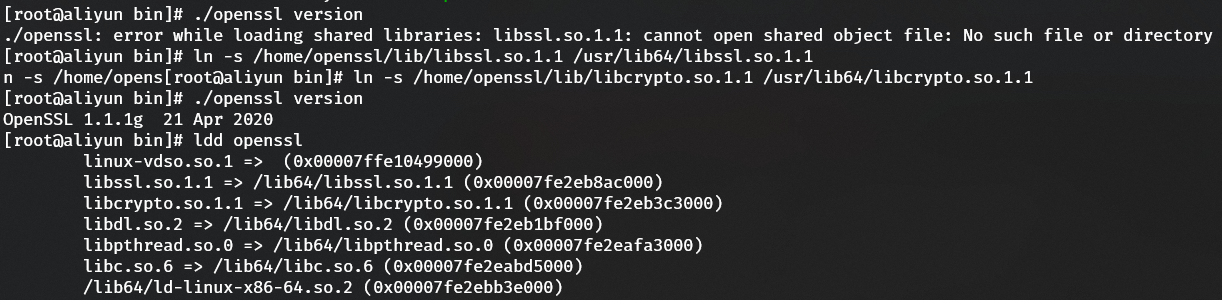
安装完成后检查链接库是否正常,将缺少的文件直接软链接到系统的/usr/lib64目录下
1 | |
最后检查系统使用的openssl的版本是否为新版以及系统的库指向是否正确
2、编译安装nginx
2.1 nginx的TLS1.3和HTTP2
想要在nginx中开启TLS1.3的支持,只需要使用支持TLS1.3的openssl库来进行编译即可。
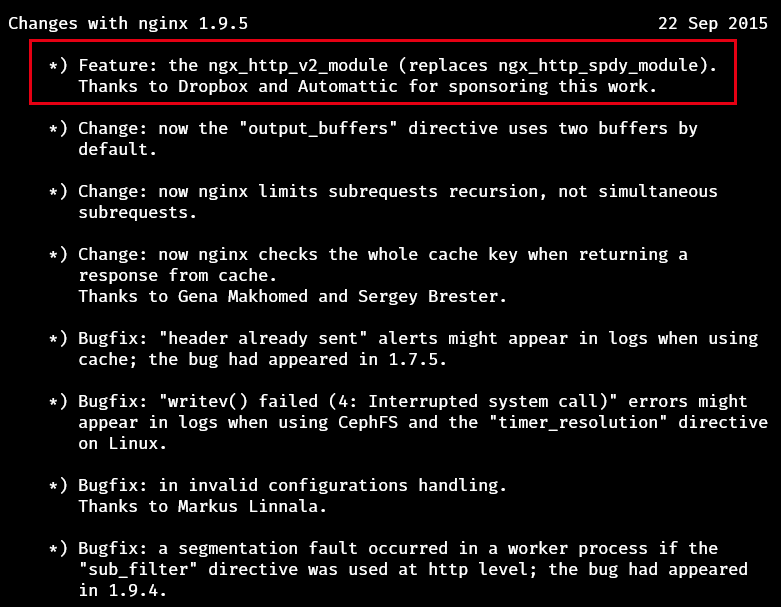
查看nginx的版本更新说明我们可以知道nginx从1.9.5版本开始支持HTTP2:
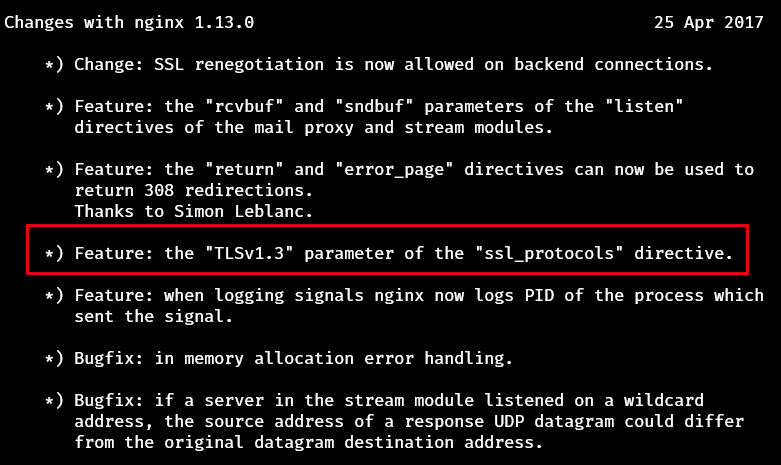
从1.13版本开始支持TLS1.3
2.2 指定openssl目录进行nginx编译安装
nginx的编译安装此前已经介绍过了,有需要的同学可以点击这里回顾。
1 | |
这次我们使用的是截止2020年5月19号最新的稳定版本nginx1.18.0,一些注意的事项如下:
--with-http_v2_module和--with-http_ssl_module用于支持HTTP2和ssl加密,--with-openssl=用于指定openssl库的安装目录--with-openssl-opt=enable-tls1_3用于开启openssl库的tls1.3支持,但是现在的新版本已经默认开启,无需额外添加这个参数
剩下的就和常规的编译安装无异,下面是此次编译的参数:
1 | |
编译的时候出现报错:

修改nginx源码目录中auto/lib/openssl/conf中的openssl路径参数,在40行左右的位置对应四个参数中的.openssl去掉,修改后的内容如下:
1 | |
然后重新编译安装。

2.3 nginx配置修改
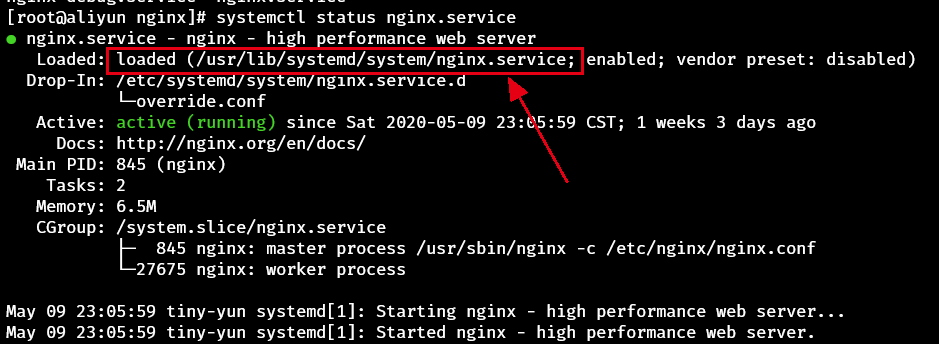
安装完成之后将原来的配置文件和html文件全部迁移到新的nginx目录下并进行相应的修改就可以正常的启用nginx了。如果此前的nginx是直接使用yum安装并且使用systemd进行守护进程的控制,我们可以将对应的systemd unit文件中的目录进行修改,一般来说只需要修改相关路径的参数即可:
首先我们停止服务,然后修改文件,接着重启服务即可:
1 | |
如果还想使用全局命令nginx的话,可以先把原来的yum安装的移除再将编译安装的新版本指向系统目录
1 | |
最后我们查看nginx版本信息:

3、配置http2和tls1.3
3.1 nginx配置
nginx中开启http2和tls1.3十分简单,这里配置如下:
1 | |
- 由于http2默认需要使用加密,因此直接在nginx对应的ssl监听端口上加上
http2字段即可 - TLS1.3则只需要在
ssl_protocols指令中加上TLSv1.3 ssl_ciphers这里的配置采用了比较激进的配置,由于前面协议只启用了TLSv1.2和TLSv1.3,因此这里对应的ssl_ciphers也直接弃用了大量旧的和弱的加密套件add_header Strict-Transport-Security "max-age=63072000; includeSubDomains; preload";这个字段头用于开启HSTS避免在进行301跳转的时候被中间人攻击,添加了preload字段还需要在HSTS的官网添加自己的网址,注意HSTS不应该添加在HTTP请求的网站上,所以上面将80端口和443端口分为两个server块ssl_stapling on用于开启OCSP(Online Certificate Status Protocol),可以减缓网络和客户端资源负担ssl_stapling_verify on用于开启OCSP Stapling(OCSP装订),这是TLS证书状态查询扩展,服务器在TLS握手时发送事先缓存的OCSP响应,用户只要验证该响应的时效性而不用再向数字证书认证机构(CA)发送请求,可以加快握手速度
3.2 检测
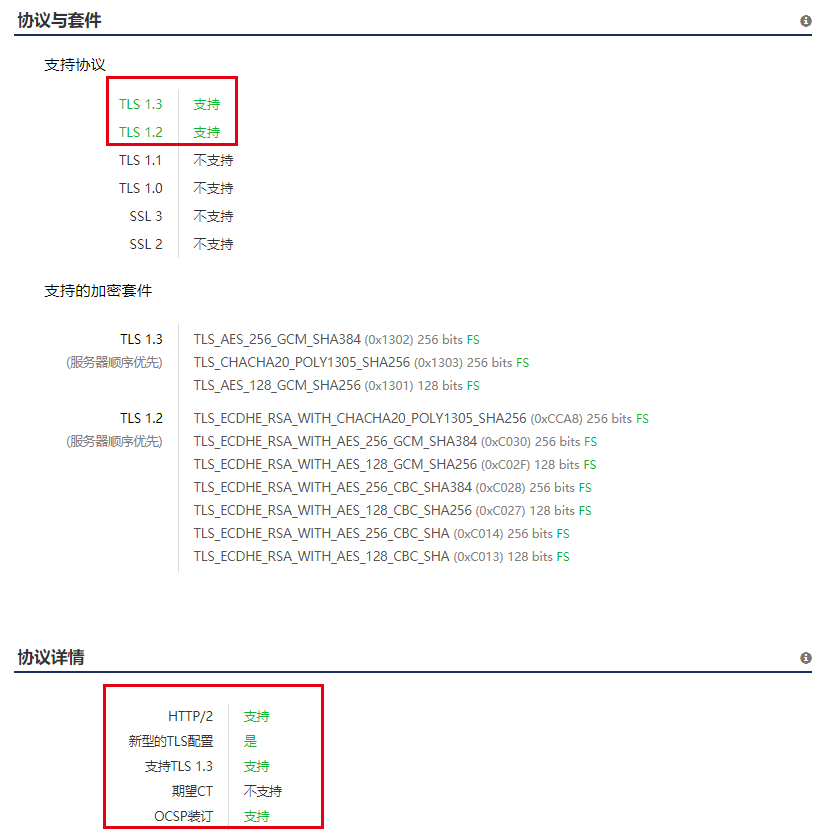
使用myssl进行检测,可以看到很顺利地显示已经支持了HTTP2和TLS1.3协议。
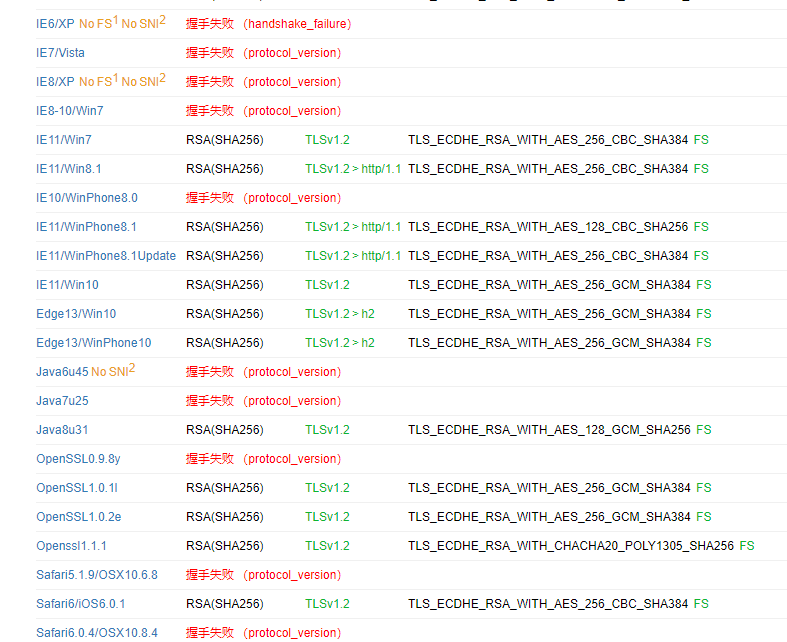
同时可以看到由于关闭了TLS1.2以下的加密协议支持并且强制启用了https之后很多旧浏览器已经不再支持了:
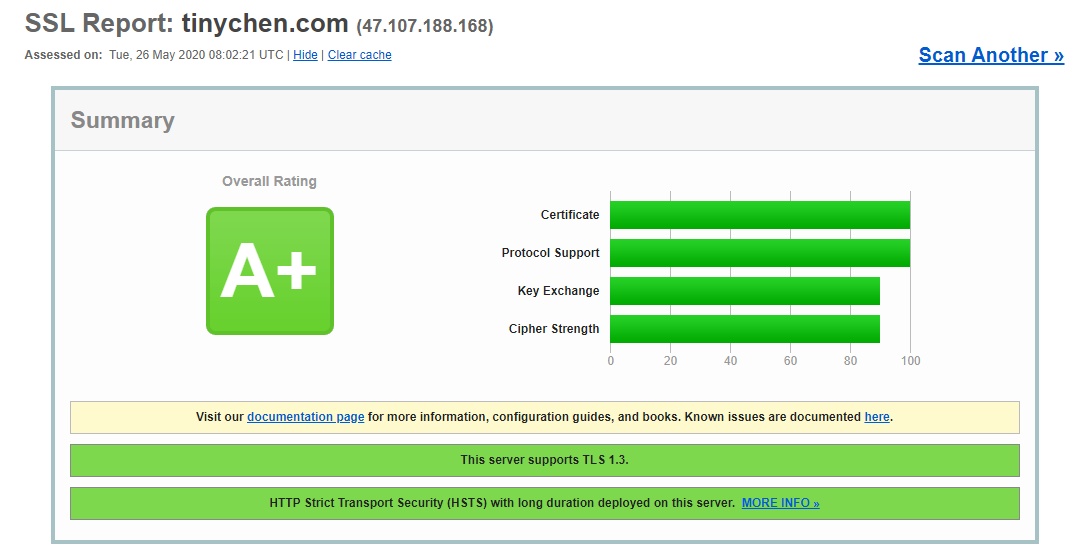
在不考虑旧版浏览器的兼容之后可以很轻松获得A+评分并且上榜:

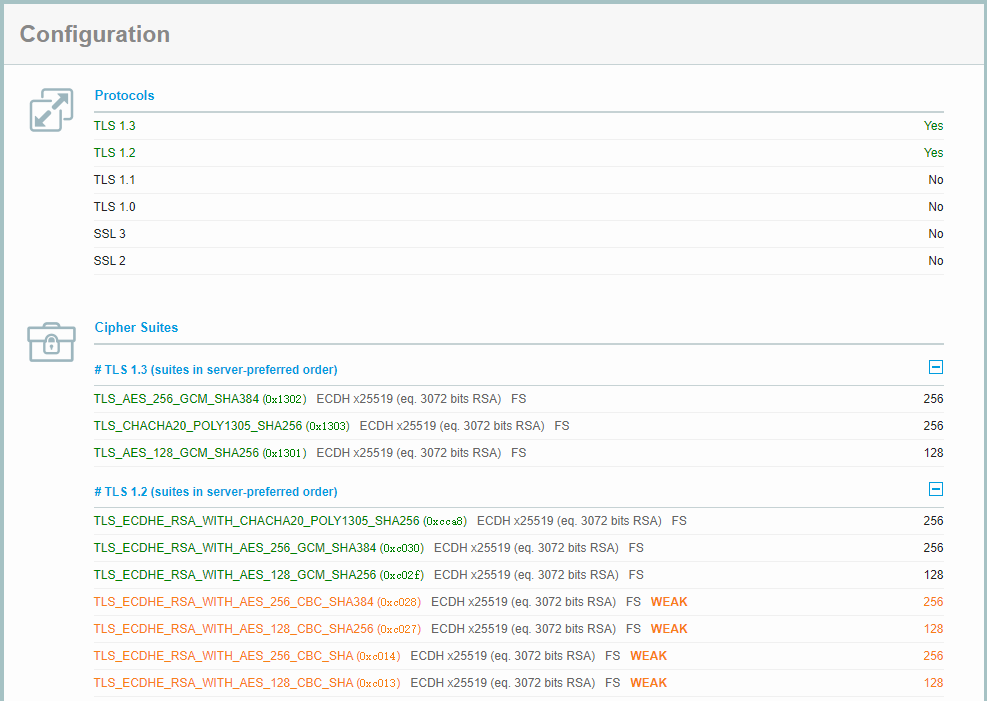
同样的我们可以使用ssllab来进行测试,测试结果也是大同小异:
3.3 主流网站测试
下表是截止2020年6月6日使用Chrome(83.0.4103.97(正式版本))对一些主要的网站首页进行的简单测试
| 简称 | 网站 | HTTP | TLS |
|---|---|---|---|
| 谷歌 | google.com/ | H2+quic/46 | TLS1.3 |
| 苹果 | apple.com.cn/ | H2 | TLS1.3 |
| GitHub | github.com/ | H2 | TLS1.3 |
| 维基百科 | en.wikipedia.org/ | H2 | TLS1.3 |
| k8s | kubernetes.io/ | H2 | TLS1.3 |
| nginx商业版 | nginx.com/ | H2 | TLS1.3 |
| 阿里CDN | *.alicdn.com | H2 | TLS1.3 |
| 163首页 | 163.com/ | H2+HTTP1.1 | TLS1.3 |
| ssllab | ssllabs.com/index.html | HTTP1.1 | TLS1.3 |
| 微软 | microsoft.com/zh-cn/ | H2 | TLS1.2 |
| docker | docker.com/ | H2 | TLS1.2 |
| 微信 | weixin.qq.com/ | H2 | TLS1.2 |
| 严选 | you.163.com/ | H2 | TLS1.2 |
| 淘宝 | taobao.com/ | H2 | TLS1.2 |
| 天猫 | tmall.com/ | H2 | TLS1.2 |
| 阿里巴巴 | alibaba.com/ | H2 | TLS1.2 |
| csdn | csdn.net/ | H2 | TLS1.2 |
| 腾讯云 | cloud.tencent.com/ | H2 | TLS1.2 |
| 亚马逊 | amazon.com/ | H2+HTTP1.1 | TLS1.2 |
| qq.com/ | H2+HTTP1.1 | TLS1.2 | |
| B站 | bilibili.com/ | H2+HTTP1.1 | TLS1.2 |
| 百度 | baidu.com/ | H2+HTTP1.1 | TLS1.2 |
| 今日头条 | toutiao.com/ | H2+HTTP1.1 | TLS1.2 |
| 小米 | mi.com/ | H2+HTTP1.1 | TLS1.2 |
| 拼多多 | pinduoduo.com/ | H2+HTTP1.1 | TLS1.2 |
| 美团 | meituan.com/ | HTTP1.1+H2(极少) | TLS1.2 |
| 网易企业邮 | qiye.163.com/ | HTTP1.1 | TLS1.2 |
| 126邮箱 | 126.com/ | HTTP1.1 | TLS1.2 |
| myssl | myssl.com/ | HTTP1.1 | TLS1.2 |
| openssl | openssl.org/ | HTTP1.1 | TLS1.2 |
| nginx开源版 | nginx.org/ | HTTP1.1 | TLS1.2 |
| 华为 | huawei.com/cn/ | HTTP1.1 | TLS1.2 |