Tomcat篇03-使用Jmeter对Tomcat9的三种IO模型进行持续压力测试
本文最后更新于:April 9, 2020 pm
本文主要包括Tomcat9的NIO、NIO2、APR三种I/O模型的工作原理以及使用Jmeter对其进行持续压力测试。
1、connector的工作原理
这里我们说的Tomcat中三种不同的I/O模型主要指的是其连接器(connector)的工作模型,对于tomcat而言,连接器一般指的是coyote,其工作原理大致如下图所示:
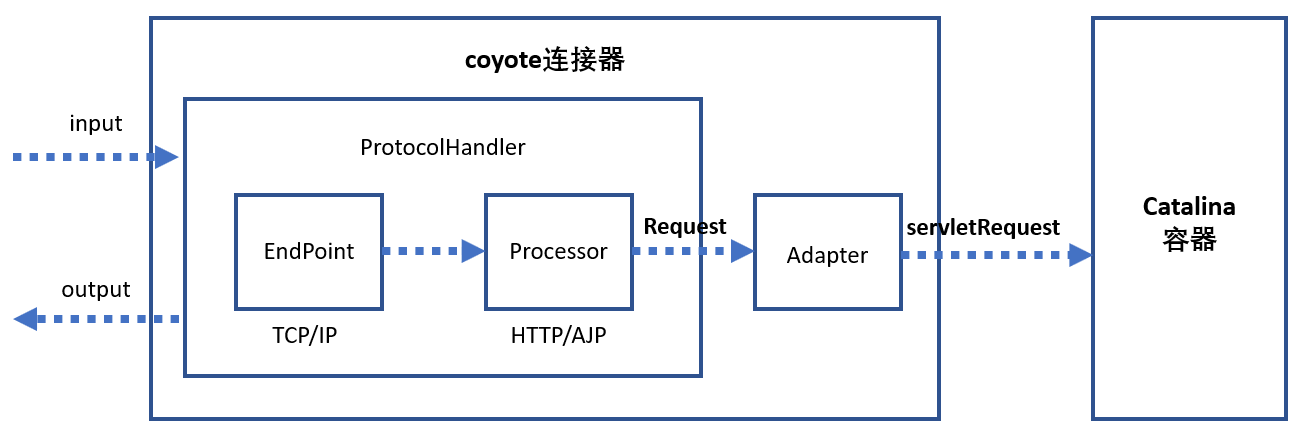
连接器中的各个组件的作用如下:
1.1 EndPoint
EndPoint即Coyote通信端点,是通信监听的接口,是具体Socket接收和发送处理器,是对传输层(四层)的抽象,因此EndPoint用来实现TCP/IP协议的。Tomcat 并没有EndPoint接口,而是提供了一个抽象类AbstractEndpoint, 里面定义了两个内部类:Acceptor和SocketProcessor。Acceptor用于监听Socket连接请求。 SocketProcessor用于处理接收到的Socket请求,它实现Runnable接口,在Run方法里 调用协议处理组件Processor进行处理。为了提高处理能力,SocketProcessor被提交到线程池来执行,而这个线程池叫作执行器(Executor)。
1.2 Processor
Processor是coyote的协议处理接口 。如果说EndPoint是用来实现TCP/IP协议的,那么 Processor用来实现HTTP协议,Processor接收来自EndPoint的Socket,读取字节流解析成Tomcat的Request和Response对象,并通过Adapter将其提交到容器处理, Processor是对应用层(七层)协议的抽象。
1.3 ProtocolHandler
ProtocolHandler是Coyote的协议接口,通过Endpoint和Processor ,实现对具体协议(HTTP或AJP)的处理。Tomcat 按照协议和I/O 提供了6个实现类 : AjpNioProtocol , AjpAprProtocol, AjpNio2Protocol , Http11NioProtocol ,Http11Nio2Protocol , Http11AprProtocol。我们在配置tomcat/conf/server.xml 中的connecter块时 , 至少要指定具体的ProtocolHandler , 当然也可以指定协议名称(如HTTP/1.1)。
1.4 Adapter
由于协议不同,客户端发过来的请求信息也不尽相同,Tomcat定义了自己的Request类来存放这些请求信息。ProtocolHandler接口负责解析请求并生成Tomcat的Request类。 但是这个Request对象不是标准的ServletRequest,不能用来作为参数来调用容器。因此需要引入CoyoteAdapter,连接器调用CoyoteAdapter的Sevice方法,传入Tomcat的Request对象,CoyoteAdapter将Request转成ServletRequest,再调用容器的Service方法。
2、三种I/O模型原理
在开始之前,我们先看一下tomcat官网给出的这三种I/O模型的工作参数的一个对比图:
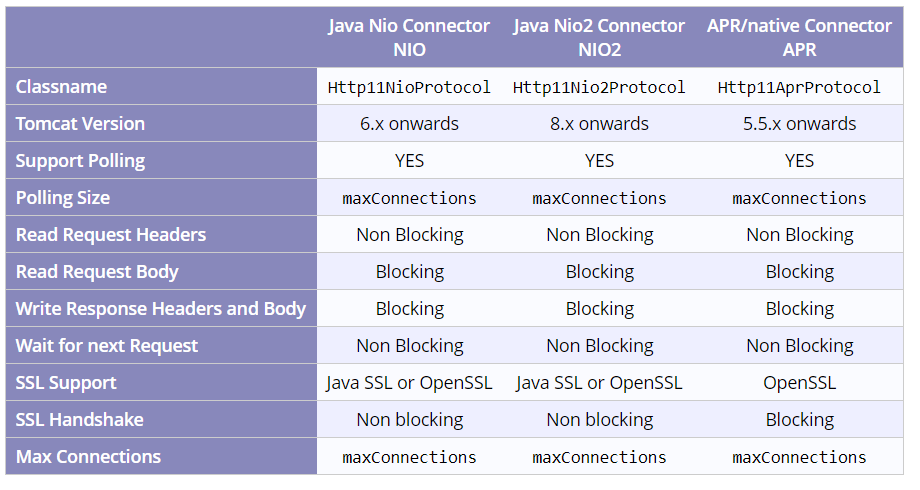
这里我们可以看到一般说的NIO、NIO2和APR使用的是非阻塞方式指的就是在读取请求报头和等待下一个请求的时候是使用的非阻塞方式。
Tomcat的NIO是基于I/O复用(同步I/O)来实现的,而NIO2是使用的异步I/O。参考经典书籍《UNIX网络编程 卷1 套接字联网API》,两者的主要原理如下:
I/O复用(NIO)
I/O复用(I/O multiplexing)可以调用select或poll,阻塞在这两个系统调用中的某一个之上,而不是阻塞在真正的I/O系统调用上。进程阻塞于select调用,等待数据报套接字变为可读。当select返回套接字可读这一条件时,进程调用recvfrom把所读数据报复制到应用进程缓冲区,尽管这里需要使用select和recvfrom两个系统调用,但是使用select的可以等待多个描述符就绪,即可以等待多个请求。

异步IO(NIO2)
异步I/O(asynchronous I/O)的工作机制是:告知内核启动某个操作,并让内核在整个操作(包括将数据从内核复制到应用程序的缓冲区)完成后通知应用程序。需要注意的是:异步I/O模型是由内核通知应用进程I/O操作何时完成。

最后我们可以把上面的过程结合剩下没有提到的三种UNIX系统中的IO模型进行对比得到下图:
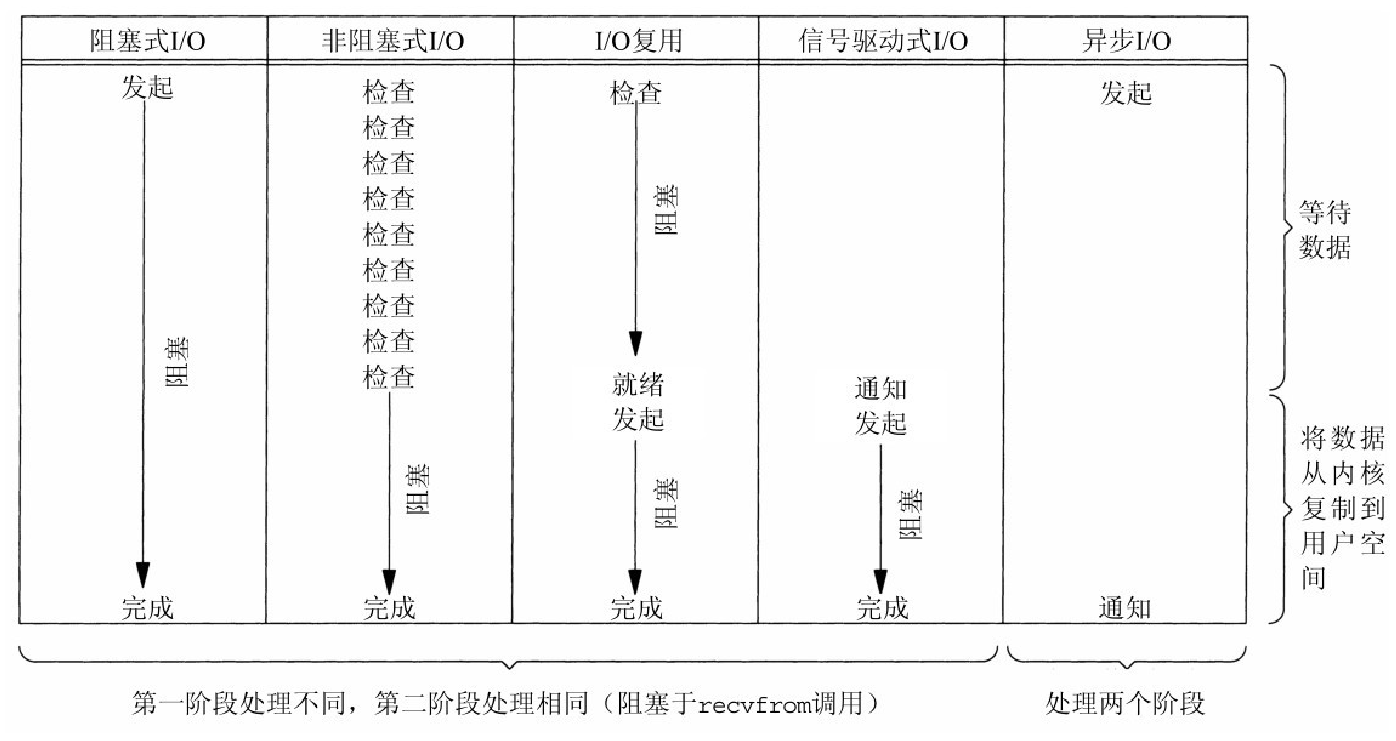
NIO、NIO2和APR的区别
| NIO | NIO2 | APR | |
|---|---|---|---|
| 实现 | JAVA NIO库 | JDK1.7 NIO2库 | C |
| IO模型 | 同步非阻塞 | 异步非阻塞 | 取决于系统 |
APR的重点在于使用C语言实现并且能够跨平台使用,它相当于将UNIX系统中的IO操作进行了一层封装使得编程开发更容易
3、connector的几个重要参数
connectionTimeout
The number of milliseconds this Connector will wait, after accepting a connection, for the request URI line to be presented. Use a value of -1 to indicate no (i.e. infinite) timeout. The default value is 60000 (i.e. 60 seconds) but note that the standard server.xml that ships with Tomcat sets this to 20000 (i.e. 20 seconds). Unless disableUploadTimeout is set to
false, this timeout will also be used when reading the request body (if any).
在connector和请求的客户端建立连接之后开始计时,当超过该值的时候就会超时,然后断开连接。使用值-1表示无超时,默认值为60000(即60秒),但Tomcat中的server.xml将此值设置为20000(即20秒)。
除非disableUploadTimeout设置为false,否则在读取请求正文(如果有)时也会使用此超时。
maxThreads
The maximum number of request processing threads to be created by this Connector, which therefore determines the maximum number of simultaneous requests that can be handled. If not specified, this attribute is set to 200. If an executor is associated with this connector, this attribute is ignored as the connector will execute tasks using the executor rather than an internal thread pool. Note that if an executor is configured any value set for this attribute will be recorded correctly but it will be reported (e.g. via JMX) as
-1to make clear that it is not used.
最大线程数,大并发请求时,tomcat能创建来处理请求的最大线程数,超过则放入请求队列中进行排队,默认值为200。
acceptCount
The maximum queue length for incoming connection requests when all possible request processing threads are in use. Any requests received when the queue is full will be refused. The default value is 100.
当最大线程数(maxThreads)被使用完时,可以放入请求队列排队个数,超过这个数返回connection refused(请求被拒绝),默认值为100;
maxConnections
The maximum number of connections that the server will accept and process at any given time. When this number has been reached, the server will accept, but not process, one further connection. This additional connection be blocked until the number of connections being processed falls below maxConnections at which point the server will start accepting and processing new connections again. Note that once the limit has been reached, the operating system may still accept connections based on the
acceptCountsetting. The default value is8192.For NIO/NIO2 only, setting the value to -1, will disable the maxConnections feature and connections will not be counted.
Tomcat在任意时刻接收和处理的最大连接数。当Tomcat接收的连接数达到maxConnections时,Acceptor线程不会读取accept队列中的连接;这时accept队列中的线程会一直阻塞着,直到Tomcat接收的连接数小于maxConnections。默认值为8192。
对于NIO / NIO2,将该值设置为-1将禁用maxConnections功能,并且不计算连接数。
图解
按照被处理的先后顺序我们可以把tomcat中的线程队列和以上四个参数使用该图进行表示
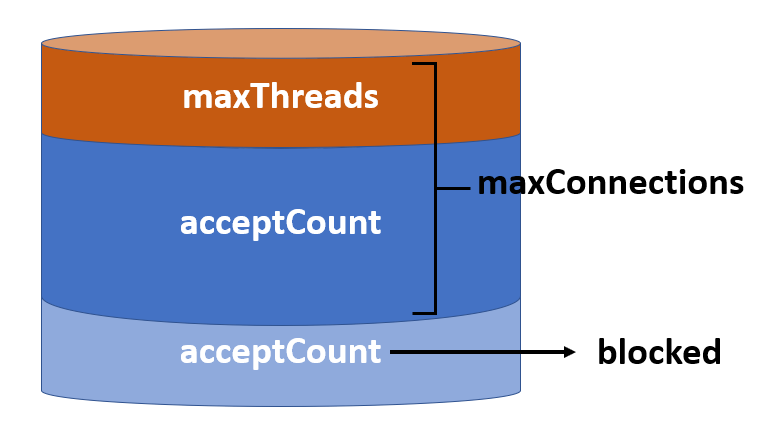
- 当
maxThreads + acceptCount < maxConnections的时候将不会有线程被阻塞 - 当阻塞的线程时间超过connectionTimeout还没得到返回值将返回连接超时
4、配置测试环境
4.1 配置connector
首先我们需要在tomcat中配置三个connector,分别对应三种I/O模型:
1 | |
4.2 配置jmeter
4.2.1 测试环境
jmeter是apache旗下的一款开源的使用JAVA编写的服务器压力测试软件,我们从官网下载源码包,分别部署在windows和Linux系统上,因为windows系统的硬件配置太差了,没办法进行高并发的压力测试,所以windows平台只进行jmeter的测试文件jmx的配置,配置完成后再使用Linux测试机来进行压力测试。(注意jmeter版本需要保持一致)
使用jmeter进行测试的机器系统和内核版本为:
1 | |
安装tomcat9的服务器系统和内核版本为:
1 | |
4.2.2 配置jmeter
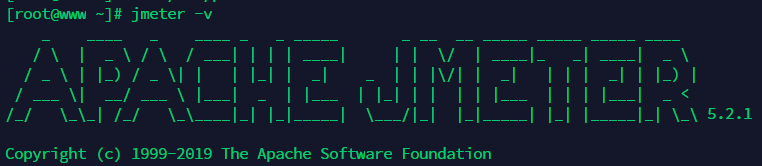
jmeter使用前需要配置JDK和系统环境变量(JDK配置这里不再赘述),我们在/etc/profile中导入相关变量并使用source命令保证生效。
1 | |
配置成功后应该可以看到如下输出
4.3 编辑JMX文件
JMX的文件配置不算复杂,最重要的是测试的时间和并发线程数量
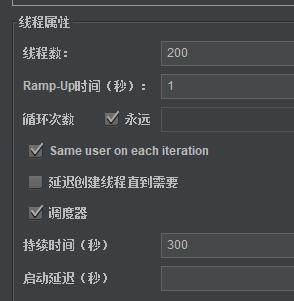
这里我们使用持续压力测试模式,设置循环次数为永远,然后设置持续时间为300秒即5分钟,设置线程数为200并且ramp-up时间为1s即每秒200并发数,如果ramp-up时间为10s即每秒200÷10=20并发数,以此类推。对应到jmx文件中的xml文件块为:
1 | |
4.4 测试类型
这里我们分别测试五分钟持续压测情况下200、400、600、800、1000的并发情况,测试的页面为tomcat的默认首页,tomcat自带的examples中的/examples/servlets/nonblocking/bytecounter.html和/examples/servlets/nonblocking/numberwriter。可以看到后面的两个example都是使用非阻塞的方式进行编写的sevlet。三者的主要操作如下:
- tomcat首页几乎相当于一个静态页面,属于简单的网页请求操作,应用程序发送请求到内核,内核从IO从读取相应文件并返回;
numberwriter是生成返回一串很长的数字,应用程序发送请求到内核并接收从内核生成返回的较大的数据;bytecounter需要上传一个文件然后再计算字数(这里使用了一个大小约30KB的markdown文件作为测试),需要进行IO传输和CPU计算再从内核返回一个简单的数值到应用程序;
4.5 tomcat9启动参数
此处我们使用的依旧是systemd调用jsvc启动tomcat,启动参数如下:
1 | |
5、测试结果
5.1 tomcat首页测试结果
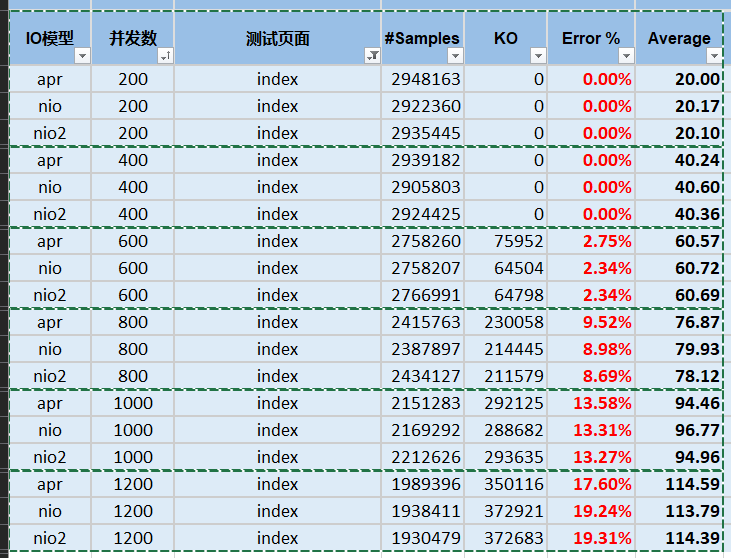
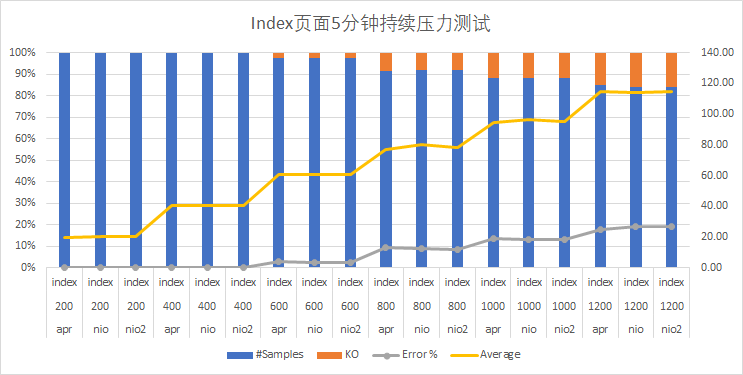
对于简单的请求,三种模式的所有表现数据都几乎一样,基本不存在测试误差范围外的差距。
5.2 numberwriter测试结果
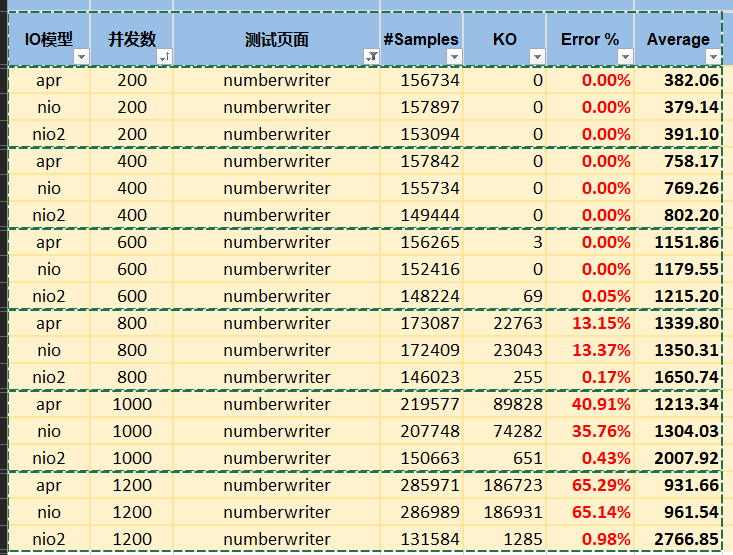
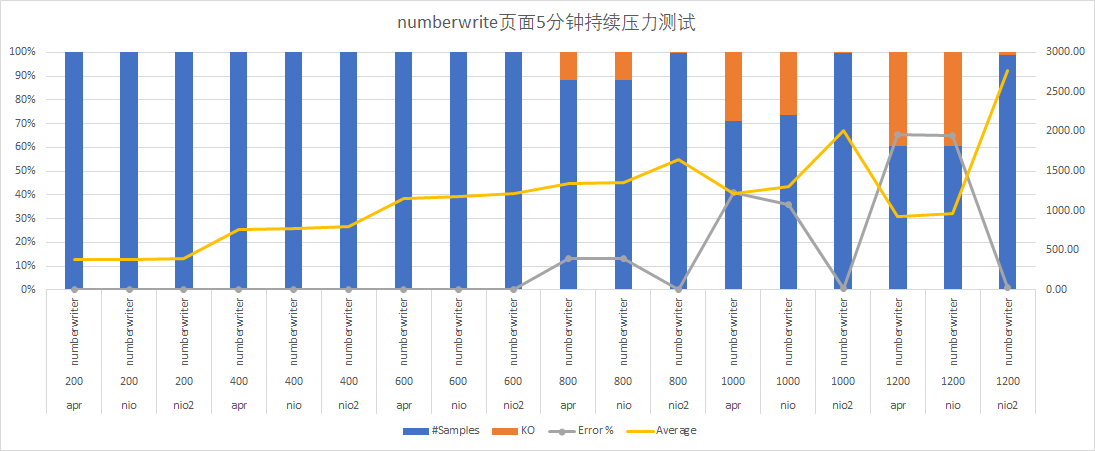
到了numberwrite这一种返回较长数据的请求,NIO2模型的错误率要比其他两者低得多,到了1200并发的时候apr模型和NIO模型的错误率都已经超过了六成,个人认为此时的响应时间不具有参考性。
5.3 wordcount测试结果
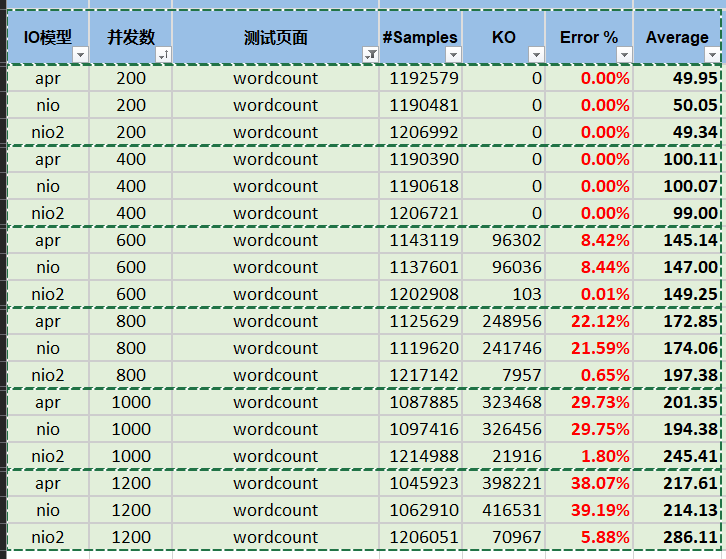
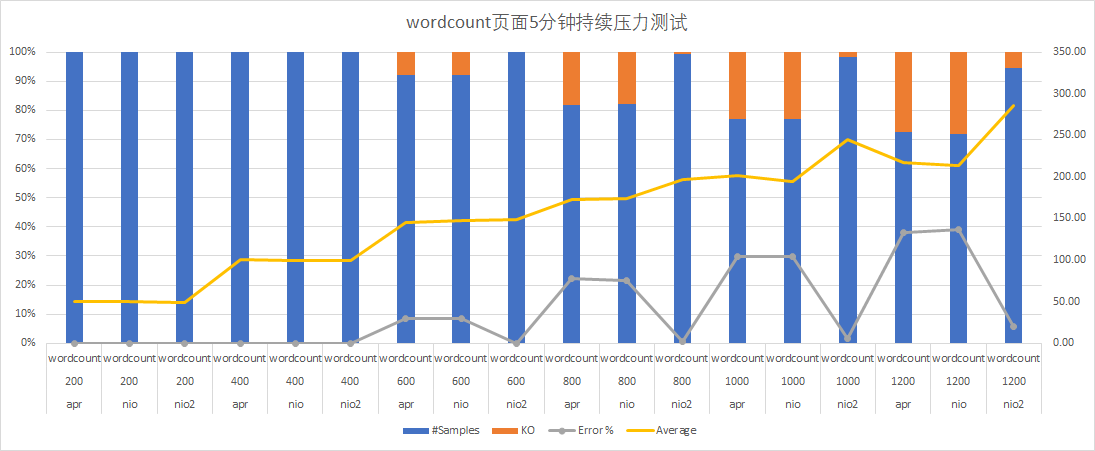
和之前的numberwrite一样,同样是牺牲了响应时间而降低了错误率。