搭建LNMP环境并配置wordpress网站

本文最后更新于:November 23, 2019 pm

CentOS7中搭建nginx+MySQL8+PHP7的LNMP环境,并且安装wordpress来作为网站服务器。

linux的安装非常的简单,一般的云主机厂商都可以直接部署安装,安装方法我们这里就不再赘述了。本文使用的是CentOS7.7版本。

这里是wordpress的官网对于安装环境的要求:

We recommend servers running version 7.3 or greater of PHP and MySQL version 5.6 OR MariaDB version 10.0 or greater.
We also recommend either Apache or Nginx as the most robust options for running WordPress, but neither is required.

1、安装nginx

nginx这里为了使用较新的版本,我们使用nginx官网提供的yum源来进行安装。

1
2
3
4
5
6
7
8
9
10
11
12
13
14
15
16
17
18
# 新建一个yum repo文件
cat >> /etc/yum.repo.d/nginx.repo << EOF
[nginx]
name=nginx repo
baseurl=http://nginx.org/packages/mainline/centos/7/x86_64/
gpgcheck=0
enabled=1
EOF

# 使用yum安装nginx
yum clean all
yum repolist
yum install nginx -y


# 启动nginx并设置开机启动
systemctl enable nginx.service
systemctl start nginx.service

2、安装PHP7.3

centos系统源中自带的php版本较旧,这里我们需要使用epel源和remi源来安装新版本的php。截止写这篇文章的时候php官网的稳定版本是7.3,7.4版本虽然已经发布但是好像还没有到稳定版。

1
2
3
4
5
6
7
8
# 使用yum来安装epel源
yum install epel-release
# 这里使用清华镜像源的remi源
rpm -ivh https://mirrors.tuna.tsinghua.edu.cn/remi/enterprise/remi-release-7.rpm
# 启用remi源中的php73
yum install yum-utils
yum-config-manager --enable remi-php73
yum install php73 php-fpm php-opcache php-cli php-gd php-curl php-mysql php-intl php-mbstring php-soap php-xml php-xmlrpc php-zip

安装完成之后我们查看一下php的版本,然后建立软链接把php指向php73。

1
2
3
4
5
6
7
8
9
10
11
12
13
14
15
16
17
# 查看php73的版本信息
$ php73 -v
PHP 7.3.12 (cli) (built: Nov 19 2019 10:24:51) ( NTS )
Copyright (c) 1997-2018 The PHP Group
Zend Engine v3.3.12, Copyright (c) 1998-2018 Zend Technologies

# 确定php73的执行文件位置
$ which php73
/usr/bin/php73

# 建立软链接将php指向php73
$ ln -s /usr/bin/php73 /usr/bin/php
# 查看php指令对应的版本信息
$ php -v
PHP 7.3.12 (cli) (built: Nov 19 2019 10:24:51) ( NTS )
Copyright (c) 1997-2018 The PHP Group
Zend Engine v3.3.12, Copyright (c) 1998-2018 Zend Technologies

3、安装MYSQL8

wordpress官网要求的数据库可以是MySQL或者是MariaDB,这里我们使用MySQL8。

详细的安装教程之前已经写过博客了,需要的同学可以查看这篇文章:

CentOS7安装MySQL

MySQL8重置root密码

接下来就是在mysql中创建一个数据库和用户用来给wordpress使用。

首先我们使用root用户登录mysql,然后执行下面的命令来创建一个名为wordpress的数据库和一个wordpress的用户:

1
2
3
CREATE DATABASE wordpress;
CREATE USER 'wordpress' IDENTIFIED BY '一个复杂的密码';
GRANT ALL PRIVILEGES ON wordpress.* TO wordpress;

这里的grant语句的授权方式和之前的mysql版本有些不太一样,还需要注意一下。

1
2
3
4
5
6
7
8
9
10
11
12
13
14
15
16
17
18
19
20
21
22
23
24
25
26
27
28
29
30
31
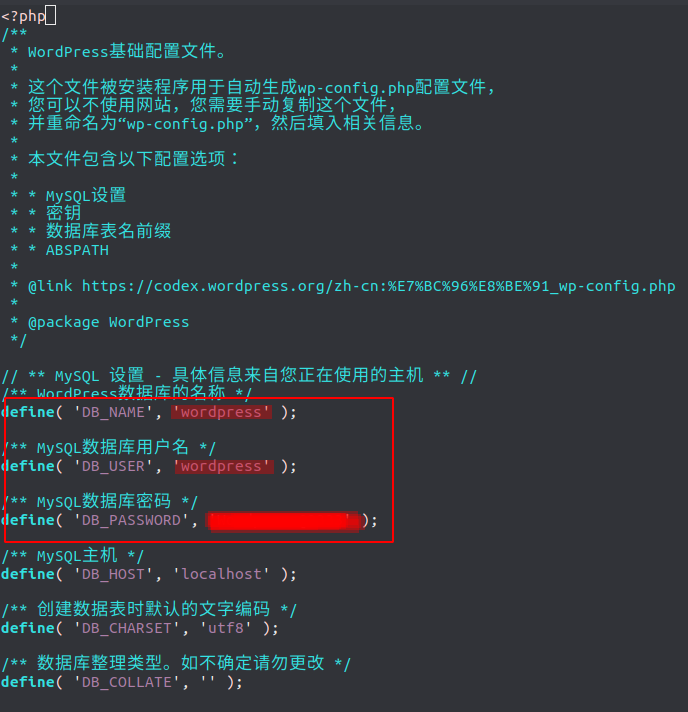
mysql> create database wordpress;
Query OK, 1 row affected (0.01 sec)
mysql> CREATE USER 'wordpress' IDENTIFIED BY '一个复杂的密码';
Query OK, 0 rows affected (0.01 sec)
mysql> GRANT ALL PRIVILEGES ON wordpress.* TO wordpress;
Query OK, 0 rows affected (0.00 sec)

$ mysql -u wordpress -p
Enter password:
Welcome to the MySQL monitor. Commands end with ; or \g.
Your MySQL connection id is 10
Server version: 8.0.18 MySQL Community Server - GPL

Copyright (c) 2000, 2019, Oracle and/or its affiliates. All rights reserved.

Oracle is a registered trademark of Oracle Corporation and/or its
affiliates. Other names may be trademarks of their respective
owners.

Type 'help;' or '\h' for help. Type '\c' to clear the current input statement.

mysql> show databases;
+--------------------+
| Database |
+--------------------+
| information_schema |
| wordpress |
+--------------------+
2 rows in set (0.00 sec)

mysql>

4、安装wordpress

接下来的wordpress的配置就比较简单了,我们先去官网下载最新版本的wordpress,解压之后配置一下配置文件。

1
2
3
# 使用wget指令下载并使用tar -zxvf参数进行解压
wget https://wordpress.org/latest.tar.gz
tar -zxvf wordpress-5.3-zh_CN.tar.gz

接下来我们需要对配置文件进行编辑,按照官网所述,我们最好将wp-config-sample.php复制成wp-config.php然后再进行编辑,不复制直接编辑wp-config-sample.php也是可以自动生成新的wp-config.php,但是出于备份一份源配置文件模板的考虑,最好还是复制一下。

1
2
cp wp-config-sample.php wp-config.php 
vim wp-config.php

这里我们填入前面创建的数据库用户名和密码以及对应的数据库。

接下来这一步就是根据主机生成独一无二的密钥。这里我们使用curl命令来访问这个链接生成密钥并保持到key.txt文件中,然后把key.txt的文件里面的内容复制替换掉里面的define部分。

1
curl -s https://api.wordpress.org/secret-key/1.1/salt/ > key.txt

然后我们将整个解压出来的wordpress文件夹移动到我们的web服务器的目录下面,这里我使用的目录是/etc/nginx/wordpress,这里在后面的nginx配置文件中会用到。接下来我们对nginx进行配置。

下面的是我的nginx配置文件,文件位于/etc/nginx/nginx.conf,注意里面的目录和域名要换成自己对应的目录和域名,以及这里还额外配置了https证书加密认证和http强制跳转https,具体的操作和解释已经在这篇博客(个人博客web服务器换用nginx)里面有解释,有需要的同学可以看看。

我们使用root用户登录mysql,然后更新wordpress用户的加密方式为mysql_native_password,然后刷新配置即可。

1
2
3
4
// 更改用户密码的加密形式
ALTER USER 'wordpress'@'%' IDENTIFIED WITH mysql_native_password BY '你的用户密码';
// 刷新MySQL的系统权限相关表
FLUSH PRIVILEGES;

再次登录就会发现已经可以连接数据库并正常设置了,简单配置过后就可以开始正常运行了。

设置过后就可以登录后台进行管理,登录的链接就是域名后面加上/wp-admin/

使用默认主题的首页。

这就是wordpress的LNMP版本安装配置过程,整体还是相对简单,没有太大的难度,相对于hexo而言,wordpress的安装显得复杂很多,整体也可能被人诟病十分臃肿,但是两者各有各的好,wordpress的插件和主题丰富程度确实要比hexo强很多,但是不管是用哪个,坚持写作才是最重要的!